
Intro
Let’s explore and deobfuscate the input stack on Linux. Our aim is to understand its components and what each does. Input handling can be divided into two parts, separated by a common layer:
- Kernel-level handling: It deals with what happens in the kernel and how events are exposed to user-space
- The actual hardware connected to the machine, along with the different buses and I/O/transport subsystems
- The input core subsystem, and the specific device drivers that register on it
- Exposed layer (middle)
- The event abstraction subsystem (evdev)
- devtmpfs for device nodes
- sysfs for kernel objects and device attributes
- procfs for an introspection interface of the input core
- User-space handling:
- The user-space device manager (udev) and hardware database (hwdb) for device management and setup
- The libinput library for general input, and other libraries such as XKB for keyboards, to interpret the events and make them manageable
- The Widgets, X Server, X11 window managers, and Wayland compositors, which rely on everything else
We’ll try to make sense of all this, one thing at a time, with a logical and coherent approach.
NB: This article compiles my understand, for any correction please contact me.
The Kernel’s Input Core
How are input devices and their events handled in the kernel? You might
think it is useless to know, but understanding some of the kernel logic
is what makes things click.
The input core is the central piece of the kernel responsible for handling
input devices and their events. Most input devices go through it, although
some bypass it entirely but these are special use-cases. It provides
common abstract components that sit between the low-level hardware,
and the more useful features for user-space, along with a sort of
publish-subscribe system.
To follow along you can either download the kernel source, or view it in any browser explorer (such as this, this, or this).
Practically, the input core is found in the kernel under
drivers/input/input.c, it defines the basic functionalities related
to the lifecycle of an input device, defined as a struct input_dev
(input.h). Namely:
- Allocating the input device structure (
input_allocate_devicethat returns astruct input_dev) - Registering and unregistering the input device in the system
along with setting sane default values
(
input_register_deviceadds toinput_dev_list). This also integrates with devtmpfs, exposing the device, and with procfs, exposing debugging information (/proc/bus/input/). - Drivers push events to the input core using
input_event. The core then forwards the events to the registered handlers in a fan-out fashion (input_register_handleradds aninput_handlertoinput_handler_list). Then handlers forward them to all clients in user-space (calledinput_handle) listening for events on that handler. The clients are registered on the handler withinput_register_handle(similar confusing names). The user-space client/handle can also grab the handler with exclusivity throughinput_grab_device(ex:EVIOCGRABin evdev).
By default the evdev (event device) is attached as the default input handler and exposes these events to user-space in a standardized way via an evdev created character stream in devtmpfs (/dev/input/eventX).
An input handler is an implementation of an abstract interface
(include/linux/input.h), which the input core will call. Particularly,
the input_event function in input core will invoke the implementation
of the input handler’s events function. Here’s the interface an input
handler should fulfil:
struct input_handler {
	void (*event)(struct input_handle *handle, unsigned int type,
			        unsigned int code, int value);
	unsigned int (*events)(struct input_handle *handle,
			       struct input_value *vals, unsigned int count);
	bool (*filter)(struct input_handle *handle, unsigned int type,
			       unsigned int code, int value);
	bool (*match)(struct input_handler *handler,
			       struct input_dev *dev);
	int (*connect)(struct input_handler *handler,
			      struct input_dev *dev,
			      const struct input_device_id *id);
	void (*disconnect)(struct input_handle *handle);
	void (*start)(struct input_handle *handle);
	/* …
	 */
};
In the same way, a handle list is simply a pointer to a device and a handler, along with a function to process events:
struct input_handle {
	void *private;

	int open;
	const char *name;

	struct input_dev *dev;
	struct input_handler *handler;

	unsigned int (*handle_events)(struct input_handle *handle,
				      struct input_value *vals,
				      unsigned int count);

	struct list_head	d_node;
	struct list_head	h_node;
};
And the input_dev abstraction returned by input_allocate_device
is a much biger structure:
struct input_dev {
	const char *name;
	const char *phys;
	const char *uniq;
	struct input_id id;
…
	unsigned int keycodemax;
	unsigned int keycodesize;
	void *keycode;
…
	int (*setkeycode)(struct input_dev *dev,
			  const struct input_keymap_entry *ke,
			  unsigned int *old_keycode);
	int (*getkeycode)(struct input_dev *dev,
			  struct input_keymap_entry *ke);
…
	int (*open)(struct input_dev *dev);
	void (*close)(struct input_dev *dev);
	int (*flush)(struct input_dev *dev, struct file *file);
	int (*event)(struct input_dev *dev, unsigned int type, unsigned int code, int value);
…
	struct device dev;
…
	struct list_head	h_list;
	struct list_head	node;
};
Each actual specific input device driver builds on top of the functions of the input core in their internal code, adding their own specificities and advertising what capabilities and features the device can generate. This creates a polymorphic-like abstraction where common input core logic is reused, and where input event handlers are abstracted away. In general, the main role of input drivers is to translate the device specific protocol to a more standardized protocol, such as evdev, so that it can be useful in user-space. And additionally, as with most drivers way of communicating with the rest of the system, they can possibly have extra configuration through an ioctl interface.
Along with all this, the kernel has a mechanism called sysfs that is
used to expose its internal objects (kobject) to user-space. Anytime
a device is created, it is exposed in /sys/ (usually mounted there)
with its properties (/sys/devices/). For the input core part, we can
find it in /sys/class/input/inputN, and within each sub-directories
we have the properties of the object.
Furthermore, when a device is plugged or unplugged (device_add,
device_remove in drivers/base/core.c), the kernel also emits events,
called uevent, via netlink (PF_NETLINK, NETLINK_KOBJECT_UEVENT) which
can then be caught in user-space and acted upon. We’ll see later how
these are handled by udev.
The kobject structure looks like this:
struct kobject {
        const char              *name;
        struct list_head        entry;
        struct kobject          *parent;
        struct kset             *kset;
        struct kobj_type        *ktype;
        struct sysfs_dirent     *sd;
        struct kref             kref;
        unsigned int state_initialized:1;
        unsigned int state_in_sysfs:1;
        unsigned int state_add_uevent_sent:1;
        unsigned int state_remove_uevent_sent:1;
        unsigned int uevent_suppress:1;
};
This is a general overview of our understanding of the input core so far:

The Logical Input Device Topological Path
We may commonly say that devices are connected to a machine and magically
handled from there on. Yet, we know that it’s an abstraction and that
there’s more to it. What happens in reality is that the electrical
connection first passes over a bus/host controller, which then let’s the
data be transported. This data is formatted in a specific input protocol
that should be handled by a driver that speaks it and that subsequently
creates a related input device. In most input device cases, the driver
then translates the protocol into evdev “common speech”.
That’s a whole layer of things before reaching the input core. Just like
in the world of networking, one thing wraps another. In this particular
case, devices have parents, a hierarchy, a stack of devices, drivers,
and helpers.
Here’s what that stack is like in theory, with in reality some lines blurred together:

In this section, let’s try to understand how the kernel uses plug’n’play/hotplug to pick the right drivers in this stack, and how we pass from electrical signal to evdev. To do that we’ll first look at how the kernel pictures its internal objects, and how these together somehow create the above hierarchy. Finally, we’ll see some concrete examples of that, along with some command line tools that can clearly display this encapsulating behavior.
As we said there’s a hierarchy of kobjects in the kernel from the bus
to its connected devices. These are stored in-memory as a linked list
hierarchy, which is also represented under sysfs as a file system tree.
Specifically, in drivers/base/core.c this is what is used to create
the parent-child relationship:
device_register(&child->dev);
child->dev.parent = &parent->dev;
For example, here’s the path that an input device data might take.
/devices/pci0000:00/0000:00:14.0/usb1/1-1/1-1:1.0/
             0003:046D:C31C.0003/input/input6/event3
/devices/...— root of the kernel’s sysfs device tree, showing all devices known to the kernel.pci0000:00/0000:00:14.0— PCI bus and controller (the USB host controller here).usb1/1-1/1-1:1.0— USB bus and port hierarchy (device 1-1, interface 1.0).0003:046D:C31C.0003— HID device node (bus0003= USB HID, vendor046D= Logitech, productC31C= specific keyboard).input/input6— input subsystem device registered under/sys/class/input/input6.event3— the evdev interface, the character device exposed in/dev/input/event3.
How did we end up with this long list, how did it get created? Let’s see
how the kernel stores this info, and what happens from its perpective.
As far as its concerned, the device-related things it knows is summed
up in these types of objects:
- bus - a device to which other devices can be attached
- device - a physical/logical device that is attached to a bus
- driver - a software entity that can be associated with a device and performs operations with it
- class - a type of device that has similar behavior; There is a class for disks, partitions, serial ports, input, etc.
- subsystem - a view on the structure of the system; Kernel subsystems include devices (hierarchical view of all devices in the system), buses (bus view of devices according to how they are attached to buses), classes, input, etc. We care about the input subsystem.
For example, there are different views of the same device. You’ll find
the physical USB device under /sys/bus/usb/devices/ and the logical
device of the input class under /sys/class/input/.
Let’s go over these objects, tracing the path, starting with buses.
A hardware bus/host controler is a communication channel between the
processor and input/output device. But a kernel bus object is more
generic than this, it’s a logical function which role is to be a point
of connection of devices. All devices are connected to a kernel bus,
even if it needs to be a virtual one. So kernel buses are the root of
the hierarchy.
The main buses are things such as PCI, USB, IDE, SCSI, platform,
ACPI, etc.
struct bus_type {
        const char              *name;
        const char              *dev_name;
        struct device           *dev_root;
        struct bus_attribute    *bus_attrs;
        struct device_attribute *dev_attrs;
        struct driver_attribute *drv_attrs;
        struct subsys_private *p;
        int   (*match)(struct device *dev, struct device_driver *drv);
        int   (*uevent)(struct device *dev, struct kobj_uevent_env *env);
        int   (*probe)(struct device *dev);
        int   (*remove)(struct device *dev);
        //...
};
Kernel buses are the connective tissue of everything, the base of the
infrastructure. As you can see from the structure it’s responsible for
probing the device to get info about it, handling connected/disconnected
events, creating a new node for it, and sending uevent to notify
user-space and triggering a chain reaction.
Yet, one of their most important role is to start the match between
devices and registered device drivers, as can be noted from the match
function. Keep in mind that the matched driver can be another bus, so
this initiates a cascade of different handlers, bubbling up the hierarchy.
A concrete example of this recursion:
- A PCI bus controller (the host bridge) is a device on the platform bus.
- The USB bus (usbcore) is a device on the PCI bus (via xHCI controller).
- The HID bus is a device on the USB bus (via usbhid).
- The specific HID protocol driver is a device on the HID bus
The low level kernel buses such as the hardware bus/host controlers
generally don’t handle input data directly, though there are some bus/host
controller drivers that do register input devices to the input core,
bypassing everything else in the stack and acting as event sources. These
exceptions are usually for brightness control hotkeys, lid sensors,
built-in special functions keys, etc.. We have for example the drivers
acpi_video, thinkpad_acpi, asus_wmi, etc..
To know how to handle the devices and whether a driver needs to be loaded
from a module, all devices and buses have specially formatted IDs, to
tell us what kind of devices they are. The ID, which we call MODALIAS,
consists of vendor and product ID with some other subsystem-specific
values. Each bus and device has its own scheme for these IDs.
For a USB mouse, it looks something like this:
MODALIAS=usb:v046DpC03Ed2000dc00dsc00dp00ic03isc01ip02
This is needed in case the driver isn’t built-in the kernel and instead
was an external module (*.ko). As a reminder, a driver is some piece
of code responsible for handling a type of device, and a module is a
piece of external kernel code that can be dynamically loaded at runtime
when needed. Depending on the distro choices, some drivers are set as
external modules that need to be loaded at runtime.
To achieve this, the kernel, after composing the MODALIAS string, sends
it within the uevent towards user-space. To complete this information,
each external kernel module comes with a list of known MODALIASes it can
handle, so that they can be loaded as needed. These lists are compiled
by programs such as depmod that creates files like modules.alias
in the kernel’s /lib/modules directory for all currently available
modules that aren’t built-in (/lib/modules/VERSION), and the built-in
ones (modules.builtin).
In theory that’s fine, this infrastructure model makes it easy to
dynamically load modules that are not already built-in, but we need
a piece of software in user-space to catch the events and perform the
actual loading. This is a role that udev embodies by calling modprobe
for every event that has a MODALIAS key, regardless of whether a module
needs loading or not. We’ll see more of udev but for now keep in mind
that its doing this hotplug mechanism.
If you’re curious, you can try this udev command to monitor the MODALIAS.
devadm monitor --property
Yet, this doesn’t solve what happens to devices that were present at
boot and which need modules. The solution: there’s a file in the device
directory in sysfs with all the uevent generated at boot for every
devices in sysfs file system, appropriately named “uevent”. If you write
“add” to that file the kernel resends the same events as the one lost
during boot. So a simple loop over all uevent files in /sys triggers
all events again.
The MODALIAS value is also stored in sysfs along with the device properties, here are a few commands to gather information on this:
> cat /sys/devices/pci0000:00/0000:00:10.0/modalias
pci:v00001022d00007812sv00001025sd00000756bc0Csc03i30

> modprobe --resolve-alias $(cat /sys/devices/\
 pci0000:00/0000:00:13.2/usb1/1-0:1.0/usb1-port3/modalias)
Not everything has an associated module

> ls -l /sys/devices/pci0000:00/0000:00:10.0/driver
lrwxrwxrwx 1 root root 0 Oct 25 11:37 driver \
               -> ../../../bus/pci/drivers/xhci_hcd

If the driver link exists, check which module implements it:
> modprobe -R xhci_hcd
xhci_hcd

> modinfo xhci_hcd
name:           xhci_hcd
filename:       (builtin)
license:        GPL
file:           drivers/usb/host/xhci-hcd
author:         Sarah Sharp
description:    'eXtensible' Host Controller (xHC) Driver
license:        GPL
file:           drivers/usb/host/xhci-hcd
description:    xHCI sideband driver for secondary interrupter management
parm:           link_quirk:Don't clear the chain bit on a link TRB (int)
parm:           quirks:Bit flags for quirks to be enabled as default (ullong)

For example that xhci_hcd module is builtin
So far we’ve learned two things: buses which devices are connected to, and the MODALIAS mechanism to match modules and dynamically load drivers that aren’t built-in. Let’s see the devices attached to buses as they appear as kernel objects.
struct device {
        // …
        struct device           *parent;
        struct device_private   *p;
        struct kobject          kobj;
        const char              *init_name; /* initial name of the device */
        // …
        struct bus_type         *bus;       /* type of bus device is on */
        struct device_driver    *driver;    /* which driver has allocated this
                                             device */
        // …
        const struct class  *class;
        // …
        void    (*release)(struct device *dev);
};
Along with the related driver:
struct device_driver {
         const char              *name;
         struct bus_type         *bus;
         struct driver_private   *p;
         struct module           *owner;
         const char              *mod_name;     /* used for built-in modules */
         int     (*probe)        (struct device *dev);
         int     (*remove)       (struct device *dev);
         void    (*shutdown)     (struct device *dev);
         int     (*suspend)      (struct device *dev, pm_message_t state);
         int     (*resume)       (struct device *dev);
};
As you can notice, they also have a probing and lifecycle functions to
be implemented. We also have the registration/unregistration functions
(input_register_device and input_unregister_device in our case)
which will announce that the device is now available in the system (plus
a uevent and other user-space stuff). Each of the registered devices
have an entry in sysfs /sys/devices, along with the information about
its driver, and similar info in /sys/class and /sys/bus. The
device also creates files in devtmpfs that represent its interfaces. Let’s
note that devtmpfs is usually mounted by default to user-space as a virtual
filesystem on most distros.
To check whether devtmpfs is enabled, which is almost always the case today:
> zcat /proc/config.gz | grep DEVTMPFS
CONFIG_DEVTMPFS=y
CONFIG_DEVTMPFS_MOUNT=y
CONFIG_DEVTMPFS_SAFE=y

> mount | grep devtmpfs
dev on /dev type devtmpfs (rw,nosuid,relatime,size=2720672k,\
   nr_inodes=680168,mode=755,inode64)

> mount | grep sysfs
 sys on /sys type sysfs (rw,nosuid,nodev,noexec,relatime)
Devices are associated to classes and subsystems that handle them. The subsystem we care about here is what we’ve seen in the earlier section: the input core, the input device subsystem.
subsys_initcall(input_init);As for the concept of a class, it’s a high-level view of the device
model, abstracting implementation details. For example there are drivers
for SCSI and ATA but both are in the disks class. Similarly, all input
devices are in the input class, which is what we care about. This is
a grouping mechanism, unrelated to how the devices are connected. They
can be found in sysfs /sys/class/.
The struct class is instantiated in the struct device through
class_register and class_unregister. This will in turn also help
udev, as we’ll see later, better manage the devices in devtmpfs user-space
mapping /dev/, adding a filter for rules.
struct class {
         const char              *name;
         struct module           *owner;
         struct kobject          *dev_kobj;
         struct subsys_private   *p;
         struct class_attribute          *class_attrs;
         struct class_device_attribute   *class_dev_attrs;
         struct device_attribute         *dev_attrs;
         int     (*dev_uevent)(struct device *dev, struct kobj_uevent_env *env);
         void    (*class_release)(struct class *class);
         void    (*dev_release)(struct device *dev);
         //...
};
In the input core:
const struct class input_class = {
    .name       = "input",
    .devnode    = input_devnode,
};
This completes our overview of the way the kernel perceives the different
types of objects it manages. However, that didn’t clarify how we ended
up with the example path above other than somehow having a kernel bus and
device hierarchy.
We talked about hardware buses and host controllers drivers that aren’t
handling data and that they delegate this to an upper layer. In theory
this upper layer is split between a kernel bus&device for the transport
layer, aka IO layer, and a kernel bus&device for the protocol layer,
but in reality those might get mixed up (bus&device because it’s both).
The IO layer is responsible for handling the physical electrical
communication with the device, it’s setup, and management. At this level
we have USB, Bluetooth, I2C, SPI, etc.. In drivers that means: usbhid
for HID devices over USB, btusb and hidp for HID over Bluetooth,
i2c-hid for touchpads and keyboards that are wired to the motherboard’s
I2C, psmouse and serio for PS2 mouse, etc..
The protocol or function specific layer then takes over and has as role
to integrate with the input core and translate the raw transport data
into a common format, usually evdev. The evdev format is favored
as it provides a uniform API to represent input devices (via
/dev/input/eventX).
A few examples:
- There’s a mouse communication protocol usin 9 pins DE-9 over the RS-232 standard for communication with UART
- The PS/2 mouse which uses a serial transport protocol with 6 pins (
serio) - The atkbd keyboard also over serial transport
- A gamepad that uses HID but the particular case of a sony joystick over USB
- A touchscreen specific driver using I²C or SPI
Or as a hierarchical example:
[PCI bus]
   └── probes -> xhci_hcd (a PCI driver)
         └── registers usb_hcd with -> [USB core]
                 └── enumerates and manages -> [USB bus]
                        └── matches -> usbhid (a USB driver)
                               └── registers -> [HID bus]
                                      └── matches -> hid-generic, hid-apple, ...
                                            └── registers -> [Input bus]
                                                  └── matches -> evdev, ...
There’s another component of complexity to add: we don’t have a
single protocol for a single transport over a single hardware bus/host
controller. Sometimes there’s a generic protocol layer which is reused
with different transport mechanisms. There can also be a delegation
mechanism for the more specific sub-protocol handlers for specific
devices or modes.
For example, you can have an HID protocol over USB (usbhid), and the
particular part of the HID protocol used for input devices, and the more
specific sub-HID protocol of a type of device (hid-generic and others).
We’ll see an example of this by diving into the HID subsystem which is the most popular input protocol these days, but first let’s check some tools that can help us see all that we’ve learned thus far and make sense of the hierarchy:
lspci -vnlist info about devices connected via PCI buseslsusb -vorusb-deviceslist usb devices information in a more human readable formdmesgthe sys logshwinfo --shortto probe hardware
Yet the best way to get a lot of info about the bus and device hierarchy
is to rely on udevadm, a user-space tool that comes with udev. Here’s
how it looks for an input device:
> udevadm info -a -p $(udevadm info -q path -n /dev/input/event9)


looking at device '/devices/.../input/input6/event9':
  KERNEL=="event9"
  SUBSYSTEM=="input"
  ATTR{name}=="Logitech USB Keyboard"
  ...
looking at parent device '/devices/.../input/input6':
  KERNEL=="input6"
  SUBSYSTEM=="input"
  ...
looking at parent device '/devices/.../0003:046D:C31C.0003':
  KERNELS=="0003:046D:C31C.0003"
  DRIVERS=="hid-generic"
  SUBSYSTEMS=="hid"
  ...
looking at parent device '/devices/.../1-1:1.0':
  KERNELS=="1-1:1.0"
  SUBSYSTEMS=="usb"
  DRIVERS=="usbhid"
  ...
looking at parent device '/devices/.../1-1':
  KERNELS=="1-1"
  SUBSYSTEMS=="usb"
  DRIVERS=="usb"
  ...
looking at parent device '/devices/.../0000:00:14.0':
  KERNELS=="0000:00:14.0"
  SUBSYSTEMS=="pci"
  DRIVERS=="ohci-pci"
...NB: It is also a bit more clearer, though for the moment confusing,
to also look at udevadm info --tree. Similarly, the loginctl
seat-status also clearly shows the hierarchy of devices in the current
session. We’ll talk more about the concept of seats later on.
We see the “looking at parent device” block that corresponds to one
struct device in the kernel kobject mapped in sysfs, along with the
driver, when it’s present, and other info it gathers at every step,
walking down the bus hierarchy. Let’s note that not everything has
an associated driver since the hardware topology might not match the
driver topology. That often means one kernel component handles multiple
parts of the stack. In the above trace, hid-generic handles the input
registering.
This example in particular shows:
PCI → USB controller → USB device → HID interface → input device → evdev node
Another source of information that we briefly mentioned is the procfs
introspection interface (/proc/bus/input/), it can also help see the
handling of input devices more clearly as it’s a text-based view of what
the kernel input subsystem knows. It is more or less analogous to the
sysfs view but is meant for human-readable diagnostics. In conjunction
with what we’ve learned in the previous input core section, it should
clarify some of our understanding. It has two files underneath: devices
and handlers.
The devices file contain all the current input devices and has entries
with these fields:
I: basic info (bus type, vendor/product/version)N: nameP: physical path (e.g.,isa0060/serio0/input0)S: sysfs pathU: unique identifier (if provided)H: list of event handler interfaces bound (likeevent3,js0, etc.)B: capability bitmaps (EV,KEY,REL,ABS, etc.) we’ll explore what this means when looking at evdev
For instance:
I: Bus=0003 Vendor=1a2c Product=6004 Version=0110
N: Name="SEMICO USB Keyboard Consumer Control"
P: Phys=usb-0000:00:12.0-1/input1
S: Sysfs=/devices/pci0000:00/0000:00:12.0/usb2/2-1/\
   2-1:1.1/0003:1A2C:6004.001E/input/input53
U: Uniq=
H: Handlers=kbd event7
B: PROP=0
B: EV=1f
B: KEY=33eff 0 0 483ffff17aff32d bfd4444600000000 1 \
   130c730b17c000 267bfad9415fed 9e168000004400 10000002
B: REL=1040
B: ABS=100000000
B: MSC=10

I: Bus=0003 Vendor=1a2c Product=6004 Version=0110
N: Name="SEMICO USB Keyboard System Control"
P: Phys=usb-0000:00:12.0-1/input1
S: Sysfs=/devices/pci0000:00/0000:00:12.0/usb2/2-1/\
   2-1:1.1/0003:1A2C:6004.001E/input/input54
U: Uniq=
H: Handlers=kbd event9
B: PROP=0
B: EV=13
B: KEY=c000 10000000000000 0
B: MSC=10
Here you can see that a single physical device can possibly present
itself as multiple input devices with different handlers attached for
separate functions (here the keys of the System Control handler are
fewer). Here, kbd is console handler, and eventN is the evdev
user-space handler. Libinput, which we’ll cover later, uses groups
LIBINPUT_DEVICE_GROUP to logically combine the different devices that
are actually on the same hardware.
The handlers file is about instances of the input_handler that will
be called from input core’s input_event we mentioned before. As we
said most of it is handled by evdev, but there are exceptions such as:
N: Number=0 Name=kbd
N: Number=1 Name=leds
N: Number=2 Name=evdev Minor=64
N: Number=3 Name=sysrq (filter)
N: Number=4 Name=rfkill
N: Number=5 Name=mousedev Minor=32
N: Number=6 Name=joydev Minor=0
We’ll talk about joydev later on. As for mousedev, it is there only for
legacy compatibility of old /dev/psaux-style mouse interface.
Let’s now see the example of a dummy input driver, to get the idea across.
// SPDX-License-Identifier: GPL-2.0
#include <linux/module.h>
#include <linux/init.h>
#include <linux/input.h>
#include <linux/timer.h>

static struct input_dev *dummy_input_dev;
static struct timer_list dummy_timer;

static void dummy_timer_func(struct timer_list *t)
{
    static bool key_down = false;

    /* Simulate key press/release of KEY_A */
    key_down = !key_down;
    input_event(dummy_input_dev, EV_KEY, KEY_A, key_down);
    input_event(dummy_input_dev, EV_SYN, SYN_REPORT, 0);

    /* Reschedule timer */
    mod_timer(&dummy_timer, jiffies + msecs_to_jiffies(2000));
}

static int __init dummy_input_init(void)
{
    int err;

    dummy_input_dev = input_allocate_device();
    if (!dummy_input_dev)
        return -ENOMEM;

    dummy_input_dev->name = "Dummy Input Device";
    dummy_input_dev->phys = "dummy/input0";
    dummy_input_dev->id.bustype = BUS_VIRTUAL;
    dummy_input_dev->id.vendor  = 0x0001;
    dummy_input_dev->id.product = 0x0001;
    dummy_input_dev->id.version = 0x0100;

    /* Declare we can emit key events */
    __set_bit(EV_KEY, dummy_input_dev->evbit);
    __set_bit(KEY_A, dummy_input_dev->keybit);

    err = input_register_device(dummy_input_dev);
    if (err) {
        input_free_device(dummy_input_dev);
        return err;
    }

    /* Setup a timer to inject key events periodically */
    timer_setup(&dummy_timer, dummy_timer_func, 0);
    mod_timer(&dummy_timer, jiffies + msecs_to_jiffies(2000));

    pr_info("dummy_input: registered fake input device\n");
    return 0;
}

static void __exit dummy_input_exit(void)
{
    del_timer_sync(&dummy_timer);
    input_unregister_device(dummy_input_dev);
    pr_info("dummy_input: unregistered\n");
}

module_init(dummy_input_init);
module_exit(dummy_input_exit);

MODULE_AUTHOR("Example Author");
MODULE_DESCRIPTION("Minimal Dummy Input Device");
MODULE_LICENSE("GPL");
That’s it, you should now somewhat have an idea of how we pass from hardware events, to kernel objects, and end up within the input core subsystem, which should prepare events for user-space. Let’s now dig on and explore a few of the topics we’ve grazed in the past two sections.
sysfs
We already covered a lot of ground in understanding sysfs, so let’s continue and summarize everything we know and complete the full picture.
As we briefly said before, sysfs is a virtual file system representation in
user-space of the kernel objects and their attributes, it’s how the kernel
views the current state of the system, and also how the user can interface
with the parameters of the kernel in a centralized manner. It’s all done
in a very Unixy way by manipulating simple files.
The file mapping happens as such: kernel objects are directories, their
attributes are regular files, and the relationship between objects is
represented as sub-directories and symbolic links.
The object information is categorized as one of the following. Each of
these is a sub-directory under /sys/.
- block - all block devices available in the system (disks, partitions)
- bus - types of bus to which physical devices are connected (pci, ide, usb)
- class - drivers classes that are available in the system (net, sound, usb)
- devices - the hierarchical structure of devices connected to the system
- dev - Major and minor device identifier. It can be used to automatically
create entries in the
/devdirectory. It’s another categorization of the devices directory - firmware - information from system firmware (ACPI)
- fs - information about mounted file systems
- kernel - kernel status information (logged-in users, hotplug)
- module - the list of modules currently loaded
- power - information related to the power management subsystem information is found in standard files that contain an attribute
- device (optionally) - a symbolic link to the directory containing devices; It can be used to discover the hardware devices that provide a particular service (for example, the ethi PCI card)
- driver (optionally) - a symbolic link to the driver directory (located in
/sys/bus/*/drivers)
As far as we’re concerned, when it comes to input devices, the
/sys/devices/ directory is probably one of the most important. It’s
the representation of the hierarchy of devices we’ve talked about in
the previous section.
Pasting the tree here would be cumbersome, but try tree -L 5 | less
within /sys/devices and you’ll clearly see how things fit together,
a direct hierarchical mapping of how devices are connected to each others.
Within this directory we can find interesting information associated to
the device and its type. For usb devices, for example, we have info such
as the bus number, port number, the vendor and product id, manufacturer,
speed, and others.
Furthermore, the /sys/bus directory organizes devices by the type of
bus they are connected to. You can imagine that this isn’t a linear
view since buses can have buses as devices (usb and hid each have
their directory even though hid is probably under usb), but it it
helpful to perceive what is happening, an easy shortcut. Within each
bus directory there are two subdirectories: drivers, that contains the
driver registered for the bus, and devices, that contains symbolic links
to the devices connected to that bus in /sys/devices.
Let’s note something we didn’t say before, but raw USB devices are also
mapped in devtmpfs under /dev/bus/usb/<BUS>/<DEV>. Which can be used
as a raw interface.
Similarly, the /sys/class directory has another view of the system
from a more functional/type perspective. It’s about what devices do and
not how they’re connected. As far as we’re concerned, the subdirectory
/sys/class/input/ is where we’ll find symbolic links to all devices
that have the input class in /sys/devices.
This directory contains both symlinks to input devices and evdev devices,
the latter are usually sub-directories of the former. A notable file in
the input directory is the “capabilities” file, which lists everything
that the device is capable, as far as input is concerned. We’ll revisit
this in the evdev section.
Finally, the last directory that is of interest to us in sysfs is
/sys/module/ which provides information and settings for all loaded
kernel modules (the ones that show with lsmod), their dependencies
and parameters.
├── hid_generic
│   ├── drivers
│   │   └── hid:hid-generic -> ../../../bus/hid/drivers/hid-generic
│   └── uevent

> modinfo hid_generic
name:           hid_generic
filename:       (builtin)
license:        GPL
file:           drivers/hid/hid-generic
description:    HID generic driver
author:         Henrik Rydberg
Lastly, and it might not need to be mentioned, but sysfs needs to be enabled in the kernel confs. It always is these days since it’s expected by many software.
CONFIG_SYSFS=y
HID — Human Interface Device
HID, or Human Interface Device, has been mentioned and sprinkled all over the place in the last sections, we said it’s a device protocol but what is it exactly?
HID is probably the most important input/output standard device protocol
these days, it’s literally everywhere and most new devices, from mice
to microphones, speak it over all types of transports such as USB, i2c,
Bluetooth, BLE, etc… It’s popular because it’s a universal way to let the
device first describe its capabilities (buttons, keys, axis, etc..),
what it can send/receive (Report Descriptor), and then send/receive them in
the expected way (Input/Output/Feature Reports).
In sum, in the ideal case it would mean avoiding having a specific driver
for every new device out there and instead have a centralized generic way
to handle all categories of devices, all working out-of-the-box. Indeed, in
practice it has worked great and there have only been minor vendor or
hardware quirks fixes (drivers/hid/hid-quirks.c and others).
For example, a HID Report Descriptor may specify that “in a report
with ID 3 the bits from 8 to 15 is the delta x coordinate of a mouse”.
The HID report itself then merely carries the actual data values without
any extra meta information.
The current list of HID devices can be found under the HID
bus in syfs, /sys/bus/hid/devices/. For each device, say
/sys/bus/hid/devices/0003:1B3F:2008.003E/, one can read the
corresponding report descriptor:
> hexdump -C /sys/bus/hid/devices/0003:1B3F:2008.003E/report_descriptor
00000000  05 0c 09 01 a1 01 15 00  25 01 09 e9 09 ea 75 01  |........%.....u.|
00000010  95 02 81 02 09 e2 09 cd  09 b5 09 b6 09 8c 95 05  |................|
00000020  81 06 09 00 95 01 81 02  c0                       |.........|
00000029
The raw HID reports can also be read from the hidraw file created by
hid core in devtmpfs /dev/hidrawN.
What does an input device HID Report and Report Descriptor look like? We won’t go into too much details since the HID specifications are huge but we’ll only do a tour to get an idea and be productive with what we know. If you want to dive deeper, check the specifications here, it’s divided into a basic structure doc “HID USB Device Class Definition”, and the HUT, “HID Usage Tables”, which defines constants to be used by applications.
So as we said, the main logic of the protocol is that HID messages are called Reports and that to parse them we need a Report Descriptor. The Report Descriptor is a kind of hashmap stream, it contains Items, which are 1B header followed by an optional payload of up-to 4B. The Items don’t make sense by themselves, but do make sense together as a whole when read as a full stream since each Item has a different meaning. Some meaning apply locally and others globally.
The encapsulating and/or categorizing Items are the Usage Page, which is a generic category of thing we’re describing, with its subset of Usage, which is the specific thing we control within that Page. These are defined in the “HID Usage Tables” doc. It’s things such as:
Usage Page: Generic Desktop (0x01) Usage: Mouse (0x02)
Usage Page: Button (0x09)          Usage: Optional
Usage Page: Consumer Page (0x0C)   Usage: Numeric Key Pad (0x02)
It’s a couple of info to know how to better handle the HID internal data, it tells you what is actually being handled.
Another grouping mechanism is the Collection, a broader category to put together all that the device handles. Let’s say a mouse can have both buttons, a scroll wheel, and axis it moves on, all within a Collection. There are 3 types of collections that encapsulate each others: Application (mandatory) the device-level group, Logical (optional) sub-grouping for related controls, and Physical (optional) sub-grouping for physical sensors.
Reports within Collections can also be grouped by IDs to facilitate parsing.
Within all these, within the inner Collections, we finally have the definition of what the Reports will actually look like. Here’s a subset of what a Report Descriptor can look like:
Report ID (01)
Usage Page (Button)
Usage Minimum (1)
Usage Maximum (5)
Report Count (5)
Report Size (1)
Input (Data,Var,Abs)

Report Size (3)
Report Count (1)
Input (Cnst,Arr,Abs)

Usage Page (Generic Desktop)
Usage (X)
Usage (Y)
Report Count (2)
Report Size (16)
Logical Minimum (-32767)
Logical Maximum (32767)
Input (Data,Var,Rel)
This is all a single report with ID 0x01, and we see first that within
the Button page we have values ranging from 1 to 5, a count of fields
in the current report size of 5, for 5 buttons each having one bit. The
Input Item tells us to start processing the Report as input data (there’s
also Output and Feature). It also indicates that buttons have absolute
values, unlike the X/Y axis which are relative.
The Cnst of the following data in the stream stands for constant,
and it’s basically ignored, it’s padding.
And so on, we parse the data afterward, the X/Y relative movements.
One thing to note, is the scope of the meaning of the Items. Some apply globally, such as the Usage Page, Logical Min/Max, Report Size, Report Count, etc.. Meanwhile, Usage only apply locally and needs to be set again. Other Items have special meaning such as Input, Output, Feature, Collection and End Collection, and are about defining the structure of data and when to process it.
Here’s a full real example with the Collection grouping mechanism:
Usage Page (Generic Desktop)
Usage (Mouse)
Collection (Application)
 Usage Page (Generic Desktop)
 Usage (Mouse)
 Collection (Logical)
  Report ID (26)
  Usage (Pointer)
  Collection (Physical)

   Usage Page (Button)
   Usage Minimum (1)
   Usage Maximum (5)
   Report Count (5)
   Report Size (1)
   Logical Minimum (0)
   Logical Maximum (1)
   Input (Data,Var,Abs)

   Report Size (3)
   Report Count (1)
   Input (Cnst,Arr,Abs)

   Usage Page (Generic Desktop)
   Usage (X)
   Usage (Y)
   Report Count (2)
   Report Size (16)
   Logical Minimum (-32767)
   Logical Maximum (32767)
   Input (Data,Var,Rel)

   Usage (Wheel)
   Physical Minimum (0)
   Physical Maximum (0)
   Report Count (1)
   Report Size (16)
   Logical Minimum (-32767)
   Logical Maximum (32767)
   Input (Data,Var,Rel)
  End Collection
 End Collection
End Collection
As you can see, lots of it may seem redundant within the Logical and
Physical optional sub-collections but they’re often there by default
for hierarchical grouping. They’re not mandatory but common.
Let’s also note that from hid-input’s perspective, one device is created
per top-level Application Collection, so in theory a device can have
many sub-devices.
From the kernel’s perspective, the transport bus notices that a device is advertised as an HID class and then the data gets routed to the hid core bus.
For example, this is what the USB transport might notice:
bInterfaceClass    = 0x03   ← USB_CLASS_HID
bInterfaceSubClass = 0x01   ← Boot Interface Subclass (optional)
bInterfaceProtocol = 0x02   ← Mouse  (0x01 = Keyboard)
And you can clearly see similar ATTRS in the udevadm trace we took in
earlier in a previous section:
looking at parent device '/devices/pci0000:00/0000:00:12.0/usb2/2-4/2-4:1.3':
  KERNELS=="2-4:1.3"
  SUBSYSTEMS=="usb"
  DRIVERS=="usbhid"
  ATTRS{authorized}=="1"
  ATTRS{bAlternateSetting}==" 0"
  ATTRS{bInterfaceClass}=="03"
  ATTRS{bInterfaceNumber}=="03"
  ATTRS{bInterfaceProtocol}=="00"
  ATTRS{bInterfaceSubClass}=="00"
  ATTRS{bNumEndpoints}=="01"
  ATTRS{supports_autosuspend}=="1"
The HID core subsystem is in charge of managing the lifecycle (connect/disconnect/open/close), parsing the HID report descriptors to understand the device capabilities. Once parsed, it dispatches Reports to the HID drivers registered on the HID bus, each driver can inspect the Usage Page and Usage to decide how and whether to handle them. This is like a publish-subscribe mechanism. The most specific registered driver (vendor specific) will match and handle Reports in whatever way they see fit, otherwise the hid-generic driver is the fallback.
Several *_connect hooks in the HID core subsystem allow attaching
handlers for different behavior that HID device provide. The most
important for us is the hidinput_connect for the HID_CONNECT_HIDINPUT,
to handle HID input devices. It’s default implementation lives in
hid-input (internally hidinput_report_event). Device specific drivers
can override this behavior if needed. The hid-input role is to bridge
with the input core, allocating and registering the input device via
input_register_device, which will in turn expose /dev/input/eventN,
as we’ve seen before, and translate HID Reports to evdev.
Similarly, in this pub-sub fan-out fashion, another handler is the
default one registered for HID_CONNECT_HIDRAW, from hidraw.c
(hidraw_report_event). This driver will create a raw interface on
devtmpfs (/dev/hidrawN) to interface with raw HID events that aren’t
necessarily input-related.
This looks somewhat like this:

This is all neat, let’s list a couple of tools that can help us debug HID and inspect HID Reports Descriptors and Reports.
usbhid-dump- will dump USB HID device report descriptors and streams- hidrdd - verbose description of hid report descriptors
hid-tools- has many sub-tools such as replay, decode, and recordinghid-replay- to test and replay hid events- Online USB Descriptor and Request Parser
The simplest one in my opinion is hid-tools, here’s an example of a
keyboard with consumer control and system control, the same one we’ve
seen in the procfs introspection interface earlier (/proc/bus/input/):
> hid-decode /sys/bus/hid/devices/0003:1A2C:6004.004F/report_descriptor

# device 0:0

# 0x05, 0x0c,        // Usage Page (Consumer Devices)   0
# 0x09, 0x01,        // Usage (Consumer Control)        2
# 0xa1, 0x01,        // Collection (Application)        4
# 0x85, 0x01,        //  Report ID (1)                  6
# 0x19, 0x00,        //  Usage Minimum (0)              8
# 0x2a, 0x3c, 0x02,  //  Usage Maximum (572)            10
# 0x15, 0x00,        //  Logical Minimum (0)            13
# 0x26, 0x3c, 0x02,  //  Logical Maximum (572)          15
# 0x95, 0x01,        //  Report Count (1)               18
# 0x75, 0x10,        //  Report Size (16)               20
# 0x81, 0x00,        //  Input (Data,Arr,Abs)           22
# 0xc0,              // End Collection                  24

# 0x05, 0x01,        // Usage Page (Generic Desktop)    25
# 0x09, 0x80,        // Usage (System Control)          27
# 0xa1, 0x01,        // Collection (Application)        29
# 0x85, 0x02,        //  Report ID (2)                  31
# 0x19, 0x81,        //  Usage Minimum (129)            33
# 0x29, 0x83,        //  Usage Maximum (131)            35
# 0x25, 0x01,        //  Logical Maximum (1)            37
# 0x75, 0x01,        //  Report Size (1)                39
# 0x95, 0x03,        //  Report Count (3)               41
# 0x81, 0x02,        //  Input (Data,Var,Abs)           43
# 0x95, 0x05,        //  Report Count (5)               45
# 0x81, 0x01,        //  Input (Cnst,Arr,Abs)           47
# 0xc0,              // End Collection                  49
#
R: 50 05 0c 09 01 a1 01 85 01 19 00 2a 3c 02 15 00 26 3c \
   02 95 01 75 10 81 00 c0 05 01 09 80 a1 01 85 02 19 81 \
   29 83 25 01 75 01 95 03 81 02 95 05 81 01 c0
N: device 0:0
I: 3 0001 0001
You can see it has two Application Collections, so that’s why we had two entries for the keyboard.
In some cases, the HID Device Descriptor is wrong
and needs some patching, which can either be done in a
special driver, or on a live system dynamically by relying on
udev-hid-bpf
which will be invoked before the kernel handles HID.
evdev — Event Device
Let’s tackle the last piece of the exposed middle-layer that we didn’t explain yet: The Event Device common protocol, the evdev layer.
From what we’ve seen, we know that evdev is a standardization interface, it decouples and abstracts the underlying devices. It could be a USB keyboard, a Bluetooth pointer, or PS/2 device, and all the user needs is to read from the evdev interface, without worrying about their differences.
It works because evdev registers itself as the default input handler in the input core, and the main job of most input driver is to translate to it:
static struct input_handler evdev_handler = {
	.events		= evdev_events,
	.connect	= evdev_connect,
	.disconnect	= evdev_disconnect,
	.legacy_minors	= true,
	.minor		= EVDEV_MINOR_BASE,
	.name		= "evdev",
	.id_table	= evdev_ids,
};
When its “connect” event is fired, it creates the corresponding evdev
node in /dev/input/eventN. Furthermore, the info is also reflected
in sysfs within the /sys/class/input/eventN directory along with its
related /sys/class/input/inputN device created by the input core, which
it is the children of (eventN within inputN).
The evdev driver also supports certain ioctl to query
its internal state, let a client handle exclusively grab a
device (EVIOCGRAB), or change certain values. The list of ioctl can be found
here
within libevdev, though libevdev doesn’t support all of them (the list
can also be found in include/linux/input.h).
Let’s see what the evdev format is about, and how the input core translates to it and generates the events.
The evdev protocol is stateful, it doesn’t forward everything to user-space but only does when it notices a change. To inquire about its current state one can rely on ioctl instead.
The format of evdev is composed of a series of input_event (from
include/linux/input.h) which look like the structure here under,
grouped in what’s called a sequence or a frame:
struct input_event {
 struct timeval time;
 __u16 type;
 __u16 code;
 __s32 value;
};
Basically a timestamp along with a type-code couple and an associated
value. The type is the general category to which this event is part of,
and the code the sub-category. For example it could be a relative movement
(type), on the x-axis (code), of 1 unit (value). The available types of
events and codes can be found under include/linux/input-event-codes.h.
The most common types are:
EV_KEY: buttons and keyboardsEV_REL: relative events, on axis or othersEV_ABS: absolute axis value, coordinates, touchscreens
Each frame ends whenever a synchronization event comes up, the most
common is of type.code(value) EV_SYN.SYN_REPORT(0). It’s the marker
that it’s time to make sense of the stream, the whole frame.
An example snapshot of a frame of an “absolute touchpad” would look like this:
E: 30.920519 0003 0018 0031     # EV_ABS / ABS_PRESSURE         31
E: 30.920519 0000 0000 0000     # ------------ SYN_REPORT (0) ---------- +13ms
E: 30.933332 0003 0035 2103     # EV_ABS / ABS_MT_POSITION_X    2103
E: 30.933332 0003 0036 1876     # EV_ABS / ABS_MT_POSITION_Y    1876
E: 30.933332 0003 003a 0029     # EV_ABS / ABS_MT_PRESSURE      29
E: 30.933332 0003 0000 2103     # EV_ABS / ABS_X                2103
E: 30.933332 0003 0001 1876     # EV_ABS / ABS_Y                1876
E: 30.933332 0003 0018 0029     # EV_ABS / ABS_PRESSURE         29
E: 30.933332 0000 0000 0000     # ------------ SYN_REPORT (0) ---------- +13ms
E: 30.946156 0003 003a 0017     # EV_ABS / ABS_MT_PRESSURE      17
E: 30.946156 0003 0018 0017     # EV_ABS / ABS_PRESSURE         17
E: 30.946156 0000 0000 0000     # ------------ SYN_REPORT (0) ---------- +13ms
E: 30.959094 0003 0039 -001     # EV_ABS / ABS_MT_TRACKING_ID   -1
E: 30.959094 0001 014a 0000     # EV_KEY / BTN_TOUCH            0
E: 30.959094 0001 0145 0000     # EV_KEY / BTN_TOOL_FINGER      0
E: 30.959094 0003 0018 0000     # EV_ABS / ABS_PRESSURE         0
E: 30.959094 0000 0000 0000     # ------------ SYN_REPORT (0) ---------- +13ms
And of a keyboard:
E: 0.000000 0004 0004 458792    # EV_MSC / MSC_SCAN             458792
E: 0.000000 0001 001c 0000      # EV_KEY / KEY_ENTER            0
E: 0.000000 0000 0000 0000      # ------------ SYN_REPORT (0) ----------
E: 0.560004 0004 0004 458976    # EV_MSC / MSC_SCAN             458976
E: 0.560004 0001 001d 0001      # EV_KEY / KEY_LEFTCTRL         1
E: 0.560004 0000 0000 0000      # ------------ SYN_REPORT (0) ----------
[....]
E: 1.172732 0001 001d 0002      # EV_KEY / KEY_LEFTCTRL         2
E: 1.172732 0000 0000 0001      # ------------ SYN_REPORT (1) ----------
E: 1.200004 0004 0004 458758    # EV_MSC / MSC_SCAN             458758
E: 1.200004 0001 002e 0001      # EV_KEY / KEY_C                1
E: 1.200004 0000 0000 0000      # ------------ SYN_REPORT (0) ----------
As we’ve said, it’s stateful, so the events are only sent when there is a state change, even when the hardware keeps resending the same event. So for example, if a key is kept pressed, it won’t resend the event until it’s released.
These events might seem simple on their own but are in fact absolutely complex to handle, especially touchpads. There are many features such as pressure, multi-touch, and the tracking of different fingers, which needs an upper layer to make sense of all this. This is where libinput shines, and we’ll see that later on. For now just keep in mind it’s a series of event.
So how do drivers use evdev to send events, we’ve talked about
input_event before, but how does it work.
Well, first of before sending any event, the input driver needs at the
registration phase to advertise to the system what it’s capable of,
to say what kind of events it can generate. These event “capabilities”,
as they’re called, are a couple of different bits in sets that are also
inspectable in sysfs /sys/class/input/inputN/capabilities/.
You’ll find the following types of capabilities:
ev, set ininput_dev->evbit, Which event types the device can generate (EV_KEY,EV_REL, etc.)key, set ininput_dev->keybit, Which key/button codes it supportsrel, set ininput_dev->relbit, Which relative axes (e.g., REL_X, REL_WHEEL)abs, set ininput_dev->absbit, Which absolute axes (e.g., ABS_X, ABS_Y)led, set ininput_dev->ledbit, LED indicators (e.g., keyboard LEDs)sw, set ininput_dev->swbit, Switch states (e.g., lid switch)ff, set ininput_dev->ffbit, Force feedback capabilitiesmsc, set ininput_dev->mscbit, Miscellaneous eventssnd, set ininput_dev->sndbit, Sound events
As you can see, it’s somewhat related the HID capabilities in a sense, but applies to all devices.
We’ve also seen these capabilities bits during our inspection of the
input core procfs interface /proc/bus/input/ in the B field:
I: Bus=0003 Vendor=1a2c Product=6004 Version=0110
N: Name="SEMICO USB Keyboard Consumer Control"
P: Phys=usb-0000:00:12.0-1/input1
S: Sysfs=/devices/pci0000:00/0000:00:12.0/usb2/\
   2-1/2-1:1.1/0003:1A2C:6004.001E/input/input53
U: Uniq=
H: Handlers=kbd event7
B: PROP=0
B: EV=1f
B: KEY=33eff 0 0 483ffff17aff32d bfd4444600000000 \
   1 130c730b17c000 267bfad9415fed 9e168000004400 10000002
B: REL=1040
B: ABS=100000000
B: MSC=10

I: Bus=0003 Vendor=1a2c Product=6004 Version=0110
N: Name="SEMICO USB Keyboard System Control"
P: Phys=usb-0000:00:12.0-1/input1
S: Sysfs=/devices/pci0000:00/0000:00:12.0/usb2/\
   2-1/2-1:1.1/0003:1A2C:6004.001E/input/input54
U: Uniq=
H: Handlers=kbd event9
B: PROP=0
B: EV=13
B: KEY=c000 10000000000000 0
B: MSC=10
However, parsing the bits manually in procfs or sysfs would be cumbersome,
it’s better to rely on tools such as libinput record, check the
“Supported Events” section:
devices:
- node: /dev/input/event5
  evdev:
    # Name: SEMICO USB Keyboard
    # ID: bus 0x0003 (usb) vendor 0x1a2c \
    #         product 0x6004 version 0x0110
    # Supported Events:
    # Event type 0 (EV_SYN)
    # Event type 1 (EV_KEY)
    #   Event code 1 (KEY_ESC)
    #   Event code 2 (KEY_1)
    #   Event code 3 (KEY_2)
    #   Event code 4 (KEY_3)
    …
    #   Event code 12 (KEY_MINUS)
    #   Event code 13 (KEY_EQUAL)
    #   Event code 14 (KEY_BACKSPACE)
    #   Event code 15 (KEY_TAB)
    #   Event code 16 (KEY_Q)
    …
    # Event type 4 (EV_MSC)
    #   Event code 4 (MSC_SCAN)
    # Event type 17 (EV_LED)
    #   Event code 0 (LED_NUML)
    #       State 0
    #   Event code 1 (LED_CAPSL)
    #       State 0
    #   Event code 2 (LED_SCROLLL)
    #       State 0
    # Event type 20 (EV_REP)
    #   Event code 0 (REP_DELAY)
    #   Event code 1 (REP_PERIOD)
    # Properties:
    name: "SEMICO USB Keyboard"
    id: [3, 6700, 24580, 272]
    codes:
      0: [0, 1, 2, 3, 4,…, 13, 14, 15] # EV_SYN
      1: [1, 2, 3, 4, 5, 6, 7, 8, 9 …]
      4: [4] # EV_MSC
      17: [0, 1, 2] # EV_LED
      20: [0, 1] # EV_REP
    properties: []
  hid: [
    0x05, 0x01, 0x09, 0x06, 0xa1, 0x01, 0x05, 0x08, 0x19, 0x01, 0x29,
    0x03, 0x15, 0x00, 0x25, 0x01, 0x75, 0x01, 0x95, 0x03, 0x91, 0x02,
    0x95, 0x05, 0x91, 0x01, 0x05, 0x07, 0x19, 0xe0, 0x29, 0xe7, 0x95,
    0x08, 0x81, 0x02, 0x75, 0x08, 0x95, 0x01, 0x81, 0x01, 0x19, 0x00,
    0x29, 0x91, 0x26, 0xff, 0x00, 0x95, 0x06, 0x81, 0x00, 0xc0
  ]
  udev:
    properties:
    - ID_INPUT=1
    - ID_INPUT_KEY=1
    - ID_INPUT_KEYBOARD=1
    - LIBINPUT_DEVICE_GROUP=3/1a2c/6004:usb-0000:00:12.0-1
    - DRIVER=hid-generic
    virtual: false
As you can see it also dumps more information such as the HID Report Descriptor and the attached udev properties.
Here’s what you can see from the much longer list that a touchpad generates:
# Input device name: "SynPS/2 Synaptics TouchPad"
# Input device ID: bus 0x11 vendor 0x02 \
#            product 0x07 version 0x1b1
# Supported events:
#   Event type 0 (EV_SYN)
#     Event code 0 (SYN_REPORT)
#     Event code 1 (SYN_CONFIG)
#     Event code 2 (SYN_MT_REPORT)
#     Event code 3 (SYN_DROPPED)
#     Event code 4 ((null))
#     Event code 5 ((null))
#     Event code 6 ((null))
#     Event code 7 ((null))
#     Event code 8 ((null))
#     Event code 9 ((null))
#     Event code 10 ((null))
#     Event code 11 ((null))
#     Event code 12 ((null))
#     Event code 13 ((null))
#     Event code 14 ((null))
#   Event type 1 (EV_KEY)
#     Event code 272 (BTN_LEFT)
#     Event code 325 (BTN_TOOL_FINGER)
#     Event code 328 (BTN_TOOL_QUINTTAP)
#     Event code 330 (BTN_TOUCH)
#     Event code 333 (BTN_TOOL_DOUBLETAP)
#     Event code 334 (BTN_TOOL_TRIPLETAP)
#     Event code 335 (BTN_TOOL_QUADTAP)
#   Event type 3 (EV_ABS)
#     Event code 0 (ABS_X)
#       Value   2919
#       Min     1024
#       Max     5112
#       Fuzz       0
#       Flat       0
#       Resolution 42
#     Event code 1 (ABS_Y)
#       Value   3711
#       Min     2024
#       Max     4832
#       Fuzz       0
#       Flat       0
#       Resolution 42
#     Event code 24 (ABS_PRESSURE)
#       Value      0
#       Min        0
#       Max      255
#       Fuzz       0
#       Flat       0
#       Resolution 0
#     Event code 28 (ABS_TOOL_WIDTH)
#       Value      0
#       Min        0
#       Max       15
#       Fuzz       0
#       Flat       0
#       Resolution 0
# Properties:
#   Property  type 0 (INPUT_PROP_POINTER)
#   Property  type 2 (INPUT_PROP_BUTTONPAD)
#   Property  type 4 (INPUT_PROP_TOPBUTTONPAD)
As a note, the Properties can let us know whether we’re dealing with
a touchscreen INPUT_PROP_DIRECT, or a touchpad INPUT_PROP_POINTER,
and INPUT_PROP_BUTTONPAD also tells us that it’s a so-called clickpad
(no separate physical buttons but the whole touchpad clicks). These are
hints for libinput to properly handle different kinds of devices.
So after registering its capabilities, the input driver simply reports
its events by relying on the input_event function, or one of it’s
many wrappers:
void input_event(struct input_dev *dev, unsigned int type, unsigned int code, int value);

static inline void input_report_key(struct input_dev *dev, unsigned int code, int value)
{
	input_event(dev, EV_KEY, code, !!value);
}

static inline void input_report_rel(struct input_dev *dev, unsigned int code, int value)
{
	input_event(dev, EV_REL, code, value);
}

static inline void input_report_abs(struct input_dev *dev, unsigned int code, int value)
{
	input_event(dev, EV_ABS, code, value);
}
That’s it mostly to understand evdev! There are multiple tools to help
debug evdev-related issues. We’ve seen libinput record. Similarly,
there’s the evemu suite with its record, device, play functions to
simulate and test devices, and evtest.
There’s also evsieve, a tool to
intercept and modify evdev events on the fly.
Along with these, the library libevdev, in C and python, is the most
used to integrate with evdev-related things.
udev & hwdb
After going through the kernel and exposed layers, we’re finally in
user-space!
The first component we’ll see is udev, since we mentioned its role
countless times in the previous sections.
Udev, or the dynamic user-space device manager, implemented as the
udev daemon systemd-udevd, has as role to take actions whenever a
uevent (PF_NETLINK, NETLINK_KOBJECT_UEVENT) is sent from the kernel
to user-space. We’ve seen a few of the possible actions it performs,
here’s a summary of the kind of things it does:
- Load kernel modules based on the uevent MODALIAS
- Set access rights on device nodes
- Attach properties to devices on detection
- Create symlinks so that devices have more predictable names
- Keep track internally of device info in its internal db
- Use its rule system to take any kind of action on plug/unplug of a device
The most important part is the last point: udev has a set of rules against which it can match devices and their attributes and take all sorts of actions based on that. The fields it has access to not only come from the uevents but also from all related info on the system.
These rules, as is the convention for pretty much all big daemons these
days, are read from system locations such as /usr/lib/udev/rules.d,
/usr/local/lib/udev/rules.d, and the volatile runtime in
/run/udev/rules.d, and from the local admin directory of
/etc/udev/rules.d which takes precedence over the other locations. The
directories contains files with a .rules extension and are processed and
ordered lexically (01-example.rules comes before 05-example.rules).
Now the syntax of udev rules, which are mainly composed of matching
patterns and actions to perform or properties to set upon match, is
dense and complex (it even has branching). Only a deep study of udev(7)
man page will help. Yet, we can still learn the very basics of it to be
able to understand what’s happening.
Our approach will consist of, first checking two examples, then have a
general overview of the possible components of the syntax, and finally
talking about the particularities of that system.
The first example is quite simple, it will run a script when a specific keyboard is plugged/unplugged.
ACTION=="add", SUBSYSTEM=="input",
  ATTRS{id/product}=="6004",
  ATTRS{id/vendor}=="1a2c",
  RUN+="/bin/kbd_is_plugged"

ACTION=="remove", SUBSYSTEM=="input",
  ATTRS{id/product}=="6004",
  ATTRS{id/vendor}=="1a2c",
  RUN+="/bin/kbd_is_unplugged"
The rule is pretty clear about what it does, on “add” or “remove” action
for specific match it’ll execute a script. But you’ll also notice that the
match components such as SUBSYSTEM and ATTRS are things we’ve seen before
in previous traces of udevadm info, which is exactly the point. udevadm
info will show us certain components we can used to match.
The second example is a tad bit more complex, we will parse
/usr/lib/udev/rules.d/60-persistent-input.rules. That file creates
a more persistent naming scheme for input devices in devtmpfs under
/dev/input/by-id and /dev/input/by-path/. Here’s a simplified version
of it.
ACTION=="remove", GOTO="persistent_input_end"
SUBSYSTEM!="input", GOTO="persistent_input_end"
# …
# determine class name for persistent symlinks
ENV{ID_INPUT_KEYBOARD}=="?*", ENV{.INPUT_CLASS}="kbd"
ENV{ID_INPUT_MOUSE}=="?*", ENV{.INPUT_CLASS}="mouse"
# …
# by-id links
KERNEL=="event*", ENV{ID_BUS}=="?*", ENV{.INPUT_CLASS}=="?*",
ATTRS{bInterfaceNumber}=="|00",
SYMLINK+="input/by-id/$env{ID_BUS}-$env{ID_SERIAL}-event-$env{.INPUT_CLASS}"
# by-path
ENV{.INPUT_CLASS}=="?*", KERNEL=="event*",
ENV{ID_PATH}=="?*",
SYMLINK+="input/by-path/$env{ID_PATH}-event-$env{.INPUT_CLASS}"
# …
LABEL="persistent_input_end"We can see multiple things from this short example. First of all,
the branching mechanism with its use of GOTO whenever certain matches
don’t fit the specific use-case. We can also see the standard comparison
operators such as == and !=.
Then we see different variables/values that are either compared against
such as SUBSYSTEM, ACTION, KERNEL, ATTRS{…}, ENV{}, or
assigned such as ENV{…}, GOTO, or SYMLINK. The assignment seems
to either use = or +=.
Furthermore, from this example we can also see some regex-like pattern
matching, and string substitution within assignment.
Yet, overall the idea makes sense. We create some string variable based
on what type of input device we’re dealing with (prepended with .
means it’s only temporary), which we found in ENV{…}, the device
properties. Then for event devices we create two symlink files in
different directories “by-id” and “by-path”. For the by-id it’s composed
of the bus name, followed by the device name, “-event-“, and the input
class we’ve stored in the temporary variable.
Let’s see how that would look for this device:
> udevadm info -p $(udevadm info -q path -n /dev/input/event7)
…
M: event7
…
N: input/event7
…
E: DEVNAME=/dev/input/event7
E: MAJOR=13
E: MINOR=71
E: SUBSYSTEM=input
…
E: ID_INPUT=1
E: ID_INPUT_KEY=1
E: ID_BUS=usb
E: ID_MODEL=USB_Keyboard
E: ID_MODEL_ENC=USB\x20Keyboard
E: ID_MODEL_ID=6004
E: ID_SERIAL=SEMICO_USB_Keyboard
E: ID_VENDOR=SEMICO
E: ID_VENDOR_ENC=SEMICO
E: ID_VENDOR_ID=1a2c
E: ID_REVISION=0110
E: ID_TYPE=hid
…The lines starting with E: are device properties that are in ENV{…},
the meaning can be found in udevadm(8) manpage, which we’ll see more
of in other examples.
So from this, the device should be symlinked as
/dev/input/by-id/usb-SEMICO_USB_Keyboard-event-kbd, which it indeed is.
That’s a neat example, it gives us a generic idea of udev. Let’s continue and try to get a more general idea of the udev syntax.
So far we’ve seen that the rules files contain key-value pairs, or
comments starting with # as is standard in most conf files, and
has operators that are either for comparison, == and !=, or for
assignment, we’ve seen = and +=.
The difference between these two assignment operators is that some
variables/keys are lists, and the += appends to that list, while the
= operator would basically empty the list and set only the single
value in it. Additionally, there are two other assignment operators
we haven’t seen: the -= to remove a value from a list, and the :=
which sets a constant and disallow future change.
How to know if something is a list or a scalar value, and if the key can
be used in comparison or assignment. Well, it depends on the key itself,
which are listed in the man page udev(7), we’ll see the most common
but first let’s talk about the values.
The values assigned are always strings within double quotes, and use
the usual same escape mechanism that C and other languages use. It also
allows case-insensitive comparison by having the string preceded by “i”,
such as i"casedoesn't matter".
The strings also allow internal substitution with variables/keys, some
that can be set on the fly, from the match, or from a set of global
ones. It’s similar to a lot of languages: "hello $kernel $env{ID_PATH}".
This is what we’ve seen in one of our examples.
Furthermore, if a string is used during matching, it can include
glob patterns, also the usual ones, such as * to match zero or more
characters, ? to match a single characters, | for the or separator,
and [] to match a set of characters. Obviously, these special characters
will need to be escaped if used as-is.
Now, as we said there are keys used to do matching/searching, and keys
that allow assigning values (list or not), yet what’s confusing is that
lots of keys can be used for both, but not all of them. A quick look at
udev(7) to be sure doesn’t hurt.
Here are some common matching keys:
KERNEL: kernel nameSUBSYSTEM: the kernel subsystem the device is associated toDRIVER: the driver currently handling the deviceACTION: Represents what’s happening on a device. Eitheradd/removewhen the device is created or removed,bind/unbindfor the driver,changewhen something happens on a device such as a state change (ex: eject, power plug, brightness),offline/onlinefor memory and cpu,movewhen a device is renamed.ATTR{attributename}: match any sysfs attribute of the deviceTAG: arbitrary tags, mostly used for user-space special behaviorENV{property_name}: Context info, device properties, added by the kernel or other udev rules associated to device. They are not environment variables, but do get passed asenvtoRUN+=commands.PROGRAMandRESULT: The first executes an external program and if it’s successful then the match is ok, the second checks the string result of the last program and uses it as a comparator.
Still, there are variants of some of the above to allow a match with any
of the parents of the devices in the topological hierarchy, these include
KERNELS, SUBSYSTEMS, DRIVERS, and ATTRS.
Now, we’ve dealt with the keys used for comparison, let’s see the common assignment keys:
SYMLINK: A list of symlinks to be createdATTR{attributename}: Value that should be set in sysfsTAG: A list of special attributes for user-space to act upon. For example, systemd acts onTAG+="systemd"and will readENV{SYSTEMD_WANTS}and interpret it as a unit dependency for the device. It can be used to automatically start services.ENV{property_name}: Context info, device properties, of the device. If the property name is prepended with a dot., then it will only temporarily be set.OWNER,GROUP,MODE: Set permissions on the deviceRUN{type}: A list of external programs to run. The type is optional and defaults to “program”, but it can be “builtin”, which are plugins. Beware thatRUNwill timeout, and so it’s always better to dispatch long running process to starter scripts instead that will exit directly.systemd-run --useris often used here to execute things in a normal graphical session such as notifications.IMPORT{type}: Similar toRUNbut used to import a set of variables (ENV) depending on the type, can be “program”, “builtin”, “file”, “db”, “parent”, “cmdline”.LABEL,GOTO: A label and goto to jump to it, creating branching.
The RUN{builtin} is a bit of an edge-case within udev since there are
many builtin modules and most of them are blackboxes that are hardly
documented. We know from udevadm test-builtin --help that these exist:
blkid Filesystem and partition probing
btrfs btrfs volume management
dissect_image Dissect Disk Images
factory_reset Factory Reset Mode
hwdb Hardware database
input_id Input device properties
keyboard Keyboard scancode mapping and touchpad/pointingstick characteristics
kmod Kernel module loader
net_driver Set driver for network device
net_id Network device properties
net_setup_link Configure network link
path_id Compose persistent device path
uaccess Manage device node user ACL
usb_id USB device properties
Unfortunately, what they do isn’t clear unless you step in the code of
udev-builtin.
For example,
input_id
will set a series of ENV info on the device depending on what it thinks
it is. Here’s some relevant code snippet:
if (is_pointing_stick)
udev_builtin_add_property(event, "ID_INPUT_POINTINGSTICK", "1");
if (is_mouse || is_abs_mouse)
udev_builtin_add_property(event, "ID_INPUT_MOUSE", "1");
if (is_touchpad)
udev_builtin_add_property(event, "ID_INPUT_TOUCHPAD", "1");
if (is_touchscreen)
udev_builtin_add_property(event, "ID_INPUT_TOUCHSCREEN", "1");
if (is_joystick)
udev_builtin_add_property(event, "ID_INPUT_JOYSTICK", "1");
if (is_tablet)
udev_builtin_add_property(event, "ID_INPUT_TABLET", "1");
if (is_tablet_pad)
udev_builtin_add_property(event, "ID_INPUT_TABLET_PAD", "1");And, that’s the tip of the iceberg to understand udev rules. Yet, the ones on
a real system are a monstrously big patchup. The only way to visualize
all of them on your system, in the way they’ll be processed, is with
systemd-analyze cat-config udev/rules.d.
Before getting on with actual examples and tools, let’s take some time
to talk about one of the most important builtin module to udev: hwdb,
the harware db, or systemd-hwdb. Which is an extra mechanism to write
rules for udev to add device properties (ENV{}).
The hardware db is a lookup table that lives in files with the .hwdb
extension under the udev directory in the hwdb.d directory. These
key-values at systemd-hwdb start are compiled in a hwdb.bin file for
quick retrieval. They consist of matches of modalias-like keys and then
a series of assignment for properties. Something like:
bluetooth:v0000*
ID_VENDOR_FROM_DATABASE=Ericsson Technology Licensing
The format is a simple series of match strings, one or multiple, and then
assignment values following it on lines that start with a space. Match
strings can use glob for the match, they’re not really following any
specific format other than prefix:search criteria. Yet, the question is:
how are these modalias-like strings used. And the answer is obviously:
it’s used by udev via its IMPORT of the builtin hwdb to set certain
device properties based on the lookup. For example:
DRIVERS=="atkbd", \
IMPORT{builtin}="hwdb 'evdev:atkbd:$attr{[dmi/id]modalias}'", \
ENV{.HAVE_HWDB_PROPERTIES}="1"So udev passes a set of parameters to hwdb, along with the device, and it
will return ENV properties to set. hwdb also has an accompanying command
line tool that works in a similar way and allows querying it. However, it
has no man page, as far as I can see, but the following args are allowed:
--filter or -f:
--device or -d:
--subsystem or -s:
--lookup-prefix -p:So for example when passing --subsystem=usb and a device, hwdb will get
the actual MODALIAS of the device, or construct one from the idVendor,
idProduct, and product, then try to match it in its lookup table.
Anyhow, we won’t spend time breaking down the source code. Let’s just
add that since the hwdb lookup table is compiled at the start, then
when entries are added or modified systemd-hwdb needs to be updated
or notified via:
systemd-hwdb update # compile the hwdbSimilarly, the same is also true of udev. However, udev has more granular reload mechanism, either to reload rules or to re-emit events so that they can be processed by the new rules:
udevadm trigger # re-emits all the uevents
udevadm trigger /sys/class/input/eventXYZ # only re-emit this device events
udevadm control --reload # reload all rules but will only apply to new eventsLet’s see more examples of udevadm, which is the main way to interface
with udev.
udevadm info is used to gather information about devices, we’ve seen
it earlier in previous sections. It’s handy to write udev rules. You can
pass it either a devtmpfs path, a sysfs path, a device ID, or a systemd
unit name of .device type (these are the TAG+="systemd" devices to
automatically load other units).
For example, we can walk and find the attribute hierarchy of a certain device.
> udevadm info --attribute-walk /dev/input/event5

  looking at device '/devices/pci0000:00/0000:00:12.0/usb2\
      /2-4/2-4:1.0/0003:1A2C:6004.0069/input/input159/event5':
    KERNEL=="event5"
    SUBSYSTEM=="input"
    DRIVER==""
    ATTR{power/control}=="auto"
    ATTR{power/runtime_active_time}=="0"
    ATTR{power/runtime_status}=="unsupported"
    ATTR{power/runtime_suspended_time}=="0"


  looking at parent device '/devices/pci0000:00/0000:00:12.0/usb\
      2/2-4/2-4:1.0/0003:1A2C:6004.0069/input/input159':
    KERNELS=="input159"
    SUBSYSTEMS=="input"
    DRIVERS==""
    ATTRS{capabilities/abs}=="0"
    ATTRS{capabilities/ev}=="120013"
    ATTRS{capabilities/ff}=="0"
    ATTRS{capabilities/key}=="1000000000007 ff800000000007ff \
        febeffdff3cfffff fffffffffffffffe"
    ATTRS{capabilities/led}=="7"
    ATTRS{capabilities/msc}=="10"
    ATTRS{capabilities/rel}=="0"
    ATTRS{capabilities/snd}=="0"
    ATTRS{capabilities/sw}=="0"
    ATTRS{id/bustype}=="0003"
    ATTRS{id/product}=="6004"
    ATTRS{id/vendor}=="1a2c"
    ATTRS{id/version}=="0110"
    ATTRS{inhibited}=="0"
    ATTRS{name}=="SEMICO USB Keyboard"
    ATTRS{phys}=="usb-0000:00:12.0-4/input0"
    ATTRS{power/control}=="auto"
    ATTRS{power/runtime_active_time}=="0"
    ATTRS{power/runtime_status}=="unsupported"
    ATTRS{power/runtime_suspended_time}=="0"
    ATTRS{properties}=="0"
    ATTRS{uniq}==""

  looking at parent device '/devices/pci0000:00/0000:00:12.0/usb2\
      /2-4/2-4:1.0/0003:1A2C:6004.0069':
    KERNELS=="0003:1A2C:6004.0069"
    SUBSYSTEMS=="hid"
…
It’s something we’ve seen before.
Another option is to rely on udevadm monitor, which is a live trace
of all the uevent being sent.
Yet another option is udevadm test to print the rules that will get
triggered on a certain device uevent. This is useful to check whether
the rules make sense and will get executed.
A last tip to remember when writing udev rules is that ATTR{} is
anything in the files of sysfs. So we can simply match like this:
> cat /sys/class/input/event5/device/name
SEMICO USB Keyboard
And the rule would be ATTR{name}=="SEMICO USB Keyboard".
Finally, let’s have a honorable mention to the mdev and eudev projects, which are udev-like projects but more compatible with other init systems.
libinput
Libinput is a wrapper over udev and evdev. It provides a centralized way to perform device detection, device event handling, input processing, along with abstractions and common set of facilities to make the practical, and user-expected, input handling easier. Today, libinput is the major input library used by all graphical environments and toolkits, it’s used by Xorg (through a driver) and Wayland compositors, so we’re all probably using it indirectly.

Its basic mechanism works as you’d expect.
As far as udev is concerned, it relies on libudev/sd-device to
enumerate devices and listen to kernel’s uevent. In particular, it
analyzes properties added by udev that helps categorize devices and
override settings (ID_INPUT, ID_INPUT_*, LIBINPUT_*), and filters
which devices it is allowed to handle by looking at which “seat” they’re
associated with. The whole udev part can be skipped by manually passing
events with libinput_path_add_device, but that’s a fallback scenario.
And when it comes to evdev, it gets the handle to the corresponding
input stream devices then continuously read events and processes
them. This processing includes a lot of things such as scaling
touch coordinate, calculating pointer acceleration, debouncing
keys, etc.. Then finally, libinput returns these events in a unified
API as LIBINPUT_EVENT_POINTER_BUTTON, LIBINPUT_EVENT_POINTER_MOTION,
and LIBINPUT_EVENT_POINTER_MOTION_ABSOLUTE.
That also means it handles only the usual input devices such as mice, keyboards, touchpads/clickpads, switches, trackpoints/pointing sticks, touchscreens, and graphic tablets. It doesn’t handle joysticks, for example, since these aren’t used for desktop environment but for games.
The main features handled by libinput are:
- Button debouncing
- Clickpad software button behavior, Middle button emulation
- Touchpad pressure-based touch detection
- Palm and thumb detection
- Scrolling, Three-finger drag, and Tap-to-click behaviour
- Gestures
We’ll see what these means, but first, why is libinput needed, can’t udev and evdev be handled directly? Why have another layer of indirection?
The answer is twofold: to avoid having additional separate modules in the upper stack such as in the X server, and because handling input devices is messy and not as simple as taking evdev events as-is, they need a bit more interpretation and cleanup.
Previously, before Wayland got traction, the X11 stack had specific custom drivers, the xf86 input driver API, for each type of hardware and use-case. Yet, these xf86 drivers could also have common functionalities such as two-finger scrolling, which adds confusion. This was mostly a hack for days before evdev existed, and there was a need for a library independent of X11 that would centralize this responsibility, instead of having it dispersed in different places. This makes it easier to test each options, and have the features interact with one another, cross-device communication.
Now why not handle it all directly, well because it’s messy. Multiple
devices have bad firmware and might send wrong capabilities and info
in their HID Report Descriptors, which will then be forwarded as-is
with evdev. Plus, having handling these in the driver would be even
more messy. For example, it could say that the size or resolution of
the touchpad is something while it’s something else. Or that the range
of valid inputs is 0 to 10 but that it’s 5-10. That’s why libinput
includes vendor-specific quirks handling in /usr/share/libinput/
along with the help of hwdb, which we’ve seen earlier, that has
/usr/lib/udev/hwdb.d/60-evdev.hwdb.
For example:
[Aiptek 8000U pressure threshold]
MatchUdevType=tablet
MatchBus=usb
MatchVendor=0x08CA
MatchProduct=0x0010
AttrPressureRange=70:50
This says that when a udev event is a usb tablet from a specific vendor,
that the pressure range should be change to 70:50.
[Bluetooth Keyboards]
MatchUdevType=keyboard
MatchBus=bluetooth
AttrKeyboardIntegration=external
And this says that when a keyboard’s bus is over Bluetooth, it should add the libinput attribute to say it’s an external keyboard.
The 60-evdev.hwdb is mostly for touchpad’s axis, the device properties
set will look like this:
EVDEV_ABS_<axis>=<min>:<max>:<res>:<fuzz>:<flat>
# where <axis> is the hexadecimal EV_ABS code as listed in linux/input.h and
# min, max, res, fuzz, flat are the decimal values to the respective fields of
# the struct input_absinfo as listed in linux/input.h. If a field is missing
# the field will be left as-is. Not all fields need to be present. e.g. ::45
# sets the resolution to 45 units/mm.
# resolution: it is given in units per millimeter and thus tells us the
# size of the device. in the above case: (5112 - 1024)/42 means the device
# is 97mm wide. The resolution is quite commonly wrong, a lot of axis
# overrides need the resolution changed to the correct value.
Furthermore, apart from quirks, there are hardware physical issues, such as the fact that some touchpads send out events before the finger even touches them, or how to handle the difference in pressure on them, or what to do to track different fingers on multitouch (MT) hardware which requires handling evdev tracking ID and slots.
Here’s a two-fingers scroll example, see how complex that is:
E: 0.000001 0003 0039 0557 # EV_ABS / ABS_MT_TRACKING_ID   557
E: 0.000001 0003 0035 2589 # EV_ABS / ABS_MT_POSITION_X    2589
E: 0.000001 0003 0036 3363 # EV_ABS / ABS_MT_POSITION_Y    3363
E: 0.000001 0003 003a 0048 # EV_ABS / ABS_MT_PRESSURE      48
E: 0.000001 0003 002f 0001 # EV_ABS / ABS_MT_SLOT          1
E: 0.000001 0003 0039 0558 # EV_ABS / ABS_MT_TRACKING_ID   558
E: 0.000001 0003 0035 3512 # EV_ABS / ABS_MT_POSITION_X    3512
E: 0.000001 0003 0036 3028 # EV_ABS / ABS_MT_POSITION_Y    3028
E: 0.000001 0003 003a 0044 # EV_ABS / ABS_MT_PRESSURE      44
E: 0.000001 0001 014a 0001 # EV_KEY / BTN_TOUCH            1
E: 0.000001 0003 0000 2589 # EV_ABS / ABS_X                2589
E: 0.000001 0003 0001 3363 # EV_ABS / ABS_Y                3363
E: 0.000001 0003 0018 0048 # EV_ABS / ABS_PRESSURE         48
E: 0.000001 0001 014d 0001 # EV_KEY / BTN_TOOL_DOUBLETAP   1
E: 0.000001 0000 0000 0000 # ------------ SYN_REPORT (0) ---------- +0ms
E: 0.027960 0003 002f 0000 # EV_ABS / ABS_MT_SLOT          0
E: 0.027960 0003 0035 2590 # EV_ABS / ABS_MT_POSITION_X    2590
E: 0.027960 0003 0036 3395 # EV_ABS / ABS_MT_POSITION_Y    3395
E: 0.027960 0003 003a 0046 # EV_ABS / ABS_MT_PRESSURE      46
E: 0.027960 0003 002f 0001 # EV_ABS / ABS_MT_SLOT          1
E: 0.027960 0003 0035 3511 # EV_ABS / ABS_MT_POSITION_X    3511
E: 0.027960 0003 0036 3052 # EV_ABS / ABS_MT_POSITION_Y    3052
E: 0.027960 0003 0000 2590 # EV_ABS / ABS_X                2590
E: 0.027960 0003 0001 3395 # EV_ABS / ABS_Y                3395
E: 0.027960 0003 0018 0046 # EV_ABS / ABS_PRESSURE         46
E: 0.027960 0000 0000 0000 # ------------ SYN_REPORT (0) ---------- +27ms
E: 0.051720 0003 002f 0000 # EV_ABS / ABS_MT_SLOT          0
E: 0.051720 0003 0035 2609 # EV_ABS / ABS_MT_POSITION_X    2609
E: 0.051720 0003 0036 3447 # EV_ABS / ABS_MT_POSITION_Y    3447
E: 0.051720 0003 002f 0001 # EV_ABS / ABS_MT_SLOT          1
E: 0.051720 0003 0036 3080 # EV_ABS / ABS_MT_POSITION_Y    3080
E: 0.051720 0003 0000 2609 # EV_ABS / ABS_X                2609
E: 0.051720 0003 0001 3447 # EV_ABS / ABS_Y                3447
E: 0.051720 0000 0000 0000 # ------------ SYN_REPORT (0) ---------- +24ms
[...]
E: 0.272034 0003 002f 0000 # EV_ABS / ABS_MT_SLOT          0
E: 0.272034 0003 0039 -001 # EV_ABS / ABS_MT_TRACKING_ID   -1
E: 0.272034 0003 002f 0001 # EV_ABS / ABS_MT_SLOT          1
E: 0.272034 0003 0039 -001 # EV_ABS / ABS_MT_TRACKING_ID   -1
E: 0.272034 0001 014a 0000 # EV_KEY / BTN_TOUCH            0
E: 0.272034 0003 0018 0000 # EV_ABS / ABS_PRESSURE         0
E: 0.272034 0001 014d 0000 # EV_KEY / BTN_TOOL_DOUBLETAP   0
E: 0.272034 0000 0000 0000 # ------------ SYN_REPORT (0) ---------- +30ms
Additionally, you also have misbehaving keyboards, with bad firmware, buttons that are old, that get stuck, or send the same events multiple time (so-called contact bouncing or chatter). We need a mechanism to decide whether the event is valid or not, that’s called hardware debouncing, and libinput does it out-of-the-box for us (see), which is truly impressive. This feature, with the help of the upper stack, may also help people that have certain disabilities with involuntary muscle movement.
So, for many reasons, libinput is indispensable!
We’ve already covered some of its features, let’s see more.
One of the interesting part of libinput is that it’s minimal in how
it decides to access external things. As we said, you can either opt
for events coming from udev, or manually pass them by path, both will
create libinput internal objects (pointer, keyboard, etc..). Furthermore,
libinput has no configuration files, it’s up to the caller to decide
how to configure each device, as we’ll see Wayland compositors and X11
have different ways. Similarly, it leaves the opening of evdev character
devices up to the caller implementation, usually either manually opening
it, which requires root privileges, or via systemd-logind or seatd, dbus
services which will automatically pass back the file descriptors of evdev
devices associated with the current “seat”.
A seat is a collection of input devices associated with a user session. That seems redundant, since most machines have only one seat, yet it only truly makes sense in multi-seat machines: one machine, multiple input devices, with multiple users. Still, it takes this particular use-case in consideration.
> libinput list-devices.
…
Device:           SEMICO USB Keyboard
Kernel:           /dev/input/event5
Id:               usb:1a2c:6004
Group:            6
Seat:             seat0, default
Capabilities:     keyboard
…


> loginctl seat status # will list all input in the hierarchy
As you would’ve guessed, the safest and most favored way to get access
to evdev event file descriptors is through the delegation that systemd-logind
provides. This is done in the code by implementing open_restricted
to call the dbus service.
The seat is assigned with the ENV{ID_SEAT} udev property, which can be
controlled with the loginctl command. To permanently attach a device
to a seat.
> loginctl attach 'seat0' /sys/devices/…/input/input174
Then checking the device properties in udev:
E: ID_FOR_SEAT=input-pci-0000_00_12_0-usb-0_1_1_0
E: ID_SEAT=seat0
E: TAGS=:seat:seat0:
E: CURRENT_TAGS=:seat:seat0:
There are alternatives to logind such as elogind and
seatd that don’t depend on
systemd.
Another detail is that we’ve seen that the same physical device can
appear as multiple input devices on the system. With the help of udev,
libinput gets the device property LIBINPUT_DEVICE_GROUP to group them,
like that we can have the whole group under a single seat, which is more
logical than giving access to only part of a physical hardware.
From udevadm info:
E: ID_PATH_TAG=pci-0000_00_12_0-usb-0_1_1_1
E: ID_SEAT=seat0
E: LIBINPUT_DEVICE_GROUP=3/1a2c/6004:usb-0000:00:12.0-1
And from libinput list-devices, look at the Group part:
Device:           SEMICO USB Keyboard
Kernel:           /dev/input/event5
Id:               usb:1a2c:6004
Group:            6
Seat:             seat0, default
Capabilities:     keyboard
…
Device:           SEMICO USB Keyboard Consumer Control
Kernel:           /dev/input/event6
Id:               usb:1a2c:6004
Group:            6
Seat:             seat0, default
Capabilities:     keyboard pointer
…
Device:           SEMICO USB Keyboard System Control
Kernel:           /dev/input/event7
Id:               usb:1a2c:6004
Group:            6
Seat:             seat0, default
Capabilities:     keyboard
You can get more info on this by checking the related udev rule in
80-libinput-device-groups.rules, which calls the built-in program
libinput-device-group with the sysfs mount point. The IMPORT{program}
basically uses a program right within /usr/lib/udev/ directory.
> /usr/lib/udev/libinput-device-group /sys/class/input/input191
LIBINPUT_DEVICE_GROUP=3/1a2c/6004:usb-0000:00:12.0-1
As far as the technical features are concerned, there are the ones which we listed earlier, so let’s explain the rest of them.
It offers full clickpad management. A clickpad (INPUT_PROP_BUTTONPAD)
is basically a touchpad with a single button, which we might not notice at
first because depending on where we press in the “software button area”
at the bottom, we have different behavior. That’s exactly the behavior
that libinput facilitates. It also handles what happens when a finger
enters or exits that area, these sort of edge cases.
Furthermore, libinput handles tap to click, be it one-finger tap for
left click, two-fingers for right click, and three-fingers tap for
middle click. While that seems simple in theory, libinput has to draw
the line between what is considered a tap and what is considered a finger
drag/move; indeed, our fingers aren’t very stable in the real world.
Unfortunately, by default libinput disables tapping when there are other
methods to trigger button clicks, but it can always be enabled again.
When talking about multiple fingers, the hardware needs to support
it obviously, but also libinput needs to track each one individually,
which is done via evdev tracking ID and slots, what we call multi-touch
handling or MT.
Within multi-touch we have the concept of “gestures” and libinput supports
two standard ones: swiping, fingers going in the same direction, and
pinching when fingers move apart or towards each others.
Similarly, there’s also different scrolling use-cases that are supported
by libinput: two-fingers scrolling, similar to a swipe, edge scrolling,
when there’s a specific area on the trackpad used for scrolling, and
on-button scrolling, which scrolls while having a button pressed just by
moving the finger.
The scrolling can either be horizontal or vertical. The user also has
a choice between natural scrolling an traditional scrolling; natural
scrolling matches the motion of the scroll like a phone, and traditional
scrolling matches the scroll bar directin so going downward will move
the page downward.
One thing libinput doesn’t provide when it comes to scrolling is kinetic
scrolling. Basically, scrolling that is faster or slower depending on
the speed. However, it allows widget libraries to implement it by relying
on the libinput_event_pointer_get_axis_source() function.
With all these, libinput offers palm and thumb detection to disable
the clickpad/touchpad when typing, or ignore a thumb in the corner or
accidental touches while other fingers are moving. It achieves this by
detecting the different pressure, speed, or touch sizes reported by evdev,
along with where they are happening (exclusion zones).
It’s also possible to automatically disable the touchpad when typing,
or when the lid is closed.
Lastly, libinput has lua plugins in /usr/lib/libinput/plugins/ and
/etc/libinput/plugins. As with other quirk fixing mechanisms in
udev and the quirk directory, the plugins are there for the last few
unfixable issues. They can be used to override evdev events.
libinput:register(1) -- register plugin version 1
libinput:connect("new-evdev-device", function (_, device)
    if device:vid() == 0x046D and device:pid() == 0xC548 then
        device:connect("evdev-frame", function (_, frame)
            for _, event in ipairs(frame.events) do
                if event.type == evdev.EV_REL and
                   (event.code == evdev.REL_HWHEEL or
                    event.code == evdev.REL_HWHEEL_HI_RES) then
                    event.value = -event.value
                end
            end
            return frame
        end)
    end
end)
For example, the above script will reverse the horizontal scroll wheel
(EV_REL.REL_HWHEEL) event value for a certain device vendor and
product ID.
We’ve covered most of the libinput features, now let’s see how to debug and interface with it.
The main command line interface is libinput, as we’ve seen it can allow
to list-devices, which is a quick summary of the devices it knows about
and on which seat they are connected. Yet most other commands are there
for debugging and testing.
libinput debug-gui: is a graphical tool mostly to debug touchpadlibinput debug-events: is a cli tool to debug all events as they are interpreted by libinput, if you want it’s similar toevtestorxevin Xorglibinput recordandlibinput replay: Used to save and then simulate again devices. This is amazing if you have a bug and want others to be able to replicate it on their machines. This is similar to howhid-toolswork.libinput measure: mostly used for touchpad, to measure things such as pressure, touch size, tap to click time, etc..
The other way to interface with libinput is programmatically. Here’s the most simple complete example I could come up with:
#include <libinput.h>
#include <libudev.h>
#include <fcntl.h>
#include <unistd.h>
#include <stdio.h>
#include <errno.h>
#include <string.h>


static int open_restricted(const char *path, int flags, void *user_data) {
	int fd = open(path, flags);
	if (fd < 0)
		fprintf(stderr, "Failed to open %s (%s)\n", path, strerror(errno));
	return fd;
}

static void close_restricted(int fd, void *user_data) {
	close(fd);
}

static const struct libinput_interface interface = {
	.open_restricted = open_restricted,
	.close_restricted = close_restricted,
};

int main(void) {
    struct udev *udev = udev_new();
    if (!udev) {
        fprintf(stderr, "Failed to create udev\n");
        return 1;
    }

    struct libinput *li = libinput_udev_create_context(&interface, NULL, udev);
    if (!li) {
        fprintf(stderr, "Failed to create libinput context\n");
        return 1;
    }

    if (libinput_udev_assign_seat(li, "seat0") != 0) {
        fprintf(stderr, "Failed to assign seat\n");
        return 1;
    }

    struct libinput_event *event;
    while (1) {
        libinput_dispatch(li);
        event = libinput_get_event(li);
        if (!event) {
            usleep(10000);
            continue;
        }

        if (libinput_event_get_type(event) == LIBINPUT_EVENT_KEYBOARD_KEY) {
            struct libinput_event_keyboard *k = libinput_event_get_keyboard_event(event);
            uint32_t key = libinput_event_keyboard_get_key(k);
            enum libinput_key_state state = libinput_event_keyboard_get_key_state(k);

            printf("Key %u is %s\n",
                   key,
                   state == LIBINPUT_KEY_STATE_PRESSED ? "PRESSED" : "RELEASED");
        }

        libinput_event_destroy(event);
    }

    libinput_unref(li);
    udev_unref(udev);
    return 0;
}
And to compile it:
gcc -o key_state key_state.c $(pkg-config --cflags --libs libinput libudev)But what about configuring devices, setting up things that we want to setup per device. Well, as we’ve said this is done in the upper stack since libinput has no configuration files, and we’ll cover this later. For now let’s just list a few of the things that can actually be configured.
- tap-to-click related, such as how many fingers are supported
- three-finger drag
- pointer acceleration profiles
- scrolling method natural vs traditional
- left-hand mode
- middle button emulation
- click method
- disable while typing (DWT)
- disable while trackpointing (DWTP)
- direct-input device calibration
- rotation confs (if touchpad is sideways)
- area confs
You can glimpse at these on X11 with the command xinput --list-props <device_id>
or at libinput list-devices which we’ve seen earlier that
should show the conf per-device:
Device:                  SYNA801A:00 06CB:CEC6 Touchpad
…
Group:                   1
Seat:                    seat0, default
Size:                    122x69mm
Capabilities:            pointer gesture
Tap-to-click:            disabled
Tap-and-drag:            enabled
Tap button map:          left/right/middle
Tap drag lock:           disabled
Left-handed:             disabled
Nat.scrolling:           disabled
Middle emulation:        disabled
Calibration:             n/a
Scroll methods:          *two-finger edge
Scroll button:           n/a
Scroll button lock:      n/a
Click methods:           *button-areas clickfinger
Clickfinger button map:  left/right/middle
Disable-w-typing:        enabled
Disable-w-trackpointing: enabled
Accel profiles:          flat *adaptive custom
Rotation:                n/a
Area rectangle:          n/a

// or another touchpad
Device:                  ETPS/2 Elantech Touchpad
…
Seat:                    seat0, default
Size:                    102x74mm
Capabilities:            pointer gesture
Tap-to-click:            disabled
Tap-and-drag:            enabled
Tap button map:          left/right/middle
Tap drag lock:           disabled
Left-handed:             disabled
Nat.scrolling:           disabled
Middle emulation:        disabled
Calibration:             n/a
Scroll methods:          *two-finger edge
Scroll button:           n/a
Scroll button lock:      n/a
Click methods:           *button-areas clickfinger
Clickfinger button map:  left/right/middle
Disable-w-typing:        enabled
Disable-w-trackpointing: enabled
Accel profiles:          flat *adaptive custom
Rotation:                n/a
Area rectangle:          n/a
That’s about it when it comes to libinput. Now we can move to more specific things in the upper stack.
Keyboard Specifics
We’re pretty much done with the lower part of the user-space stack, but
before moving on to the graphical library widgets and desktop environments,
let’s take some time to see some of the specific device handling that
are good to know about, namely keyboards, mice, and gamepads.
In this section we’ll see three important concepts related to keyboards:
scancodes to keycodes, console keyboard handling, and XKB.
Scancodes to Keycodes
Like other input drivers, the role of keyboard drivers is to translate
from raw hardware keys to events that can be normalized and interpreted by
user-space. We call the raw keys scancodes, and the events ones keycodes
(/usr/include/linux/input-event-codes.h). Keycodes are also mapped
to key symbols in user-space unrelated to their actual keycodes, which we
call keysyms.
For example, a scancode can look like a random hex 0x1E, a kernel-mapped
event as KEY_A, and a keysym will look like a symbol such as “a” or “A”.
We’ll talk more about keysyms mapping when we see XKB. But let’s focus on the scancodes to keycode translation for now.
When a keyboard input device registers itself in the input core
(input_register_device) it has to report which keycodes it supports
in its capabilities (keybit capability). In general it has to set its
keycode, keycodemax, and keycodesize fields, which are a map of
the translation of scancodes to keycodes.
These keymaps can either be full fledge dense keymap or sparse keymap,
which means they’re smaller and use less memory. The sparse keys are
mostly used when registering a few entries such as special keys that
don’t need huge arrays.
If a scancode isn’t found in these translation arrays, they’re often either completely ignored, or the driver returns that it’s an unknown key.
Keyboard input devices can also optionally implement two important
functions: getkeycode and setkeycode, which will by default retrieve
the current keymap and alter the current keymap respectively. Most drivers
fallback to the default mechanism, so this can be taken for granted.
Importantly, the evdev and kbd (console) handlers offer ways to call
these via ioctl interfaces, which will be propagated to the devices
they’re currently handling. For evdev it’s through EVIOCGKEYCODE and
EVIOCSKEYCODE, to get and set keycodes respectively. For the console
handler it’s through KDGETKEYCODE and KDSETKEYCODE. The exception
is that the console driver will propagate it to all handlers, and thus
indirectly to all devices on the platform.
You can also do the runtime patching of scancode to keycode
mapping through udev and hwdb by setting a device property in
ENV{KEYBOARD_KEY_<hex scan code>}=<key code identifier> which will in
turn be caught by systemd/src/udev/udev-builtin-keyboard.c and also
call the same ioctl interfaces.
For example:
ENV{KEYBOARD_KEY_b4}=dollar
To find out the actual scancodes the device is generating the showkey(1)
tool from the Linux Keyboard tools project, with the --scancodes flag,
will attach to the console handler and display them in raw mode. And the
setkeycodes(8) command from the same project will propagate it to the
driver via the console input handler.
There are multiple other tools used to do the keycode remapping such
as evmapd, evremap, evdevremapkeys, but these work at the evdev
layer and don’t know about scancodes. So for now, the simplest one to
do scancode to keycode mapping is obviously the built-in one: hwdb.
This mechanism for runtime modifications might save us time instead of getting our hands dirty and having to modify kernel drivers.
Console Keyboard
We’ve discussed the evdev handler extensively, however in the console
it’s the kbd input event handler (drivers/tty/vt/keyboard.c) that is
used, and it’s working in sync with the tty and line discipline mechanism.
This particular handler exposes its devices as TTYs in the infamous
/dev/ttyN and /dev/console (system) and handles all the messiness
of console text-mode input.
The input handlers coexist. When switching from graphical environment
to console, the VT kbd handler takes over.

Obviously, as a console input handler, the kbd handler has much more
work to do, and it has a lot of special handling via ioctl too. From
bell and tone, leds, setting console key rate, modifiers, interpreting
special keys that have meanings for the TTY, switching to other modes
such as raw input mode or graphic (X11, Wayland session), all the push
towards line discipline, etc.. It’s handling things that are often
handled in user-space (key rate is handled in the graphical stack too
as we’ll see). The reason: historical entangling, the console existed
before the graphical stack.
For instance, showkey(1) which we’ve just seen, relies on changing the
mode of the terminal via ioctl KDSKBMODE to K_RAW.
There are a bunch of commands to interface with the ioctl such as
kbdrate(8) to set the keyboard rate, kbdinfo(1) to get more info
about the kbd driver, and kbd_mode(1) to get the current keyboard mode
(raw, xlate, etc..)
[Keyboard hardware]
   ↓
[input driver: atkbd, hid-input]
   ↓
[input core]
   ↓
[keyboard.c handler (kbd_event)]
   ↓
[TTY layer (virtual console, ttyN)]
   ↓
[N_TTY line discipline]
   ↓
[read() by shell, echo, canonical editing, etc.]
Furthermore, since it’s taking a bigger role on handling scancode to
keycode, it also somewhat does keycode interpretation via its internal
keymap. That means, the kbd handler can be responsible of handling the
difference in regional keyboard layouts and special keys. This is
something which usually happens in XKB, in user-space, which we’ll see
in the next section.
Thus it has two sets of ioctl: KDSETKEYCODE and KDGETKEYCODE for
low-level scancodes to keycodes, and KDGKBENT and KDSKBENT for the
keycode to symbol/action mapping (internally also confusingly called
key_maps, as you’ll see everyone uses the word “keymap”).
The format of the keymaps translating keycode to symbol (keymaps(5))
is managed by the kernel for each console, but usually more
easily set with user-space tools also from the Linux keyboard
tools project. For example loadkeys(1) and
dumpkeys(1). These can rely on files in /usr/share/kbd/keymaps/
for a predefined set of keymaps. Let’s also mention that the default
one is found in /usr/src/linux/drivers/tty/vt/defkeymap.map.
Before we end, let’s mention systemd-localed.service(8) and its
localectl(1) command. It is used to set the keyboard map for
both the console and the graphical environment (XKB in X11 as we’ll see)
based on the current locale. For example, it sets the keymap,
font, and others, of the console and X11 XKB to the value found in
/etc/vconsole.conf (see vconsole.conf(5)) through its service called
systemd-vconsole-setup(8), which is also called when the console is
initialized with udev. It can also help in setting the same values in
both the console and graphical stack.
Here’s vconsole.conf:
KEYMAP=us
XKBLAYOUT=us
> localectl
System Locale: LANG=en_US.UTF-8
VC Keymap: us
X11 Layout: us
NB: Terminal emulators don’t rely on the console input handler at all,
they use pseudo-terminals instead (PTYs). These don’t have VGA console,
nor plug to the kbd handler, nor screen, etc.. They are fed entirely by
user-space programs.
Example:
Line discipline <-> TTY driver (PTY slave side) <-> user process
`-> PTY master side <-> xterm process
See this old article for more details on that.
> cat /proc/consoles
tty0 -WU (EC p ) 4:2
> cat /proc/tty/drivers
/proc/tty/drivers
/dev/tty /dev/tty 5 0 system:/dev/tty
/dev/console /dev/console 5 1 system:console
/dev/ptmx /dev/ptmx 5 2 system
/dev/vc/0 /dev/vc/0 4 0 system:vtmaster
serial /dev/ttyS 4 64-95 serial
pty_slave /dev/pts 136 0-1048575 pty:slave
pty_master /dev/ptm 128 0-1048575 pty:master
unknown /dev/tty 4 1-63 console
Now let’s see how the keycode to keysym is done in user-space in the graphical stack with XKB.
XKB
XKB, or X keyboard, is a common library (xkbcommon, xkbregistry,
xkbcompose) with a set of tools, an X11 protocol extension (X
Keyboard Extension), and a database collection of descriptions
(xkeyboard-config). Its role is to handle the keycode to keysym
translation in user-space.
While the name includes “X”, the common library and database are not only
used by Xorg but by most software, including graphical widgets such as
GTK and Qt, and Wayland compositors. We won’t cover the older X protocol
extension here, yet the reason why there’s an “X” in the name is that
it started as an extension and then got separated into a common library.
The two things we’ll focus on are xkbcommon, the xkb core engine that parse and executes XKB definitions, and the xkeyboard-config, which is a project compiling a database of keyboard info, layouts, variants, symbols, and rules. They work together.
As a word of notice, XKB is one of the most complex piece of software I’ve
encountered and its documentation is fiercely lacking and dispersed. It
has its own language, compiler, and the format is extremely convoluted
and inconsistent, often mixing camel case and snake case for no apparent
reasons.
Even in the XKB documentation we find such comments:
Todo
Explain how to configure XKB, with examples
Due to the complexity of the format, this document is still is construction.
And internally Xorg devs called it “X Kitten Butcher”.
We’ll try to make it approachable, and break the bad spell. However, if you ever want more info check the official format.
In order to perform the translation from keycodes coming from event handlers to actual symbols, XKB relies on something called an XKB keymap (yes everything is called a keymap). This XKB keymap is a compilation of different components coming from the xkeyboard-config database that are chosen based on the abstract, and more coherent, concept of layout, variants, models, and options the user pick: “RMLVO”.
After this is picked, the XKB client software just has to keep track of
what’s called a state, and then send it along with the received keycode
to receive back the keysym.
A very basic example looks like this:
// create a complete keymap from the xkeyboard-config db
struct xkb_keymap *keymap;
// .. and a state object to keep track of what special state we're in
// that could affect the keysym output
struct xkb_state *state;
…
state = xkb_state_new(keymap);
xkb_state_update_key(state, keycode,
pressed ? XKB_KEY_DOWN : XKB_KEY_UP);
xkb_keysym_t sym = xkb_state_key_get_one_sym(state, keycode);The XKB state object tracks what affects the output of keycode to keysym, things like modifiers and groups. This example doesn’t mention the idea of key composing, but we’ll come back to it.
This is important to understand, since you can either have XKB handle
what happens in a specific state when a key is pressed, or do it from
the client side. For example, a client can choose to catch all Ctrl keys
and interpret Ctrl+h as backspace, or leave it up to XKB with a custom
mechanism to know what Ctrl+h means, and the client will receive back
the keysym for backspace directly, with no special handling from its side.
Yet, the downside is that this key combination will apply to everyone
that relies on this XKB keymap.
Before moving forward, we need a little baggage of definitions, and understanding, otherwise nothing will make sense.
- evdev keycodes: the events coming from evdev, the ones listed in
/usr/include/linux/input-event-codes.h - XKB keysyms: Actual symbols (or dead key), actions, and special keys
that XKB will return, they exist in
/usr/include/xkbcommon/xkbcommon-keysyms.h - Modifier states (modes, locks, latches): A value that is internally seen as a modifier and often set or unset, lock or unlocked, when a modifier symbol is activated. These are kept in a list of all modifiers present (some by default, some added as virtual) that affect the processing of other keys.
- Geometry: The physical layout of a keyboard, what it looks like and where the keys are
- Levels and Groups: Levels is another state a key could be in when you press a modifier. For example, it’s expected that pressing shift with “a” will output “A”, upper case “A” is the level 2 of what happens when pressing the key. A Group is similar but it completely switches the whole keyboard to another key mapping, as if you switched variants.
As you can imagine, there’s a lot at play with levels, groups, modifiers, and actions that can happen, and that’s apart from the basic idea of keycodes to keysym.
Even when it comes to keysym, the translation isn’t straight away. XKB
relies on intermediary objects.
XKB keycodes are not straight up evdev keycodes, but
evdev keycodes + 8. Why 8, someone might ask. Well, the only answer
is backward compatibility from before evdev was a thing, and it’s
still there.
Furthermore, XKB converts these keycodes into physical key
positions values that are compatible with ISO/IEC 9995-1. So we
move from evdev keycodes, to XKB keycodes, to physical abstract
position on a keyboard layout. This is what happens in the keycode
component files under /usr/share/xkeyboard-config-2/keycodes/. Keycodes
have this form within <...> tags. For example:
<TLDE> = 49;
<AE01> = 10;
<AE02> = 11;
<AE03> = 12;
<AE04> = 13;
<AE05> = 14;
<AE06> = 15;
<AE07> = 16;
<AE08> = 17;
<AE09> = 18;
<AE10> = 19;
<AE11> = 20;
<AE12> = 21;
<BKSP> = 22;
Remember “49”, “10”, “11” are equivalent to evdev:
#define KEY_GRAVE 41
#define KEY_1 2
#define KEY_2 3
#define KEY_3 4
#define KEY_4 5
#define KEY_5 6
#define KEY_6 7
#define KEY_7 8
#define KEY_8 9
#define KEY_9 10
#define KEY_0 11
#define KEY_MINUS 12
#define KEY_EQUAL 13
#define KEY_BACKSPACE 14
Or basically the first row from ISO/IEC 9995-1 on a keyboard.
To make it easier for users to pick an XKB keymap, without having to know much details, the idea of picking only RMLVO, Rules-Model-Layout-Variant-Options, was invented. This is an abstraction on top to pick the components that make up a keymap, and thus come up with the right keyboard behavior expected by the user. This is managed by the XKB registry, which graphical environments interact with, this is what is shown to the user when they’re asked about picking their keyboard layout, the list of possible layouts and variants on those layouts, along with special options.
- Model – the name of the model of your keyboard
- Layout – the layout(s) you intend to use (usually refer to country code)
- Variant – the variant(s) of the layout(s) you intend to use (minor and national variants)
- Options – extra XKB configuration options to customize the standard layout. For example to change modifier keys.
To know what’s actually picked as the final keymap, what’s called KcCGST,
we can run xkbcli. For example, for a dvorak keyboard, or a normal
qwerty keyboard:
> xkbcli compile-keymap --kccgst \
--layout us \
--variant dvorak \
--options terminate:ctrl_alt_bksp
xkb_keymap {
xkb_keycodes { include "evdev+aliases(qwerty)" };
xkb_types { include "complete" };
xkb_compat { include "complete" };
xkb_symbols { include "pc+us(dvorak)+inet(evdev)+terminate(ctrl_alt_bksp)" };
xkb_geometry { include "pc(pc105)" };
};
> xkbcli compile-keymap --kccgst \
--layout us \
--variant qwerty \
--options terminate:ctrl_alt_bksp
xkb_keymap {
xkb_keycodes { include "evdev+aliases(qwerty)" };
xkb_types { include "complete" };
xkb_compat { include "complete" };
xkb_symbols { include "pc+us(qwerty)+inet(evdev)+terminate(ctrl_alt_bksp)" };
xkb_geometry { include "pc(pc105)" };
};We’ll revisit the RMLVO, let’s just say it’s all about what the “rule” part refers to: a lookup table with rules mapping the abstract names to the components of the keymaps which are called KcCGST.
To find your layout and visualize it you can check the gallery here and the analyzer here.
KcCGST, or the Keycodes, Compat, Geometry, Symbols, Types, are the component parts of an XKB keymap. This is the actual functional XKB configuration that is used behind the RMLVO easy facade. In general, XKB considers it an implementation detail and pushes for users to favor configuring XKB through RMLVO. Yet, it’s the core of XKB!
The resolution of the RMLVO will create a complete keymap, a self-contain object that has all the related KcCGST components assembled together. This complete XKB keymap is what is used by the clients.
To get a quick glimpse at what a full resolved keymap looks like, try this command:
> xkbcli compile-keymap --layout us --rules evdev
Or for a more compact one, look again at the command such as the one we just did before:
> xkbcli compile-keymap --kccgst --layout us --options terminate:ctrl_alt_bksp
xkb_keymap {
xkb_keycodes { include "evdev+aliases(qwerty)" };
xkb_types { include "complete" };
xkb_compat { include "complete" };
xkb_symbols { include "pc+us+inet(evdev)+terminate(ctrl_alt_bksp)" };
xkb_geometry { include "pc(pc105)" };
};Let’s go over these components and explain them.
First of, the KcCGST configurations that come from the keyboard-config project are often found in the following places in reverse order of precedence, with the component bundled underneath:
/usr/share/X11/xkb,$XKB_CONFIG_ROOT,/usr/share/xkeyboard-config-2//etc/xkb$XKB_CONFIG_EXTRA_PATH$HOME/.xkb$HOME/.config/xkb
Most of the components have a useful utility. That’s apart from the geometry, which is a complex file used to describe what a keyboard physical layout looks like. It’s not used in the latest xkbcommon mechanism though, so we’ll skip explaining it.
The XKB configuration format has types: string, numbers, key positions, and keysym:
"hello","%S/pc"42,134<AE12>,<BKSP>percent,a,A
It also has many special keywords, and some structure format. The main structural format is called a component, basically the components of the KcCGST. Each XKB conf file is an aggregation of multiple of these components. They have the form:
<generic_flags> <symbols_flags> <xkb_componentname> "<name>" {
// body
};
// Example
default partial alphanumeric_keys modifier_keys
xkb_symbols "basic" {
// body
};The generic flags can be one or many of these:
default: One of these “variant” per component file, the default values to be usedpartial: To be used in another confhidden: Only used internally within the file’s scope
And the symbols flags can be one or many of these:
alphanumeric_keysmodifier_keyskeypad_keysfunction_keysalternate_group
The symbols flags are mostly metadata and don’t affect the XKB processing. They’re indicators of what the component configuration covers, and if none are present it’s assumed it covers a complete keyboard.
Let’s start with the most important keywords, the ones used to import
and merge files together, we’ve seen the include. It works by finding
the file of the same component with the specified name, if it exists
in any of the valid conf paths (or if explicitly mentioned with string
substitution shorthands), and then look for the variants inside or the
default value if none are passed: include "file(variant)".
The include will override any information that already exists:
that is if new values are undefined it will keep the old one, but new
defined values will always override old ones. To avoid this, the augment
"file(variant)" should be used instead, it will update the properties
that are undefined, but keep the defined ones (it’s the reverse). Another
option is the replace "file(variant)" which will, as the name implies,
completely replace the full properties, regardless if some elements are
defined or not.
This “merge resolution” mechanism also applies to values within the
components objects, which can be tagged with augment, override,
replace, too.
As for files, a shorthand exists to have a single statement with multiple includes concatenated. In this case the following merge mode prefixes are used:
+selects the override merge mode (default).|selects the augment merge mode.^selects the replace merge mode.
So you can now understand why the following line we’ve seen works, and how it creates an inheritance mechanism, plugging multiple files together:
xkb_symbols { include "pc+us+inet(evdev)+terminate(ctrl_alt_bksp)" };Let’s now explain what each component does, and wrap up with how the rules mechanism of the RMLVO then resolves them into an XKB full keymap.
The keycodes file is the most obvious one and the first entry-point for XKB logic, it translates from XKB keycodes to the physical codes ISO/IEC 9995-1. The syntax of the components looks something like this:
default xkb_keycodes "mykeycode" {
// defining the range
minimum = 8;
maximum = 255;
// mapping of keycodes to layout keys
<TAB> = 23;
<AD01> = 24;
<AD02> = 25;
<AD03> = 26;
<AD04> = 27;
<AD05> = 28;
<AD06> = 29;
<BKSL> = 51;
<RTRN> = 36;
// making one physical key name equivalent to another
alias <LatQ> = <AD01>;
alias <LatW> = <AD02>;
alias <LatE> = <AD03>;
alias <LatR> = <AD04>;
alias <LatT> = <AD05>;
alias <LatY> = <AD06>;
// these are for LEDs, not always used by clients
indicator 1 = "Caps Lock";
indicator 2 = "Num Lock";
indicator 3 = "Scroll Lock";
};The syntax is straight forward, it’s a couple of assignment, with the possibility to have aliases, and giving names to LEDs, indicators, which aren’t really leds afaik but keys that lock or latch. By convention it explicitly names special keys, but other keys as their ISO positions.
Here’s a standard keyboard with its key positions:
 Courtesy from https://www.charvolant.org/doug/xkb/html/img3.png
Let’s move to the types component. This is where the information about levels, and how to switch between them is defined.
virtual_modifiers NumLock;
type "ONE_LEVEL" {
modifiers = None;
map[None] = Level1;
level_name[Level1] = "Any";
};
type "TWO_LEVEL" {
modifiers = Shift;
map[Shift] = Level2;
level_name[Level1] = "Base";
level_name[Level2] = "Shift";
};
type "ALPHABETIC" {
modifiers = Shift + Lock;
map[Shift] = Level2;
map[Lock] = Level2;
level_name[Level1] = "Base";
level_name[Level2] = "Caps";
};
// override ALPHABETIC Shift will cancel capslock
override type "ALPHABETIC" {
modifiers = Shift + Lock;
map[Shift] = Level2;
preserve[Lock] = Lock;
level_name[Level1] = "Base";
level_name[Level2] = "Caps";
};
// override ALPHABETIC, Shift will ignore capslock
override type "ALPHABETIC" {
modifiers = Shift;
map[Shift] = Level2;
level_name[Level1] = "Base";
level_name[Level2] = "Caps";
};
// CapsLock acts as Shift with locking, Shift does not cancel CapsLock.
type "ALPHABETIC" {
modifiers = Shift + Lock;
map[Shift] = Level2;
map[Lock] = Level2;
map[Shift+Lock] = Level2;
level_name[Level1] = "Base";
level_name[Level2] = "Caps";
};The syntax here is more cumbersome. Firstly, there are some definition
lines. In each type entry (which can be prepended with merge syntax
like anything else in this syntax really) of the form type "name",
we have to define the modifiers that will be used as such:
modifiers = Shift + Lock;The +, is just a separator here.
If the modifiers modes are not the built-in XKB ones, then those
virtual modifiers also need to be defined, as-in tagged like a variable
definition, earlier in the scope, that’s why you see multiple times in
the same file these sort of lines:
virtual_modifiers NumLock;After defining the modifiers that are used for that type, we have a series of mapping to define the combination and what levels these will achieve.
map[Shift] = Level2;
map[Lock] = Level2;
map[Shift+Lock] = Level2;The syntax is also straight forward, it’s a list of mapping from a
combination of modifiers to the LevelX it will take the keysym to.
Afterward, we have a naming section, which is there only for the metadata information, to give names to levels:
level_name[Level1] = "Base";
level_name[Level2] = "Caps";The only tricky part is the preserve keyword:
preserve[Lock] = Lock;This has to do with how XKB consumes modifiers as it processes types
and outputs keysyms, its internal list of effective modifiers. Simply
said, without the preserve when the keysym is sent back to the client
(xkb_state_key_get_one_sym) the state object doesn’t consume the
modifier, so the client can inspect the list of modifiers for further
special handling (that’s why we define virtual modifiers otherwise they
wouldn’t be in the list).
The logic within XKB clients looks something like this:
xkb_mod_mask_t mods = xkb_state_serialize_mods(state, XKB_STATE_MODS_EFFECTIVE);
xkb_mod_mask_t consumed = xkb_state_key_get_consumed_mods2(state, keycode, XKB_CONSUMED_MODE_XKB);
xkb_mod_mask_t unconsumed_mods = mods & ~consumed;That’s useful for layout where you have, let’s say Greek letters for
Level1 and Level2, and at Level3 and Level4 there are the usual Latin
letters. So you’d want to preserve Ctrl and Shift, so that the
application can catch Ctrl+c for example, which would be in Level3
(Latin lower-case).
I’ve added different versions of the ALPHABETIC type in the example,
and how the capslock and shift combinations can affect letters.
Later on we’ll see how we assign the levels logic to symbols and compatibility logic, but let’s just say that XKB will categorize keys with a heuristic and assign them to default types if no other types were explicitly chosen. These are:
"ONE_LEVEL": When there are only one level change for the keysym"TWO_LEVEL": When there are exacly two levels change for the keysym"ALPHABETIC": When the keysym is alphabetic and has two levels"KEYPAD": For keypad keys of any level (two usually)"FOUR_LEVEL_ALPHABETIC","FOUR_LEVEL_SEMIALPHABETIC", 3 to 4 keysym"FOUR_LEVEL": When nothing else matches
The next component is the XKB compatibility, which is used to translate
key combinations into action statements. Actions can also be attached
directly in the XKB symbols component for each key, however it’s done in
the compatibility layer because it has a mechanism for generic pattern
matching of keysym combinations, so we don’t have to repeat the same
things in different places.
The actions that can be done in the XKB compatibility are varied
from latching/unlatching/locking/unlocking modifiers modes, changing level,
switching group, etc.. Many of these actions, however, only make sense in
combination with the XKB symbols component, so keep that in mind for now.
A compatibility map looks something like:
default xkb_compatibility "basic" {
virtual_modifiers NumLock,AltGr;
...
interpret.repeat= False;
setMods.clearLocks= True;
...
interpret Shift_Lock+AnyOf(Shift+Lock) {
action= LockMods(modifiers=Shift);
};
...
group 2 = AltGr;
...
indicator.allowExplicit= False;
...
indicator "Caps Lock" {
whichModState= Locked;
modifiers= Lock;
};
...
};
default partial xkb_compatibility "pc" {
// Sets the "Alt" virtual modifier.
virtual_modifiers Alt;
setMods.clearLocks= True;
interpret Alt_L+Any {
virtualModifier= Alt;
action = SetMods(modifiers=modMapMods);
};
interpret Alt_R+Any {
virtualModifier= Alt;
action = SetMods(modifiers=modMapMods);
};
};This has many components, the interpret sections to map keys to actions,
the virtual modifier definitions, indicators, repeat behavior of keys,
and more. The important part is the interpret section which matches
keysym along with a modifier (AnyOfOrNone, AnyOf, Any, NoneOf,
AllOf, Exactly). The body of the interpret can also be more specific
by setting values of useModMapMods to match a certain level.
Default values to params can be set globally such as setMods.clearLocks,
which affects how SetMods and other mods actions behave.
The list of possibilities and actions within the compatibility is
too long to explain here, the list is extensive and can be found
here.
Let’s move to the keysym or symbol component, which as you would
have guessed, finally maps physical keys in ISO location format to
symbols. These files are often named after countries or languages or
specific features, us, jp, group.
partial alphanumeric_keys
xkb_symbols "basic" {
name[Group1]= "US/ASCII";
key <ESC> { [ Escape ] };
...
key <TLDE> { [ quoteleft, asciitilde ] };
key <AE01> { [ 1, exclam ] };
...
modifier_map Shift { Shift_L, Shift_R };
...
};It first has a metadata name in the name[GroupX] = "Symbols Name"
property, which can also be used to find which groups the symbols
belong to.
This is also where modifiers can possibly be mapped to actual keys with
the modifier_map VIRTUAL_MOD { Symbol1, Symbol2}, but that could also
indirectly be done in the compatibility file too by “interpret” and
setting some modifiers as locked/unlocked/set/unset in the modifier list.
And obviously, that’s where the key <VAL> are mapped to list of groups
within {}, and levels within [].
key <TLDE> { [ quoteleft, asciitilde ] };This means the physical key <TLDE>, in level1 will output a left quote
(backtick), and in level2 will output the tilde character.
Additionally, we can also specify within the curly brackets whether a specific type should be used instead of the default matching one:
key <AE05> { [parenleft, 1, EuroSign], type[Group1] = "FOUR_LEVEL_ALPHABETIC" };Similarly, the actions can be assigned here instead of in the compatibility component, and the groups can also be explicitly expressed with the syntax:
key <LALT> {
symbols[Group1]=[Alt_L],
actions[Group1]=[SetMods(modifiers=modMapMods)]
};That all should cover the KcCGST component syntax. It’s very long already, I know, yet it barely covers the basics. Let’s see a few examples to grasp the concepts.
In symbol/group we have:
// The left Alt key (while pressed) chooses the next group.
partial modifier_keys
xkb_symbols "lswitch" {
key <LALT> {[ Mode_switch, Multi_key ]};
};And in compat/basic we have these interpret:
interpret Mode_switch {
action= SetGroup(group=+1);
};The Multi_key maps to a compose key in compat/ledcompose:
interpret Multi_key+Any {
virtualModifier= Compose;
action = LatchMods(modifiers=modMapMods);
};
indicator "Compose" {
allowExplicit;
whichModState= Latched;
modifiers= Compose;
};We’ll see in a bit how compose works.
Another example setting <LWIN> to Super_L which sets Mod3 modifier.
xkb_compatibility {
interpret Super_L { action = SetMods(modifiers=Mod3); };
}
xkb_symbols {
key <LWIN> { [ Super_L ] };
modifier_map Mod3 { Super_L };
}Here’s another example swapping the top row numbers on shift:
default partial alphanumeric_keys
xkb_symbols "basic" {
include "us(basic)"
name[Group1]= "Banana (US)";
key <AE01> { [ exclam, 1] };
key <AE02> { [ at, 2] };
key <AE03> { [ numbersign, 3] };
key <AE04> { [ dollar, 4] };
key <AE05> { [ percent, 5] };
key <AE06> { [ asciicircum, 6] };
key <AE07> { [ ampersand, 7] };
key <AE08> { [ asterisk, 8] };
key <AE09> { [ parenleft, 9] };
key <AE10> { [ parenright, 0] };
key <AE11> { [ underscore, minus] };
key <AE12> { [ plus, equal] };
};
// Same as banana but map the euro sign to the 5 key
partial alphanumeric_keys
xkb_symbols "orange" {
include "banana(basic)"
name[Group1] = "Banana (Eurosign on 5)";
include "eurosign(5)"
};Here’s a symbol component which replaces key “B” to have a third level activated with the right alt to display a broccoli.
partial alphanumeric_keys
xkb_symbols "broccoli" {
include "us(basic)"
name[Group1] = "Broccoli";
key <AD05> { [ b, B, U1F966 ]}; // 🥦
include "level3(ralt_switch)"
};NB: XKB has keysym to allow controlling the mouse pointer from the keyboard, this can be useful if clients actually understand these keysym and act on them.
It’s fine and all but we need the RMLVO so that the users can actually
use the keymap properly without bothering with all that we’ve seen.
The rules are in the rules directory as simple files without extensions,
and are accompanied with two listing files for GUI selectors: *.lst
and *.xml that follow the xkb.dtd in the same directory. The listing
files are simply listing all the models, variants, layouts, and options
available, nothing more, and are used by the XKB registry library. That’s
in turn used by GUI selectors.
The logic exists within the rules files, that have this sort syntax:
! include %S/evdev
! option = symbols
custom:foo = +custom(bar)
custom:baz = +other(baz)
// One may use multiple MLVO components on the LHS
! layout option = symbols
be caps:digits_row = +capslock(digits_row)
fr caps:digits_row = +capslock(digits_row)The full syntax grammar looks like this:
File ::= { "!" (Include | Group | RuleSet) }
Include ::= "include" <ident>
Group ::= GroupName "=" { GroupElement } "\n"
GroupName ::= "$"<ident>
GroupElement ::= <ident>
RuleSet ::= Mapping { Rule }
Mapping ::= { Mlvo } "=" { Kccgst } "\n"
Mlvo ::= "model" | "option" | ("layout" | "variant") [ Index ]
Index ::= "[" ({ NumericIndex } | { SpecialIndex }) "]"
NumericIndex ::= 1..XKB_MAX_GROUPS
SpecialIndex ::= "single" | "first" | "later" | "any"
Kccgst ::= "keycodes" | "symbols" | "types" | "compat" | "geometry"
Rule ::= { MlvoValue } "=" { KccgstValue } "\n"
MlvoValue ::= "*" | "<none>" | "<some>" | "<any>" | GroupName | <ident>
KccgstValue ::= <ident> [ { Qualifier } ]
Qualifier ::= ":" ({ NumericIndex } | "all")We won’t go into details, but basically it has lines starting with !
that set certain MLVO values and then map them to KccgstValue specific
component values. There are also variable names that can be defined
as shorthand for multiple values with $var = val1 val2, and there
are string substitutions starting with %. More info can be found
here.
So we’ve got the full scope now of RMLVO to KcCGST, the big picture!
We didn’t discuss another sub-feature of XKB called composing, or the
compose key processor. We didn’t mention it because the configuration
doesn’t come with the xkeyboard-config project. It’s loaded independently
by clients that want to perform composition.
For X11 the configuration is found under /usr/share/X11/local/*/Compose
and compose.dir, and the home directory in ~/.XCompose. The
content of this directory is mostly deprecated apart from the compose
definitions, which follows the XKB_COMPOSE_FORMAT_TEXT_V1 format (see
Compose(5)). It’s a simple format that looks like this:
<Multi_key> <e> <'> : "é" U00E9
<Multi_key> <'> <e> : "é" U00E9
<Multi_key> <o> <slash> : "ø" U00F8
<Multi_key> <s> <s> : "ß" U00DF
As you can see, this is the <Multi_key> keysym we’ve talked about in
an earlier example, this is where it’s interpreted.
After editing any of the files, the syntax can be validated with xkbcli
compile-compose.
The way the file is used is that clients will pass it to the XKB compose parser to get an in-memory table of it. Then the client keeps the compose state, just like the modifier state, and plug it in the main interaction with XKB we’ve seen earlier. Like this:
// 1. Load compose table (locale-dependent)
struct xkb_compose_table *table =
xkb_compose_table_new_from_locale(ctx, getenv("LANG"),
XKB_COMPOSE_COMPILE_NO_FLAGS);
// 2. Create a compose state
struct xkb_compose_state *compose =
xkb_compose_state_new(table, XKB_COMPOSE_STATE_NO_FLAGS);
// 3. For each key press:
xkb_keysym_t sym = xkb_state_key_get_one_sym(state, keycode);
xkb_compose_feed_result res = xkb_compose_state_feed(compose, sym);
// Feed all keysyms into the compose engine:
xkb_compose_state_feed(compose_state, sym);
// 4. Check compose status
switch (xkb_compose_state_get_status(compose_state)) {
case XKB_COMPOSE_COMPOSED:
composed_sym = xkb_compose_state_get_one_sym(compose_state);
// Use composed_sym; DO NOT use 'sym'
// char buf[64];
// xkb_compose_state_get_utf8(compose_state, buf, sizeof(buf));
// printf("→ composed result: %s\n", buf);
break;
case XKB_COMPOSE_CANCELLED:
// Typically fall back to original sym
break;
case XKB_COMPOSE_COMPOSING:
// Wait for next key
break;
case XKB_COMPOSE_NOTHING:
// No composition; use raw 'sym'
break;
}
// otherwise
// xkb_state_key_get_utf8So, to make key composing work, it’s all dependent on the client, be it in X11 or Wayland. In general widget/toolkit libraries, and Xlib, does it out-of-the-box and/or easily for us.
Finally, let’s review how to interface with XKB from the command line.
There are a couple of X11 bound, and deprecated legacy, commands such as:
xmodmap(pre-XKB even)setxkbmapxkbcompxevxkbprintxkbevd
They will not work on Wayland since they rely on the XKB X11 specific proto (XKM binary format and others), but are still good to debug certain behavior on X11, and to directly interface with X11 to configure XKB interpretation on the fly, since obviously it’s these software that rely on the library and load the appropriate configurations.
The main interaction these days should all pass through xkbcli and
its subcommands. It comes with a few handy man pages:
xkbclixkbcli-listxkbcli-dump-keymap-x11xkbcli-dump-keymap-waylandxkbcli-interactive-x11xkbcli-interactive-waylandxkbcli-compile-composexkbcli-how-to-typexkbcli-compile-keymapxkbcli-interactive-evdev
> xkbcli how-to-type 'P'
keysym: P (0x0050)
KEYCODE KEY NAME LAYOUT LAYOUT NAME LEVEL# MODIFIERS
33 AD10 1 English (US) 2 [ Shift ]
33 AD10 1 English (US) 2 [ Lock ]
> xkbcli compile-keymap --kccgst --layout us --options terminate:ctrl_alt_bksp
xkb_keymap {
xkb_keycodes { include "evdev+aliases(qwerty)" };
xkb_types { include "complete" };
xkb_compat { include "complete" };
xkb_symbols { include "pc+us+inet(evdev)+terminate(ctrl_alt_bksp)" };
xkb_geometry { include "pc(pc105)" };
};To list the whole RMLVO possible values from the registry:
> xkbcli list
Print current RMLVO:
> xkbcli compile-keymap --rmlvo
rules: "evdev"
model: "pc105"
layout: "us"
variant: ""
options: ""
A nice debugging trace for a compose example alt+'+e that outputs “é”.
> xkbcli interactive-x11 --enable-compose --multiline
------------
key down: 0x06c <RALT>
layout: depressed: 0
latched: 0
locked: 0 "English (US)"
effective: 0 "English (US)"
key: 0 "English (US)"
modifiers: depressed: 0x00000000
latched: 0x00000000
locked: 0x00000010 Mod2 NumLock
effective: 0x00000010 Mod2 NumLock
level: 0
raw keysyms: Multi_key
compose: pending
LEDs: 1 "Num Lock"
------------
key up: 0x06c <RALT>
------------
key down: 0x030 <AC11>
layout: depressed: 0
latched: 0
locked: 0 "English (US)"
effective: 0 "English (US)"
key: 0 "English (US)"
modifiers: depressed: 0x00000000
latched: 0x00000000
locked: 0x00000010 Mod2 NumLock
effective: 0x00000010 Mod2 NumLock
level: 0
raw keysyms: apostrophe
compose: pending
LEDs: 1 "Num Lock"
------------
key up: 0x030 <AC11>
------------
key down: 0x01a <AD03>
layout: depressed: 0
latched: 0
locked: 0 "English (US)"
effective: 0 "English (US)"
key: 0 "English (US)"
modifiers: depressed: 0x00000000
latched: 0x00000000
locked: 0x00000010 Mod2 NumLock
effective: 0x00000010 Mod2 NumLock
level: 0
raw keysyms: e
composed: eacute "é" (U+00E9, 1 code point)
LEDs: 1 "Num Lock"
------------Let’s note I have these confs:
// in symbols
key <RALT> {
type= "TWO_LEVEL",
symbols[1]= [ Multi_key, Multi_key ]
};
// in Compose
<Multi_key> <apostrophe> <e> : "é" eacute # LATIN SMALL LETTER E WITH ACUTEThere are additional third party projects such as klfcAUR to compile
layouts from JSON.
Probably the most impressive is how you can rely on the geometry and print it as a PDF, this only works with the legacy tools though:
> setxkbmap -print | xkbcomp -xkm - - | xkbprint - - | ps2pdf - mymap.pdf
Another thing that is interesting to know is that the XKB
keymap can be converted to Console keymap with scripts such as the
setupcon(1)
which relies on ckbcomp and others, and will read confs from /etc/default/keyboard.
Obviously, let’s not forget to mention localectl(1) to interface with
systemd-localed.service(8) that is the newer version of
setupcon(1). It’s sort of a big wrapper over other tools and behavior
to automate things.
> localectl
System Locale: LANG=en_US.UTF-8
    VC Keymap: us
   X11 Layout: us
We’ll see how it sets it in X11, but let’s just say it can be used to list keymaps:
> localectl list-keymaps
There are also the options list-x11-keymap-models,
list-x11-keymap-layouts, list-x11-keymap-variants [LAYOUT],
list-x11-keymap-options.
And to set it with set-x11-keymap. However it always tries to convert
the XKB keymap to console keymap whenever it can, if you don’t want that
behavior, you should add this option:
> localectl set-x11-keymap --no-convert keymap
Let’s end on a funny note to wrap things up about XKB. Yubikeys work by
simulating keyboards, and thus they have to anticipate a very specific
layout and variant, otherwise inserting a Yubikey would output the
wrong values. To skip this, there are udev device properties (ENV{}
set from hwdb) called XKB_FIXED_LAYOUT and XKB_FIXED_VARIANT that
need to be set and respected by the clients of libxkbcommon.
From 60-keyboard.hwdb:
# Yubico Yubico Yubikey II
evdev:input:b0003v1050p0010*
# Yubico Yubikey NEO OTP+CCID
evdev:input:b0003v1050p0111*
# Yubico Yubikey NEO OTP+U2F+CCID
evdev:input:b0003v1050p0116*
# OKE Electron Company USB barcode reader
evdev:input:b0003v05FEp1010*
 XKB_FIXED_LAYOUT=us
 XKB_FIXED_VARIANT=
Here’s a summary of what was discussed in the XKB stack:

Pointer Specifics
We’ve seen a lot of complex keyboard specific input behavior, let’s dabble a bit with pointer devices now, from mice to touchpads.
Types of Touchpads
Let’s mention a few definitions.
In general we call a pointer the representation of the input device,
and the cursor the drawn icon representation.
We have clickpads, a touchpad that has no separate buttons, but
that is all clickable. The behavior then depends on where the click
happens. Meanwhile, forcepads are like clickpads but they don’t have
any buttons and instead will vibrate when pressed. Lastly, trackpoints
are the little balls/nudge in the middle of the keyboard of Thinkpads,
they’re tagged in udev/hwdb with ID_INPUT_POINTINGSTICK property.
Device:                  TPPS/2 Elan TrackPoint
trackpoint: the nudge of thinkpads

    # Name: TPPS/2 Elan TrackPoint
    # ID: bus 0x0011 vendor 0x0002 product 0x000a version 0x0063
    # Supported Events:
    # Event type 0 (EV_SYN)
    # Event type 1 (EV_KEY)
    #   Event code 272 (BTN_LEFT)
    #   Event code 273 (BTN_RIGHT)
    #   Event code 274 (BTN_MIDDLE)
    # Event type 2 (EV_REL)
    #   Event code 0 (REL_X)
    #   Event code 1 (REL_Y)
    # Properties:
    #    Property 0 (INPUT_PROP_POINTER)
    #    Property 5 (INPUT_PROP_POINTING_STICK)

    properties:
    - ID_INPUT=1
    - ID_INPUT_MOUSE=1
    - ID_INPUT_POINTINGSTICK=1
driver:psmouse
As you can see from the above, the trackpoint also has attached to it some physical buttons, they’re the ones above the Thinkpad touchpad. It’s in between a mouse and a touchpad.
There are internal touchpads and external touchpads. The external
touchpads don’t get turned off when the lid is closed, nor disabled
while typing. A graphic tablet such as a wacom device is effectively an
external touchpad.
This information can be embedded in a udev device property called
ENV{ID_INPUT_TOUCHPAD_INTEGRATION}, and set to either “external” or
“internal”. This is part of the hwdb, out-of-the-box:
 ~ > udevadm info /dev/input/event11
P: /devices/platform/i8042/serio1/input/input11/event11
M: event11
….
N: input/event11
E: DEVNAME=/dev/input/event11
…
E: SUBSYSTEM=input
E: ID_INPUT=1
E: ID_INPUT_TOUCHPAD=1
E: ID_INPUT_WIDTH_MM=101
E: ID_INPUT_HEIGHT_MM=73
…
E: ID_INPUT_TOUCHPAD_INTEGRATION=internal
Last interesting fact is that some touchpad can have capacitive touch,
that means they can detect the finger in a range above the touchpad,
hovering in proximity. This is the BTN_TOOL_FINGER in contrast to
BTN_TOUCH, but they often come together and so you have to discern if
it’s a real touchdown or not. For MT there’s also ABS_MT_PRESSURE and
ABS_MT_DISTANCE that can be used for this. That’s another job that
libinput is good at.
MT — MultiTouch
We quickly went over the concept of MT, or multitouch before, let’s add a bit more info to that.
Multitouch are touchpads that support tracking more than one finger. They speak evdev multitouch to user-space (type B), and most often are handled by the hid-multitouch driver from the kernel side.
The capabilities of an MT touchpad should have something similar to this
(libinput record output or others):
key: BTN_LEFT, BTN_TOOL_FINGER, BTN_TOOL_DOUBLETAP, BTN_TOUCH
     (BTN_TOOL_DOUBLETAP up to BTN_TOOL_QUINTTAP)
abs: ABS_X, ABS_Y, ABS_MT_SLOT, ABS_MT_POSITION_X, ABS_MT_POSITION_Y,
     ABS_MT_TOOL_TYPE, ABS_MT_TRACKING_ID
There can also be ABS_MT_TOUCH_MAJOR, ABS_MT_TOUCH_MINOR,
ABS_MT_WIDTH_MINOR, and ABS_MT_WIDTH_MAJOR, that are used to provide
the size of the contact area in surface or absolute units. There’s
also ABS_MT_ORIENTATION, for the orientation of the touching ellipse
(finger).
For MT, the key events are simple, they tell us how many fingers are
tapping.
Then, fingers are tracked in what’s called “slots” along with a new
unique tracking id each time a finger touchdown again, and like all
evdev it’s a stateful protocol.
So for example, slot 0 gets assigned tracking id 1 when the first finger
is down, then slot 1 gets assigned tracking id 2 when the second finger
is down, then the first finger is lifted and put back down again, and
slot 0 gets assigned tracking id 3.
That can sound complex to track, and again that’s where libinput
shines. Here’s what it looks like in a simplified evdev trace:
ABS_MT_SLOT 0
ABS_MT_TRACKING_ID 45
ABS_MT_POSITION_X x[0]
ABS_MT_POSITION_Y y[0]
ABS_MT_SLOT 1
ABS_MT_TRACKING_ID 46
ABS_MT_POSITION_X x[1]
ABS_MT_POSITION_Y y[1]
SYN_REPORT
// slot 0 moves in x position
ABS_MT_SLOT 0
ABS_MT_POSITION_X x[0]
SYN_REPORT
// lifting slot 0
ABS_MT_TRACKING_ID -1
SYN_REPORT
// lifting slot 1
ABS_MT_SLOT 1
ABS_MT_TRACKING_ID -1
SYN_REPORT
Synaptics
Once upon a time everyone was bragging about their synaptics touchpad confs, yet this is now deprecated in favor of libinput. What was that all about?
Synaptics, unrelated to synaptics inc, was a complex X11 driver with so many configurations. It was buggy and had lots of internal magic, especially its acceleration profiles, which had logic split between the X11 server and the driver.
 $ synclient -l
 Parameter settings:
 LeftEdge                = 1310
 RightEdge               = 4826
 TopEdge                 = 2220
 BottomEdge              = 4636
 FingerLow               = 25
 FingerHigh              = 30
 MaxTapTime              = 180
 ...
Synaptics was configured through the command line synclient. They
talked through a special interfaced with a custom protocol (shared memory
segment). That is before X11 had any standard way to dynamically be
configured (with xinput), and before evdev was a thing. This was hacky.
These days X11 and Wayland rely on libinput so this should be used instead.
The only feature missing from libinput, which is implemented in user-space by the widget libraries and DE, is non-linear acceleration and speed, kinetic scrolling. That’s mostly a non-issue.
Acceleration Profile
Simply said, pointer acceleration is the function that multiplies the movement deltas with a given factor:
accel(x,y) = (Fx, Fy)
One of the main role of libinput is to make pointer movement as precise as possible on all devices. If the user intends and performs action, the feedback should be that it’s what they expected to do.
An acceleration profile defines a series of points of the form (x, f(x)),
input to output speed, that are linearly interpolated (a curve is drawn
between them for deduction). For example, flat acceleration is
[(0.0, 0.0), (1.0, 1.0)].
The default acceleration, adaptive, is pretty smart, and differs per device type and resolution, it already has these configured for touchpads for example:
- super-slow: deceleration
- slow: deceleration
- medium: adaptive+deceleration
- fast: adaptive+fast
- flick: fast
In general, libinput allows to configure this behavior. We can pick
between 3 pointer acceleration profiles: adaptive (default), flat the
45° one we’ve seen, and custom profiles. Along with different types
of motions the profiles can apply to: motion, scroll, fallback. We can
configure points and steps for each one: the points are the x and y
creating the curve of the acceleration profile we talked about, and the
steps is how the interpolation granularity happens between the points
(a value of 0 will use the default).
In most cases, not touching the acceleration profile provides better
results.
In libinput list-devices for a touchpad:
Accel profiles: flat *adaptive custom
Gestures
We’ve seen that libinput offers two types of gestures out-of-the-box: swiping and pinching. For anything else, one has to rely on third party libraries. Here are a few:
YMMV while using them.
Gaming, libwacom, and Others
Let’s close this section with a few random details that don’t need much discussion.
High-end gaming mice are finicky and often normal basic drivers are not enough to configure their high precision, nor is libinput. That’s why the libratbag project exists.
The libwacom (not only wacom) and tools such as Tuhi are used to manage
information needed by libinput to handle drawing tablets. These tablets
come with a tool such as a pen/stylus, it’s specificities are handled too.
For example, pressing certain button to reverse the behavior and start
erasing. There are X11 tools such as xsetwacom that also help.
An interesting software is gpm(8) which is a mouse in
the console that relies on reading directly the mouse stream
character device and interfacing/translating them to TIOCLINUX
TIOCL_SELMOUSEREPORT, terminal ioctl, to draw it. The terminal
will then output specific mouse reporting escape codes (more info
here).
Finally, here’s a few pointer specific debug tools:
- cleartouch
- mtview
- mtdiag-qt
- The
libinput debug-guiandlibinput debug-tablet
Gamepad Specifics
Gamepads aren’t handled by libinput in user-space, nor do they rely on the evdev handler in the kernel. Instead they rely on the joydev handler.
The gamepads get associated to their specific drivers, which
will consume all these events. The joydev handler then normalizes
and sends them to user-space in a format called js_event from
include/uapi/linux/joystick.h.
The handler will listen to all devices that support EV_KEY
BTN_JOYSTICK or BTN_GAMEPAD and similar events, and create a stream
device in devtmpfs for it /dev/input/jsN.
The handler character device supports a bunch of standard ioctl calls to get/set info:
JSIOCGVERSION: get driver versionJSIOCGAXES: get number of axesJSIOCGBUTTONS: get number of buttonsJSIOCGNAME(len): get identifier stringJSIOCSCORR: set correction valuesJSIOCGCORR: get correction valuesJSIOCSAXMAP: set axis mappingJSIOCGAXMAP: get axis mappingJSIOCSBTNMAP: set button mappingJSIOCGBTNMAP: get button mapping
Obviously, it’s better to do this via tools such as:
jstestandjstest-gtkjscaljoyful
Upper Stack: X11 & Wayland
We’ve reached the graphical environment with desktop widget libraries such
as GNOME and Qt, and the XServer and Wayland Compositors. They’re
the ones that rely on all types of input events for concrete behavior,
from clicking buttons on the appropriate window, drawing a cursor
on screen, scrolling, and literally all interactions a user has with
a computer.
This upper stack relies on libinput and XKB to make everything happen. As
far as these two are concerned, the role of the upper stack is to
initialize them with the right configurations, and then create the
handling for whatever they’re meant to do.
The big difference between the X11 stack and Wayland stack is related to
the protocol and where these libraries are included. There are no window
managers in Wayland, but compositors that fully implement the standard
protocol of both a display server and window manager at the same time. So
it’s not a two-process equation, the compositor is the one handling
libinput and implementing the desktop interface. Meanwhile, in X11, the
Xserver, which is quite old, has the abstract concept of input drivers,
of which the currently only useful one is xf86-input-libinput. The
X11 input are interfaced with through the X11 protocol with XInput
events shared to the WM and other clients so that they can use them,
and configure the server’s input devices. Similarly, in X11 all the
configurations happen over the X protocol and its extensions, meanwhile
for compositors there’s no agreed way to configure things, so each
compositor can implement their own thing.
Here’s a general picture of the stack (courtesy of
who-t, Peter Hutterer):


Obviously, each have their own internal representation and ways of managing
the information they get from libinput, XKB, and others, but this is
outside the scope of this article (wl_pointer and wl_keyboard on
Wayland for example). Let’s focus more on how they configure the input
stack we’ve seen.
The X server has an internal store of information about input devices,
and their drivers, and will apply the default settings for each. To
apply specific configurations for certain devices, we can add snippets
in the X11 config directory, usually /usr/share/X11/xorg.conf.d/.
The libinput(4) driver settings can be passed there for a matching
device.
Section "InputClass"
        Identifier "libinput touchpad catchall"
        MatchIsTouchpad "on"
        MatchDevicePath "/dev/input/event*"
        MatchProduct "substring of the device name"
        Driver "libinput"
        Option "some option name" "the option value"
EndSection
The “Identifier” is just a human-readable string for logging, meanwhile
the series of “Match” statements can be found in xorg.conf(5), there’s
quite a few of them and they remind us of udev rules. The “Option”
part is what interests us, these are the settings to pass to libinput
and that can be found in libinput(4). For example:
Option "AccelSpeed" "float"
Option "ButtonMapping" "string"
Option "DisableWhileTyping" "bool"
Option "ClickMethod" "string"
Option "Tapping" "on"
These should all be very familiar by now.
On the X11 stack, the server will initially set these values to override
the default ones, but afterward, during runtime, any caller can rely on
the X protocol to update them. The xinput(1) command can be used to
debug and test setting X input devices.
To list input devices that the X server is aware of:
> xinput list
⎡ Virtual core pointer                          id=2    [master pointer  (3)]
⎜   ↳ Virtual core XTEST pointer                id=4    [slave  pointer  (2)]
⎜   ↳ ETPS/2 Elantech Touchpad                  id=15   [slave  pointer  (2)]
⎜   ↳ SEMICO USB Keyboard Consumer Control      id=10   [slave  pointer  (2)]
⎣ Virtual core keyboard                         id=3    [master keyboard (2)]
    ↳ Virtual core XTEST keyboard               id=5    [slave  keyboard (3)]
    ↳ Power Button                              id=6    [slave  keyboard (3)]
    ↳ Video Bus                                 id=7    [slave  keyboard (3)]
    ↳ Power Button                              id=8    [slave  keyboard (3)]
    ↳ Sleep Button                              id=9    [slave  keyboard (3)]
    ↳ AT Translated Set 2 keyboard              id=14   [slave  keyboard (3)]
    ↳ Acer WMI hotkeys                          id=16   [slave  keyboard (3)]
    ↳ GeneralPlus USB Audio Device              id=17   [slave  keyboard (3)]
    ↳ SEMICO USB Keyboard Consumer Control      id=11   [slave  keyboard (3)]
    ↳ SEMICO USB Keyboard System Control        id=12   [slave  keyboard (3)]
    ↳ SEMICO USB Keyboard                       id=13   [slave  keyboard (3)]
NB: Keep in mind the XTEST virtual devices, which only exist within
X11 internally and don’t appear in libinput list-devices, we’ll get
back to these in the next section.
Or list the properties of a particular device entry:
> xinput list-props 14
Device 'AT Translated Set 2 keyboard':
        Device Enabled (147):   1
        libinput Rotation Angle (263):  0.000000
        libinput Rotation Angle Default (264):  0.000000
        libinput Send Events Modes Available (265):     1, 0
        libinput Send Events Mode Enabled (266):        0, 0
        libinput Send Events Mode Enabled Default (267):        0, 0
        Device Node (268):      "/dev/input/event4"
        Device Product ID (269):        1, 1
Or setting particular properties:
> xinput set-prop "the device name" "the property name" value [value2]For example:
> xinput set-prop 'ETPS/2 Elantech Touchpad' "libinput Tapping Enabled" '1'
> xinput set-prop 'ETPS/2 Elantech Touchpad' "libinput Accel Speed" '-0.1'
What happens here is that the client (xinput) talks to the X server
over the X protocol, then the X server talks to its libinput driver
xf86-input-libinput which in turn talks to libinput and updates its
configurations, and the X server keeps track of all this.
These all look somewhat redundant, as you can see, it’s like having an
intermediate layer. That’s why on Wayland there’s no intermediary, if
a client tells it, through whatever configuration means it exposes, to
set certain settings on an input device, it does it directly via libinput.
Yet, the list of input devices is internal to Wayland, and not exposed
directly in the protocol, that’s why it differs in each compositor
implementation.
For instance, if we’re toggling a setting in GNOME, KDE, MATE, or others,
the behavior will be more direct. In GNOME, things happen through
gsettings:
> gsettings list-keys  org.gnome.desktop.peripherals.
org.gnome.desktop.peripherals.keyboard
org.gnome.desktop.peripherals.mouse
org.gnome.desktop.peripherals.trackball
org.gnome.desktop.peripherals.pointingstick
org.gnome.desktop.peripherals.touchpad
…
> gsettings list-keys  org.gnome.desktop.peripherals.mouse
accel-profile
double-click
drag-threshold
left-handed
middle-click-emulation
natural-scroll
speed
> gsettings get org.gnome.desktop.peripherals.mouse accel-profile
'default'
So that’s how you’d configure input devices on GNOME Wayland compositor
Mutter. Yet that’s annoying, isn’t there a common way to do this on
Wayland?
There are workarounds such as
libinput-config but it’s not
very well maintained.
So, clients in graphical environments need to get input events to
them. On X11 these are called X events, and they can be spied on with the
xev(1) tool, which can help debug issues. It shows events sent to the
particular window chosen.
In theory on X11 one could catch all events on the “root window” is
subscribed to (xev -root does that) or of any other window. Events
conceptually travel down the window hierarchy, and clients only
receive the events for which they have selected an appropriate event
mask. However, the root window always sits at the top of this hierarchy
and can optionally subscribe to essentially all events before they
propagate to child windows, while grabs and higher-priority selections
(such as by the window manager) can intercept or redirect them. That’s
how WMs work, they’re the parent window and have an “event mask” to
catch certain events and input for itself, and is exclusively allowed
to do redirect of certain events such as mapping/moving/configuring
windows.
Meanwhile, a sort of equivalent, but more simple, tool on Wayland is
called wev, we’ll do the comparison
in a bit to help us understand the differences. Here’s a trace of xev
> xev -event keyboard
KeyRelease event, serial 28, synthetic NO, window 0x2e00001,
    root 0x3fa, subw 0x0, time 465318306, (81,81), root:(893,376),
    state 0x10, keycode 108 (keysym 0xff20, Multi_key), same_screen YES,
    XLookupString gives 0 bytes:
    XFilterEvent returns: False
…
KeyRelease event, serial 28, synthetic NO, window 0x2e00001,
    root 0x3fa, subw 0x0, time 465318602, (81,81), root:(893,376),
    state 0x10, keycode 48 (keysym 0x27, apostrophe), same_screen YES,
    XLookupString gives 1 bytes: (27) "'"
    XFilterEvent returns: False
KeyPress event, serial 28, synthetic NO, window 0x2e00001,
    root 0x3fa, subw 0x0, time 465318866, (81,81), root:(893,376),
    state 0x10, keycode 26 (keysym 0x65, e), same_screen YES,
    XLookupString gives 1 bytes: (65) "e"
    XmbLookupString gives 1 bytes: (65) "e"
    XFilterEvent returns: True
KeyPress event, serial 28, synthetic NO, window 0x2e00001,
    root 0x3fa, subw 0x0, time 465318866, (81,81), root:(893,376),
    state 0x10, keycode 0 (keysym 0xe9, eacute), same_screen YES,
    XLookupString gives 0 bytes:
    XmbLookupString gives 2 bytes: (c3 a9) "é"
    XFilterEvent returns: False
As you can observe here, The Xlib client does a lookup for keycode to
keysym translation by relying on functions such as XLookupString and
XmbLookupString. These particular functions use a keymap logic that
dates back to pre-XKB time, we’ll talk more about them in a bit. Yet,
internally now, the X server does rely on XKB in the backend, just like
for input device info, it keeps a keymap table internally, and it’s
shared over the X protocol with clients (they ask for it at connection,
or lazily when calling functions, and cache it) so that they perform
the translation with Xlib or XCB.
There are two main formats for the shared X server keymap the clients
can rely on: the old “X core keymap”, and an XKB keymap. We’ll discuss
that old core keymap in a bit.
In XCB, the old keymap translation is done via:
xcb_key_symbols_get_keycodexcb_key_symbols_get_keysym
And in Xlib with functions such as:
XLookupStringXutf8LookupStringXLookupKeysymXkbTranslateKeyCodeXkbTranslateKeySymXStringToKeysymXKeysymToKeycode
Meanwhile, with the newer XKB keymap it’s done via:
XkbTranslateKeyCode
Or in XCB with the xcb_xkb_* functions (you have to do it manually).
In all cases, since XKB is the tech in the backend of the X server that stores the keymap truth, it’s what needs to be configured. The XKB configuration can be set statically, along with the usual input confs we’ve seen earlier, with the Xkb options:
Section "InputClass"
        Identifier "system-keyboard"
        MatchIsKeyboard "on"
        Option "XkbLayout" "us"
        Option "XkbModel" "pc104"
        Option "XkbVariant" "dvorak"
        Option "XkbOptions" "terminate:ctrl_alt_bksp"
EndSection
There are also two special options that get interpreted when certain
special keysym are generated, the DontVTSwitch which is there to disable
the ctrl+alt+fn sequence to switch virtual terminal, and the DontZap
which catches the Terminate_Server keysym of XKB and will kill the Xorg
server. Both are enabled by default and these options would turn them off.
To change the XKB options on a running X server on-the-fly, we need to
rely on two tools: xkbcomp(1) and setxkbmap(1). The first one is
used to compile new KcCGST and upload it to the server as a full keymap
in XKM compiled format that the server understands, and the second one
to change the current value of the RMLVO.
$ setxkbmap -model thinkpad60 -layout us,sk,de -variant altgr-intl,qwerty \
       -option -option grp:menu_toggle -option grp_led:caps -print
We can get the same info as with xkbcli too:
> setxkbmap -print -verbose 10
Setting verbose level to 10
locale is C
Trying to load rules file ./rules/evdev...
Trying to load rules file /usr/share/X11/xkb/rules/evdev...
Success.
Applied rules from evdev:
rules:      evdev
model:      pc105
layout:     us
options:    compose:ralt
Trying to build keymap using the following components:
keycodes:   evdev+aliases(qwerty)
types:      complete
compat:     complete
symbols:    pc+us+inet(evdev)+compose(ralt)
geometry:   pc(pc105)
xkb_keymap {
        xkb_keycodes  { include "evdev+aliases(qwerty)" };
        xkb_types     { include "complete"      };
        xkb_compat    { include "complete"      };
        xkb_symbols   { include "pc+us+inet(evdev)+compose(ralt)"       };
        xkb_geometry  { include "pc(pc105)"     };
};
Now let’s talk about that pre-XKB logic with functions such as
XLookupKeysym(3) we’ve seen in the xev trace earlier. It’s currently
basically a wrapper over XKB, but that can also bypass it entirely. It
relies on the old “X core keymap table” in the X server, a facade on
the authoritative keymap that is XKB backed. The client asks for it
via a request, cache it, and use it for the mapping of X11 keycode
to X11 keysym. It’s own X11 keycodes are implementation dependent,
but nowadays it’s mostly evdev + 8, and its keysyms are found in
/usr/include/X11/keysymdef.h, which the newer XKB stack also relies
on in X11. So that old keymap is indeed initially filled with the XKB
keymap. The tool xmodmap(1) will help us explore and show some of the
things it handles.
To print its internal keymap table:
> xmodmap -pk
There are 7 KeySyms per KeyCode; KeyCodes range from 8 to 255.

    KeyCode Keysym (Keysym)   ...
    Value   Value   (Name)    ...

      8
      9     0xff1b (Escape)   0x0000 (NoSymbol) 0xff1b (Escape)
     10     0x0031 (1)  0x0021 (exclam)   0x0031 (1)  0x0021 (exclam)
     11     0x0032 (2)  0x0040 (at) 0x0032 (2)  0x0040 (at)
     12     0x0033 (3)  0x0023 (numbersign)  0x0033 (3)  0x0023 (numbersign)
     13     0x0034 (4)  0x0024 (dollar)   0x0034 (4)  0x0024 (dollar)
     14     0x0035 (5)  0x0025 (percent)  0x0035 (5)  0x0025 (percent)
     15     0x0036 (6)  0x005e (asciicircum) 0x0036 (6)  0x005e (asciicircum)
     16     0x0037 (7)  0x0026 (ampersand)   0x0037 (7)  0x0026 (ampersand)
     17     0x0038 (8)  0x002a (asterisk) 0x0038 (8)  0x002a (asterisk)
And print the modifiers:
> xmodmap -pm
xmodmap:  up to 3 keys per modifier, (keycodes in parentheses):

shift       Shift_L (0x32),  Shift_R (0x3e)
lock        Caps_Lock (0x42)
control     Control_L (0x25),  Control_R (0x69)
mod1        Alt_L (0x40),  Alt_L (0xcc),  Meta_L (0xcd)
mod2        Num_Lock (0x4d)
mod3        ISO_Level5_Shift (0xcb)
mod4        Super_L (0x85),  Super_R (0x86),  Super_L (0xce)
mod5        ISO_Level3_Shift (0x5c)
Or print the keymap as “expressions”:
keycode   8 =
keycode   9 = Escape NoSymbol Escape
keycode  10 = 1 exclam 1 exclam
keycode  11 = 2 at 2 at
keycode  12 = 3 numbersign 3 numbersign
keycode  13 = 4 dollar 4 dollar
keycode  14 = 5 percent 5 percent
keycode  15 = 6 asciicircum 6 asciicircum
keycode  16 = 7 ampersand 7 ampersand
keycode  17 = 8 asterisk 8 asterisk
Yes, xmodmap has its own configuration in ~/.Xmodmap and expression
grammar that looks something like a simplified version of XKB:
! remove Caps Lock functionality
remove Lock = Caps_Lock

! make CapsLock (keycode 66) act as Tab
keycode 66 = Tab

! set Menu key (keycode 134) properly
keycode 134 = Menu

! Set Right Alt as Compose (Multi_key)
! Use keysym form so you don't need to know the numeric keycode:
keycode 108 = Multi_key

! ensure Right Alt is not still treated as an Alt modifier
remove Mod1 = Alt_R
Or on-the-fly with:
xmodmap -e "remove Lock = Caps_Lock"
xmodmap -e "keycode 66 = Tab"
xmodmap -e "keycode 134 = Menu"
There’s even the xkeycaps GUI around it, and wrappers like
xcape.
Yet, GNOME and certain other toolkits and desktop environments
have stopped relying on the old core keymap a long time ago,
deprecating it in favor of the XKB related functions. Still, the
X server will internally reflect these changes in its XKB cache,
making them internally compatible, notifying X clients of teh
change, and it’ll work but temporarily
(mainly with XChangeKeyboardMapping which calls
XkbApplyMappingChange
in the X Server). It’s fragile and legacy. Also, changing the keymap with
xmodmap is flimsy since any time the XKB keymap is reloading the changes
to the old in-memory X keymap compatibility is lost. Those combined
together means that it isn’t reliable to use the old X11 core keymap.
As you can see yet again, this is quite confusing and redundant, and
obviously Wayland doesn’t have these old layers of indirection and
relies on XKB directly. It also doesn’t need a compiled forms like XKM
to upload keymaps to the server, but it doesn’t even include that upload
part in the protocol anyhow. The keycode to keysym translation is also
done in the client (with calls such as xkb_state_key_get_one_sym)
but the keymap is directly shared along the wl_keyboard object that
it gets accessed to when it wants input access on the seat, so there’s
no need for another round-trip.
Yet, again the configuration of XKB-related stuff on Wayland depends on the compositor implementation.
For example
wlroots
relies on environment variables to set the RMLVO.
GNOME on gsettings with
gsettings set org.gnome.desktop.input-sources sources "[('xkb', 'us'), ('xkb', 'fr')]"
Hyprland has
hyprctl keyword input:kb_layout "us,fr"
And etc…
> gsettings list-recursively org.gnome.desktop.input-sources
org.gnome.desktop.input-sources current uint32 0
org.gnome.desktop.input-sources mru-sources @a(ss) []
org.gnome.desktop.input-sources per-window false
org.gnome.desktop.input-sources show-all-sources false
org.gnome.desktop.input-sources sources [('xkb', 'us')]
org.gnome.desktop.input-sources xkb-model 'pc105+inet'
org.gnome.desktop.input-sources xkb-options ['compose:ralt']
Let’s go back to the
wev tool,
which displays input events on Wayland, it’ll help us understand a
huge difference in input handling on Wayland compared to X11. Unlike X
severs, a Wayland compositor doesn’t propagate and broadcast the events
globally to anyone listening. Instead, clients must explicitly register
a listener for the objects they care about. These are announced via the
global Wayland registry, which it has to register to (wl_registry).
Afterward, a client has to bind and listen to the given seat (wl_seat)
of the given name by the registry (this is where the ENV{ID_SEAT} and
loginctl can help since they often map 1-to-1), and advertise the set of
“seat capabilities” it requires and wants to bind to, such as pointer,
keyboard, or touch. Once bound, the client can now fetch a handle to the
wl_<pointer/keyboard/touch> objects, and register listener handlers
for their events. Let’s note that a wl_keyboard is an abstraction
of all logical keyboard events. So clients aren’t aware of underlying
devices, it’s abstracted and aggregated in the compositor internally,
by its own logic. Plus, for extra security, wl_<pointer/keyboard/touch>
events are only forwarded to the currently focused client. All and all,
it’s very choreographed, unlike in X11.
Beyond the core protocol, there are more “unstable” or “non-standard” extensions that allow clients to do more things related to input. Here’s a non-exhaustive list:
- Repositioning the pointer (
wp_pointer_warp_v1) - Subscribing to high-def keyboard timestamps (
zwp_input_timestamps_manager_v1) - Ignoring keyboard shortcuts from a client (
zwp_keyboard_shortcuts_inhibit_manager_v1) - Adding constraints to pointer motion (
zwp_pointer_constraints_v1) - Register to handle gestures, swipe, pinch, and hold (
zwp_pointer_gestures_v1) - Specific XWayland grabbing of input, monopolizing it (
zwp_xwayland_keyboard_grab_manager_v1) - Grab hotkeys, usually not needed since the compositor do this (
hyprland_global_shortcuts_manager_v1) - Grab/Inhibit an input to a single surface such as lock screen (
zwlr_input_inhibit_manager_v1,hyprland_focus_grab_manager_v1) - Create virtual pointer/keyboard, fake input (
zwlr_virtual_pointer_manager_v1,org_kde_kwin_fake_input,zwp_virtual_keyboard_v1)
Notice too that nowhere in the protocol is there any interface
to list the compositor’s internal input devices in its registry,
it’s intentionally abstracted away. It’s up to each compositor
to choose if it wants to expose this info. To my knowledge,
there’s only Sway that offers an interface for this through
swaymsg, it’s kind of
similar to gsettings.
> swaymsg -t get_inputs
The closest compositor-agnostic tools are external utilities such
as libinput list-devices or loginctl seat-status. However, these
enumerate kernel devices, not the compositor’s internal virtual devices,
so you will not see compositor-created synthetic devices there.
In short, which compositor implements which part of the “non-standard” protocol varies a lot. GNOME uses almost none of the wlroots/WLR extensions. KDE uses KDE-specific extensions. wlroots-based compositors share WLR extensions. It’s a mix really, check this for support and more info.
We mentioned before localectl too for setting keyboard keymap
setups that works across environments. Let’s add that when using
the set-x11-keymap option it will modify X11 configurations in
/etc/X11/xorg.conf.d/00-keyboard.conf and pre-fill them for you so
you won’t have to worry about editing anything with the options we’ve
listed. It doesn’t have this option for Wayland though.
> localectl [--no-convert] set-x11-keymap layout [model [variant [options]]]
Yet, what if someone on Wayland wants to remap just a specific
key without passing by the static XKB and its mess, just a
quick runtime change. There’s no real solution to that other
than what we’ve already mentioned in the scancode to keycode
section, namely tools that rely on evdev interception to remap events
such as evmapd, evremap, evdevremapkeys, evsieve,
keyd , kbct, makima,
input-remapper,
etc.. A true panoply of tools that are hacks. Most, if not all, of
these work by intercepting evdev events, creating a new virtual device
(we’ll see how uinput works in the next section), and modifying the
events on-the-fly to write them to the virtual device. This adds a new
unnecessary layer of indirection, which you should obviously avoid if
you are doing anything speed sensitive with the keyboard. Furthermore,
some of these re-include the key composition and a semblance of XKB
logic within them, which creates a total mess.
Let’s continue…
Contrary to everything else in the GUI stack, XKB composition is a
bit less cumbersome. Both Wayland clients, through their toolkits
(GTK, Qt, etc..) and X11, through Xlib with the functions we’ve seen
earlier that do it out-of-the-box (XLookupString), rely on the
same configuration files we’ve discussed in the XKB section. Namely,
/usr/share/X11/locale/<locale>/Compose and the home ~/.XCompose. It
follows the simple format described in Compose(5).
And lastly, one thing that isn’t handled neither in libinput nor XKB is key repeat: how long when pressing a key will the client wait to print it again.
In X11 this is configured in the X Server, either as a startup option
-ardelay and -arinterval, or dynamically via xset(1). There’s the
option to set the delay and interval for a specific key too.
> xset r rate delay [rate]
> xset r rate 210 50
If you inspect xev you’ll see that the server resends keys to the
client continuously.
Meanwhile, as with everything else on Wayland, it depends on the
compositor. The compositor sends to the clients the repeat parameters
wl_keyboard.repeat_info(rate, delay) and it’s up to them to respect
it. So, the compositor doesn’t keep forwarding the key to the client but
instead this is handled directly in the client.
And similarly, these are configured in gsettings and other
compositor-specific configurations.
The repeat key rate and delay being delegated to clients on Wayland has had its share of issues it created though (see) and some people want to have it back in the compositor.
That’s it, we’ve covered most of the things we wanted in the upper graphical stack.

Virtual Input, Automation, Emulation, and Remote Desktop
We’ve grazed the topic of virtual inputs before, in this section we’ll see what types exist and where they’re used, from automation, emulation, and remote desktop.
The first layer where we can create virtual input devices is at the
kernel layer. It provides two modules that can be used for this:
UHID, User-space I/O driver support for HID subsystem, and uinput,
the User-space input emulation module.
The uhid module,
as the name implies, allows simulating HID events from user-space
by reading/writing to a special character device in devtmpfs
/dev/uhid. The interface is quite simple as is shown in this
example.
However, this is only used for emulating devices and debugging, not for
the average user’s virtual input. This is the underlying mechanism behind
hid-record and hid-replay, which can easily allow debugging hid
issues by reproducing the exact sequences of events on anyone’s machine.
While uhid acts in the HID layer, the uinput module
(drivers/input/misc/uinput.c) acts at the input core layer, which
makes it more approachable for basic input event virtualisation.
It is also a character device in devtmpfs /dev/uinput that exposes
particular ioctl to create, manage, and configure capabilities of a
virtual device, and then allow writing to /dev/uinput file descriptor
to simulate the events of said device. The device will appear, like any
other input device, in devtmpfs and sysfs, since it’ll pass by the same
pipeline with struct input_dev and the default evdev event handler.
There are two main ways to use uinput in the code, via <linux/uinput.h>
or via <libevdev/libevdev-uinput.h>. The libevdev mechanism is simpler
and recommended.
Example 1:
#include <unistd.h>
#include <linux/uinput.h>
#include <fcntl.h>
#include <string.h>
#include <stdio.h>
#include <errno.h>
#include <linux/uinput.h>

void emit(int fd, int type, int code, int val)
{
   struct input_event ie;

   ie.type = type;
   ie.code = code;
   ie.value = val;
   /* timestamp values below are ignored */
   ie.time.tv_sec = 0;
   ie.time.tv_usec = 0;

   write(fd, &ie, sizeof(ie));
}

int main(void)
{
   struct uinput_setup usetup;

   int fd = open("/dev/uinput", O_WRONLY | O_NONBLOCK);


   /*
    * The ioctls below will enable the device that is about to be
    * created, to pass key events, in this case the space key.
    */
   ioctl(fd, UI_SET_EVBIT, EV_KEY);
   ioctl(fd, UI_SET_KEYBIT, KEY_SPACE);

   memset(&usetup, 0, sizeof(usetup));
   usetup.id.bustype = BUS_USB;
   usetup.id.vendor = 0x1234; /* sample vendor */
   usetup.id.product = 0x5678; /* sample product */
   strcpy(usetup.name, "Example device");

   ioctl(fd, UI_DEV_SETUP, &usetup);
   ioctl(fd, UI_DEV_CREATE);

   /*
    * On UI_DEV_CREATE the kernel will create the device node for this
    * device. We are inserting a pause here so that user-space has time
    * to detect, initialize the new device, and can start listening to
    * the event, otherwise it will not notice the event we are about
    * to send. This pause is only needed in our example code!
    */
   sleep(60);

   /* Key press, report the event, send key release, and report again */
   emit(fd, EV_KEY, KEY_SPACE, 1);
   emit(fd, EV_SYN, SYN_REPORT, 0);
   emit(fd, EV_KEY, KEY_SPACE, 0);
   emit(fd, EV_SYN, SYN_REPORT, 0);

   /*
    * Give user-space some time to read the events before we destroy the
    * device with UI_DEV_DESTROY.
    */
   sleep(100);

   ioctl(fd, UI_DEV_DESTROY);
   close(fd);

   return 0;
}
Compile with
gcc -o uinput_test uinput_test.c -Wall -Wextra
And example 2 with libevdev:
#include <libevdev/libevdev.h>
#include <libevdev/libevdev-uinput.h>
#include <unistd.h>
#include <stdio.h>
#include <string.h>
#include <errno.h>

int main(void)
{
    struct libevdev *dev = NULL;
    struct libevdev_uinput *uidev = NULL;
    int err;

    /* Allocate and configure the virtual device */
    dev = libevdev_new();
    if (!dev) {
        fprintf(stderr, "Failed to allocate libevdev device\n");
        return 1;
    }

    libevdev_set_name(dev, "Example device (libevdev uinput)");
    libevdev_set_id_bustype(dev, BUS_USB);
    libevdev_set_id_vendor(dev, 0x1234);
    libevdev_set_id_product(dev, 0x5678);

    /* Enable only one key: KEY_SPACE */
    libevdev_enable_event_type(dev, EV_KEY);
    libevdev_enable_event_code(dev, EV_KEY, KEY_SPACE, NULL);

    /* Create the uinput device */
    err = libevdev_uinput_create_from_device(dev, LIBEVDEV_UINPUT_OPEN_MANAGED, &uidev);
    if (err != 0) {
        fprintf(stderr, "Failed to create uinput device: %s\n", strerror(-err));
        return 1;
    }

    /* A pause to allow the system (udev etc.) to register the device */
    sleep(100);

    /* Emit a space key press */
    libevdev_uinput_write_event(uidev, EV_KEY, KEY_SPACE, 1);
    libevdev_uinput_write_event(uidev, EV_SYN, SYN_REPORT, 0);

    /* Emit the key release */
    libevdev_uinput_write_event(uidev, EV_KEY, KEY_SPACE, 0);
    libevdev_uinput_write_event(uidev, EV_SYN, SYN_REPORT, 0);

    /* Let user-space read the events before destruction (optional) */
    sleep(200);

    libevdev_uinput_destroy(uidev);
    libevdev_free(dev);

    return 0;
}
Compile with
gcc $(pkg-config --cflags --libs libevdev) -o libevdev_example example.c
Furthermore, there’s a similar mechanism for simulation that could be
used to create virtual USB gadget and dummy_hcd, but this is more
complex as there’s no clear tool relying on those.
The disadvantage of all these is that, since they interface with the kernel, they require root privilege and relying on HID or evdev might not be practical for the average day-to-day usage. For example, if we want to output a symbol, let’s say ‘p’, we have to know its keycode, and for that we need to know the keymapping, which in turn requires XKB or others. Thus, we’re back to square one and re-creating the upper input stack from scratch.
What if we could directly say “send this keycode or keysym, it’s from this virtual device”, without even needing extra permission if we’re already in a desktop environment. Well, that’s exactly what the X11 XTEST extension does, and what some Wayland extensions and mechanisms achieve too.
Remember when we used xinput to list some devices and some virtual ones were listed:
> xinput list
Virtual core pointer                          id=2    [master pointer  (3)]
⎜   ↳ Virtual core XTEST pointer                id=4    [slave  pointer  (2)]
…
Virtual core keyboard                         id=3    [master keyboard (2)]
    ↳ Virtual core XTEST keyboard               id=5    [slave  keyboard (3)]
…
These were created by the XTest extension which was written to support
automated testing of X server. These days this can be used for remote
desktop, task automation, password managers (autofill), and others. When
clients interface through this extension they directly inject keyboard
and mouse events into the X server, bypassing the whole input stack,
and these events are propagated afterward to the X clients.
Let’s see a simple programming example relying on XTEST(3) that will
send the keysym “a”:
#include <X11/Xlib.h>
#include <X11/extensions/XTest.h>
#include <X11/keysym.h>

int main() {
    Display *dpy = XOpenDisplay(NULL);
    if (!dpy) return 1;

    KeyCode kc = XKeysymToKeycode(dpy, XStringToKeysym("a"));
    XTestFakeKeyEvent(dpy, kc, True,  0);
    XTestFakeKeyEvent(dpy, kc, False, 0);

    XFlush(dpy);
    XCloseDisplay(dpy);
    return 0;
}
Compile with:
> gcc xtest_min.c -o xtest_min -lX11 -lXtst
That’s clean and easy, now on Wayland the picture is a bit more complex since the protocol doesn’t allow clients to randomly generate input events. It was designed this way for security reasons.
As with anything Wayland, there are a few unstable extensions,
though deprecated now, such as zwlr_virtual_pointer_v1 and
zwp_virtual_keyboard_manager_v1, mostly wlroots Wayland extensions.
An example of the zwp_virtual_keyboard_manager_v1 extension would look
somewhat like this:
#define _POSIX_C_SOURCE 200809L
#include <wayland-client.h>
#include "virtual-keyboard-unstable-v1-client-protocol.h"
static struct zwp_virtual_keyboard_v1 *vk;
static void global_add(void *data, struct wl_registry *reg,
uint32_t name, const char *iface, uint32_t ver) {
if (strcmp(iface, zwp_virtual_keyboard_manager_v1_interface.name) == 0) {
auto *mgr = wl_registry_bind(reg, name,
&zwp_virtual_keyboard_manager_v1_interface, 1);
// NULL seat → compositor chooses default seat
vk = zwp_virtual_keyboard_manager_v1_create_virtual_keyboard(mgr, NULL);
}
}
static const struct wl_registry_listener reg_listener = {
.global = global_add,
.global_remove = NULL
};
int main() {
struct wl_display *d = wl_display_connect(NULL);
struct wl_registry *reg = wl_display_get_registry(d);
wl_registry_add_listener(reg, ®_listener, NULL);
wl_display_roundtrip(d); // wait until vk is ready
uint32_t keycode = 30; // Linux evdev (KEY_A)
uint32_t state_pressed = 1;
uint32_t state_released = 0;
zwp_virtual_keyboard_v1_key(vk, 0, keycode, state_pressed);
zwp_virtual_keyboard_v1_key(vk, 0, keycode, state_released);
wl_display_flush(d);
return 0;
}But for a better example check the source of
wlrctl
that also relies on the zwp_virtual_keyboard_manager_v1 extension.
Yet, these days, this isn’t the path that Wayland has taken, and none of the compositors agree on these extensions, instead they rely on libei, a library to consolidate Emulated Input. This is its architecture:
 Courtesy from https://libinput.pages.freedesktop.org/libei/
It has two pieces: a client side that creates virtual devices and generates evdev events, and the server side called EIS that lives within the compositor (but that isn’t limited to Wayland) and is responsible for giving a file descriptor to the client to interface with, and dispatching received events to where they need to go. The dispatching could be through uinput devices, that’s an implementation detail, yet most compositors just store it as an internal virtual device.
This allows compositor to be aware of who is currently emulating input, which capabilities they require (keyboard, touch, pointer), and to restrict and/or suspend devices at any time.
Optionally, the compositor may delegate the file descriptor mechanism to a xdg-desktop-portal dbus service implemented by the desktop environment so that it can check with polkit and others the allowed permissions (see). So it would look like this:
    +--------------------+
    | Wayland compositor |_
    +--------------------+  \
    | libinput | libeis  |   \_wayland______
    +----------+---------+                  \
        |     [eis-0.socket]                 \
 /dev/input/     /   \\       +-------+------------------+
                |      ======>| libei | Wayland client A |
                |      after    +-------+------------------+
         initial|     handover   /
      connection|               / initial request
                |              /  dbus[org.freedesktop.portal.EmulatedInput]
                |              /  or dbus[org.freedesktop.portal.RemoteDesktop]
        +--------------------+
        | xdg-desktop-portal |
        +--------------------+
An example implementation of a client can be found here. Or mixed with an XKB mess to translate from keysym to keycode, for the pleasure of your eyes:
#include <ei.h>
#include <xkbcommon/xkbcommon.h>
#include <string.h>

int main() {
    // ----------------------------
    // 1. Create an XKB context
    // ----------------------------
    struct xkb_context *ctx = xkb_context_new(XKB_CONTEXT_NO_FLAGS);

    // load the default system keymap (XKB rules, model, layout, variant, options)
    struct xkb_keymap *keymap =
        xkb_keymap_new_from_names(ctx, NULL, XKB_KEYMAP_COMPILE_NO_FLAGS);

    if (!keymap) {
        fprintf(stderr, "failed to load xkb keymap\n");
        return 1;
    }


    // ----------------------------
    // 2. Convert keysym → evdev code but only for group 1 and level 1
    // ----------------------------
    xkb_keysym_t sym = xkb_keysym_from_name("a", XKB_KEYSYM_NO_FLAGS);

    // if we know the key by name it would be much easier
    // xkb_keycode_t code = xkb_keymap_key_by_name(keymap, "AD01");

    // But better: find the keycode for the keysym
    xkb_keycode_t key = 0;

    // Iterate keycodes until we find the one producing this keysym
    // That's because keycodes->keysym is many-to-one
    xkb_keycode_t min = xkb_keymap_min_keycode(keymap);
    xkb_keycode_t max = xkb_keymap_max_keycode(keymap);

    for (xkb_keycode_t k = min; k <= max; k++) {
        if (xkb_keymap_key_get_level(keymap, k, 0, 0) >= 0) {
            int nsyms;
            const xkb_keysym_t *syms = xkb_keymap_key_get_syms_by_level(keymap, k, 0, 0, &nsyms);
            for (int i = 0; i < nsyms; i++) {
                if (syms[i] == sym) {
                    key = k;
                    break;
                }
            }
        }
    }

    if (!key) {
        fprintf(stderr, "could not map keysym\n");
        return 1;
    }

    // IMPORTANT: xkbcommon keycodes are **+8** relative to evdev
    int evdev_code = key - 8;

    struct ei *ei = ei_new();
    // compositor socket, we'd need to get it through portal in real scenario
    ei_connect(ei, "unix:path=/run/user/1000/ei_socket");

    struct ei_client *client = ei_get_client(ei);
    ei_client_set_name(client, "xkb-sender");

    struct ei_device *dev = ei_device_new(client, "xkd-virt-keyboard0");
    ei_device_add_capability(dev, EI_DEVICE_CAP_KEYBOARD);

    ei_device_start_emulating(dev);


    // press and release
    ei_key(dev, evdev_code, true);
    ei_key(dev, evdev_code, false);

    ei_flush(ei);
    ei_disconnect(ei);
    ei_free(ei);
    return 0;
}
Then obviously the EIS side has to catch these events and handle them. There’s also an example that creates uinput devices found here.
The main logic of an EIS is quite straight forward (from the official docs):
- create a context with
eis_new() - set up a backend with
eis_setup_backend_fd()oreis_setup_backend_socket() - register the
eis_get_fd()with its own event loop - call
eis_dispatch()whenever the fd triggers - call
eis_get_event()and process incoming events
And whenever a new client connects:
- accept new clients with
eis_client_connect() - create one or more seats for the client with
eis_client_new_seat() - wait for
EIS_EVENT_SEAT_BINDand then - create one or more devices with the bound capabilities, see
eis_seat_new_device()
That’s kind of like network programming.
So far, most Wayland compositors implement this mechanism along with portals. You can see the list of support here, from GNOME, KDE, XWayland, and more.
On that note, XWayland is both an X server, and a Wayland client. So it understands XTest requests. Yet what happens when it receives them is that internally it relies on libei client side to handle virtual device events. That means xdotool can work on XWayland with libei context.
    +--------------------+             +------------------+
    | Wayland compositor |---wayland---| Wayland client B |
    +--------------------+\            +------------------+
    | libinput | libeis  | \_wayland______
    +----------+---------+                \
        |          |           +-------+------------------+
 /dev/input/       +---brei----| libei |     XWayland     |
                               +-------+------------------+
                                                |
                                                | XTEST
                                                |
                                         +-----------+
                                         |  X client |
                                         +-----------+
This is summarized well here, I quote:
- An X11 client sends a key event using XTEST (normal)
- XWayland receives it and initiates Remote Desktop XDG Portal session to … your own system (???)
- XDG Portal uses DBus in an odd way, with many method calls receiving responses via signals because DBus isn’t designed for long asynchronous methods.
- Once the Remote Desktop portal session is setup, Xwayland asks for a file descriptor to talk an libei server (emulated input server).
- After that, libei is used to send events, query the keyboard map, etc.
- You can ask libei for the keyboard mapping (keycodes to keysyms, etc), you get another file descriptor and process that with yet another library, libxkbcommon.
The main issue is that if the libei client gets its file descriptor via dbus portal, then every time it asks for it then the user will get prompted to “Allow remote interaction?”. And most portal software don’t have config or whitelist rule mechanisms to skip that (as far as I know), which would make sense while keeping the same security level.
When it comes to remote desktop on Wayland, it’s quite similar, it relies on the same libei mechanism. Yet, we need to add to the equation, as far as input goes, a listener that captures input regardless of the focused window.
The remote desktop is also achieved with libei and a dbus xdg-desktop-portal
either org.freedesktop.portal.RemoteDesktop or
.InputCapture, which will give back to the client
a special file descriptor for listening to the input stream.
And similarly, it is always explicit about asking for
permission to share input or share the screen (or specific
window/surface), and there doesn’t seem to be a general
configuration to turn it off or whitelist certain clients (see
discussion).
Let’s note that in the case of Wayland it is the compositor that usually
provides VNC/RDP servers, for example KWin and GNOME Mutter (apart from
wayvnc for wlroots compositors).
Meanwhile, on X11 the remote desktop protocol was part of the X11 protocol
itself from the start, with full access, the whole events. The X server
can be on another machine and clients can communicate with it over the X11
protocol, or the events could be forwarded over ssh and others. VNC and
other remote desktop protocol can rely on how open it is too. Plus, XTEST is
there for injecting events too. There’s no limitation for apps to read the
screen framebuffer either, send it, and draw it in another X session,
but it’s often re-rendered when doing remote desktop. (x11vnc, TigerVNC,
etc..). There have been extensions over the years for security (XACE)
but nobody is relying on them.
There’s also xrdp, but this creates a whole new virtual Xorg session,
so it’s another story.
Let’s now review a couple of tools used for automation.
We’ve already seen quite a lot of the ones that rely on evdev and uinput, but now they will make more sense with our current context:
evemuandevtestlibinput recordandlibinput replayunplugevsievekeyd- creates a uinput device to remap keysevmuxandinputattach- multiplex multiple evdev devices into a single virtual stream
The most popular tool that relies on XTEST (plus EWMH and others) is
xdotool.
NB: the “toplevel-management” Wayland “unstable” extension somewhat replaces some of the EWMH, but it’s not implemented by most compositor for security reasons.
Similar tools to xdotool but that relies on uinput are ydotool and
dotool.
We’ve seen wlrctl that relies on the unstable wayland protocol for
wlroots-based compositors. There’s also wtype that also relies on the
unstable virtual keyboard protocol.
We can also possibly perform automation via very specific desktop
environment mechanisms. That means using something such as GNOME shell
extensions for example, which has a javascript API. KDE has that
concept and the utility kdotool relies on this.
As you’ve observed, the situation is a bit fragmented on Wayland when it comes to automations, both in utilities and extensions.

Input Method
In this last section we’ll explore the concept of input method (IMF & IME), a mechanism to input keysym/characters that are not natively available on the user’s input device. This is necessary for languages that have more graphemes than there are keys on the keyboard.
There are two sides to the equation: the IMF, the input method framework,
and the IME, the input method engine which works within the framework. An
input method framework’s role is to pick the most appropriate way
to enter the text, shape it, and return it to the widget. The IME is
basically the place where input are interpreted in any way shape, form,
or logic, to produce the text that the IMF asked for.
The IMF can also act as wrapper over XKB configs, to allow easily swapping
between keyboard layouts, it coexist with the idea of switching between
different IMEs.
Simply said, the IME is a middleman between the keyboard and the actual
output text when relying on the toolkit/widget.
 Courtesy from https://nerufic.com/en/posts/how-input-methods-work-in-linux/
 Courtesy from https://www.chromium.org/chromium-os/chromiumos-design-docs/text-input/basic-architecture2.png
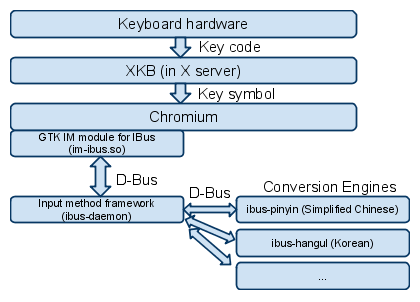
The way the input method plugs into the whole input stack is at the window
client side, within the widget/toolkit library framework in the input
handling event loop. After the client performs the keycode to keysym
translation and composing, it calls the toolkit specifically configured
input method, which will reroute it to the IM pipeline. Within the
pipeline, the IMF implementation will talk over its protocol to have
the IME interpret the input, and return preedit and committed text. This
will in turn be pushed back to the toolkit to display.
That means that simply by relying on input widgets from a framework
such as GTK or Qt, it will automatically handle the integration with the
Input Method.
Some of these input frameworks are swappable, either because they talk over the same protocol, be it the old deprecated XIM protocol for legacy purpose (X Input Method over X protocol extension), or because they plug straight as a module into the widget framework, which is mostly that case today.
There are a lot of IMFs and IMEs implementations, and interoperability, see this list. These days the two major IMFs are IBus (Intelligent Input Bus, GTK-based like GNOME), and Fcitx5 (Qt-based like KDE).
To swap between them, if they are compatible with the toolkit, one can set certain environment variables related to their toolkit:
GTK_IM_MODULE=ibus
QT_IM_MODULE=ibus
XMODIFIERS=@im=ibus
For example the path that the text will take with Ibus looks like this:
Application → GTK/Qt IM module → D-Bus → IBus/Fcitx
               →    IME      → D-Bus → GTK/Qt widget
As you can see, this bypasses all graphic servers, be it the X servers or Wayland compositors.
Yet for it to work across the Wayland ecosystem, and not only on some
widgets like GTK and Qt (games, electron apps, java apps, sandboxed apps,
etc..), the IMF/IME stack needs to be able to listen to key events from
any application, provided it is focused, get the surrounding context,
take field focus, and inject text into clients. This is why some
“unstable” extensions were created, mostly “text-input-unstable-v3”
(zwp_text_input_v3) and “input-method-v2” (zwp_input_methd_v2)
protocol. With this, there’ll be consistent IM behavior across all
applications without compromising security.
On a side note, this same extension protocol for injecting text can be used for the speech-to-text accessibility framework. In practice this can either be done via a virtual input device, or a specific desktop service mechanism integrated in the toolkits. We have a desktop service catching voice input, a standalone voice recognizer to convert it to text, and a virtual keyboard or feature to inject events. For example, GNOME VoiceInput, Plasma Whisper Integration, QtSpeech, SpeechDispatcher, Caribou, Onboard, or GNOME Accessibility Services (AT-SPI). We won’t go into details on that, nor mention text-to-speech, since it’s outside our scope.
One issue remains though, and it’s related to the key repeat rate and delay, which on Wayland is implemented client-side. It’s not implemented by IMs, and tough to handle apparently (see).
And that it!

Conclusion
Congratulations for making it this far into the article!
We’ve covered a lot of ground, literally from hardware to the very
abstract components of the graphical input stack.
I have some hope that in the future there’s going to be a more common way to configure the Wayland input stack across compositors and have fewer discrepancies and fragmentation. I also wish the XKB stack would one day get cleanup up, but on this one my hopes are pretty low. It’s fallen victim to entropy and chaos.
A huge gigantic thanks to “who-t” aka Peter Hutterer, whose blog has been my trusty companion for the past months.
We need more articles like this in the age of AI overlords, so please share it if you’ve enjoyed it!
Thanks for reading, have a wonderful end of day!
NB: This article compiles my understand, for any correction please contact me.
Diagrams Summary
Patrick Louis written in Lebanon
Resources
- GENERIC, FULL STACK
- https://linuxtouchpad.org/docs/
- https://linuxtouchpad.org/resources/
- https://monroeclinton.com/pointing-devices-in-linux/
- https://wiki.archlinux.org/title/Keyboard_input
- https://vkoskiv.com/first-linux-patch/
- https://linux-kernel-labs.github.io/refs/heads/master/labs/device_model.html
- https://apexpenn.github.io/2025/02/13/linux-input-subsystem/
- HARDWARE INTERFACE
- KERNEL, MODULES, HID AND OTHERS
- https://who-t.blogspot.com/2018/12/understanding-hid-report-descriptors.html
- https://who-t.blogspot.com/2021/01/parsing-hid-unit-items.html
- http://bentiss.github.io/hid-replay-docs/
- https://gitlab.freedesktop.org/libevdev/hid-tools/
- https://docs.kernel.org/hid/hidintro.html
- https://docs.kernel.org/hid/hid-transport.html
- https://learn.microsoft.com/en-us/windows-hardware/drivers/hid/
- https://www.kernel.org/doc/Documentation/hid/hiddev.txt
- https://www.man7.org/linux//man-pages/man8/usbhid-dump.8.html
- https://www.kernel.org/doc/Documentation/input/input.txt
- https://www.kernel.org/doc/Documentation/input/input-programming.txt
- https://www.kernel.org/doc/Documentation/input/joystick.txt
- https://github.com/libratbag/piper/
- https://git.annabunches.net/anna/joyful
- https://docs.kernel.org/input/
- https://www.kernel.org/doc/Documentation/input/
- https://www.kernel.org/doc/Documentation/input/event-codes.rst
- https://www.kernel.org/doc/Documentation/input/appletouch.txt
- https://www.kernel.org/doc/Documentation/input/gamepad.rst
- https://www.kernel.org/doc/Documentation/input/multi-touch-protocol.rst
- https://github.com/torvalds/linux/blob/master/drivers/input/keyboard/atkbd.c
- https://www.kernel.org/doc/Documentation/laptops/thinkpad-acpi.txt
- https://www.kernel.org/doc/html/latest/driver-api/input.html
- https://www.kernelconfig.io/config_devtmpfs_safe
- SYSFS MAPPING
- UDEV, MDEV, SMDEV, HWDB
- https://codelucky.com/devtmpfs-linux/
- https://who-t.blogspot.com/2019/02/adding-entries-to-udev-hwdb.html
- https://who-t.blogspot.com/2024/04/udev-hid-bpf-quickstart-tooling-to-fix.html
- https://libevdev.pages.freedesktop.org/udev-hid-bpf/index.html
- https://lwn.net/Articles/970702/
- https://wiki.archlinux.org/title/Udev
- https://www.man7.org/linux/man-pages/man5/udev.conf.5.html
- https://www.freedesktop.org/software/systemd/man/latest/systemd-udevd.service.html
- https://www.man7.org/linux/man-pages/man8/udevadm.8.html udevadm
- https://www.freedesktop.org/software/systemd/man/latest/udev.html#
- https://www.reactivated.net/writing_udev_rules.html
- https://opensource.com/article/18/11/udev
- https://stackoverflow.com/questions/45987478/udev-rule-for-input-device
- https://dataswamp.org/~solene/2025-05-31-linux-killswitch-on-power-disconnect.html
- https://en.wikipedia.org/wiki/Udev
- https://www.linuxfromscratch.org/lfs/view/12.3/chapter09/udev.html
- https://documentation.suse.com/sles/12-SP5/html/SLES-all/cha-udev.html
- https://wiki.gentoo.org/wiki/Mdev
- https://wiki.gentoo.org/wiki/Udev
- https://git.suckless.org/smdev/file/README.html
- https://www.man7.org/linux/man-pages/man7/hwdb.7.html
- https://github.com/systemd/systemd/blob/main/hwdb.d/60-evdev.hwdb
- http://www.linux-usb.org/ (deprecated)
- https://web.archive.org/web/20160127215232/https://www.kernel.org/doc/pending/hotplug.txt
- https://elixir.bootlin.com/linux/v3.12.74/source/lib/kobject_uevent.c#L121
- EVDEV, LIBEVDEV, IOCTL
- https://en.wikipedia.org/wiki/Evdev#/media/File:Linux_API.svg
- https://en.wikipedia.org/wiki/Evdev
- https://www.kernel.org/doc/Documentation/input/uinput.rst
- https://www.freedesktop.org/software/libevdev/doc/latest/ioctls.html
- https://gitlab.freedesktop.org/libevdev/libevdev
- https://www.freedesktop.org/software/libevdev/doc/latest/
- https://who-t.blogspot.com/2016/09/understanding-evdev.html
- https://who-t.blogspot.com/2018/07/why-its-not-good-idea-to-handle-evdev.html
- https://who-t.blogspot.com/2018/01/libevdev-python.html
- https://gist.github.com/TriceHelix/de47ed38dcb4f7216b26291c47445d99
- https://who-t.blogspot.com/2014/11/analysing-input-events-with-evemu.html
- LIBINPUT
- https://blog.martin-graesslin.com/blog/2016/12/how-input-works-creating-a-device/
- https://blog.martin-graesslin.com/blog/2016/12/how-input-works-keyboard-input/
- https://blog.martin-graesslin.com/blog/2016/12/how-input-works-pointer-input/
- https://blog.martin-graesslin.com/blog/2017/02/how-input-works-touch-input/
- https://www.michaelminn.com/linux/peripherals/
- https://linuxtouchpad.org/news/2021/12/03/best-of-libinput-on-lwn.html
- https://who-t.blogspot.com/2016/07/libinput-is-done.html
- https://who-t.blogspot.com/2014/09/libinput-common-input-stack-for-wayland.html
- https://who-t.blogspot.com/2019/03/libinputs-internal-building-blocks.html
- https://wiki.archlinux.org/title/Libinput
- https://who-t.blogspot.com/2017/01/how-libinput-opens-device-nodes.html
- https://who-t.blogspot.com/2025/06/libinput-and-tablet-tool-eraser-buttons.html
- https://who-t.blogspot.com/2025/05/libinput-and-lua-plugins.html
- https://wayland.freedesktop.org/libinput/doc/latest/lua-plugins.html
- https://wayland.freedesktop.org/libinput/doc/latest/
- https://wayland.freedesktop.org/libinput/doc/latest/configuration.html
- https://www.x.org/wiki/Events/XDC2014/XDC2014HuttererLibInput/
- https://who-t.blogspot.com/2015/02/libinput-device-groups.html
- https://who-t.blogspot.com/2019/10/libinputs-bus-factor-is-1.html
- https://who-t.blogspot.com/2017/02/libinput-knows-about-internal-and.html
- https://who-t.blogspot.com/2017/02/libinput-and-lid-switch-events.html
- LIBINPUT AND POINTER SPECFICIS
- https://bitmath.se/org/code/mtdev/
- https://who-t.blogspot.com/2015/07/a-short-overview-of-touchpad-devices.html
- https://who-t.blogspot.com/2016/12/libinput-touchpad-pointer-acceleration.html
- https://who-t.blogspot.com/2018/06/x-server-pointer-acceleration-analysis.html
- https://who-t.blogspot.com/2014/09/pointer-acceleration-in-libinput.html
- https://who-t.blogspot.com/2017/07/libinput-and-pressure-based-palm.html
- https://who-t.blogspot.com/2019/07/libinputs-new-thumb-detection-code.html
- https://who-t.blogspot.com/2016/09/synaptics-pointer-acceleration.html
- https://who-t.blogspot.com/2017/01/the-definitive-guide-to-synclient.html
- https://who-t.blogspot.com/2016/07/why-synclient-does-not-work-anymore.html
- https://who-t.blogspot.com/2016/12/xf86-input-synaptics-is-not-synaptics.html
- https://www.x.org/releases/X11R7.6-RC1/doc/man/man4/synaptics.4.xhtml
- https://cookie.engineer/weblog/articles/synaptics-touchpad-on-linux.html
- https://who-t.blogspot.com/2017/10/what-is-libwacom.html
- https://github.com/tuhiproject/tuhi/
- https://who-t.blogspot.com/2020/02/a-tale-of-missing-touches.html
- https://who-t.blogspot.com/2021/07/libinput-and-hold-gestures.html
- https://who-t.blogspot.com/2021/08/libinput-and-high-resolution-wheel.html
- https://who-t.blogspot.com/2023/01/libinput-and-custom-pointer.html
- https://who-t.blogspot.com/2024/03/enforcing-touchscreen-mapping-in-gnome.html
- https://github.com/iberianpig/fusuma
- https://github.com/bulletmark/libinput-gestures
- https://github.com/Coffee2CodeNL/gebaar-libinput
- https://bill.harding.blog/2019/03/25/linux-touchpad-like-a-macbook-progress-and-a-call-for-help/
- https://www.davidrevoy.com/article1002/how-a-kernel-developer-made-my-styluses-work-again
- https://lwn.net/Articles/801767/
- http://github.com/libratbag/libratbag
- https://libratbag.github.io/
- https://github.com/libratbag/ratbag-toolbox
- https://github.com/libratbag/ratbag-emu
- KEYBOARDS SCANCODES TO KEYCODES
- XKB
- https://xkbcommon.org/
- https://web.archive.org/web/20170825051821/http://madduck.net:80/docs/extending-xkb/
- https://man.archlinux.org/man/xkbcli.1 xkbcli
- https://www.charvolant.org/doug/xkb/html/index.html
- https://xkbcommon.org/doc/current/user-configuration.html
- https://wiki.archlinux.org/title/X_keyboard_extension
- https://who-t.blogspot.com/2021/02/a-pre-supplied-custom-keyboard-layout.html
- https://who-t.blogspot.com/2020/02/user-specific-xkb-configuration-part-1.html
- https://who-t.blogspot.com/2020/07/user-specific-xkb-configuration-part-2.html
- https://who-t.blogspot.com/2020/08/user-specific-xkb-configuration-part-3.html
- https://who-t.blogspot.com/2020/09/user-specific-xkb-configuration-putting.html
- https://who-t.blogspot.com/2021/01/auto-updating-xkb-for-new-kernel.html
- https://who-t.blogspot.com/2016/12/new-udev-property-xkbfixedlayout-for.html
- https://xkbcommon.org/doc/current/xkb-intro.html#md_doc_2introduction-to-xkb
- https://x.org/releases/current/doc/kbproto/xkbproto.pdf
- https://xkeyboard-config.freedesktop.org/
- https://xkbcommon.org/doc/current/keymap-text-format-v1-v2.html
- https://xkbcommon.org/doc/current/rule-file-format.html
- https://xkbcommon.org/doc/current/user-configuration.html
- https://xkbcommon.org/doc/current/debugging.html
- https://web.archive.org/web/20190718184358/http://pascal.tsu.ru/en/xkb/internals.html
- https://who-t.blogspot.com/2008/09/rmlvo-keyboard-configuration.html
- https://www.x.org/wiki/XKB/
- https://medium.com/@damko/a-simple-humble-but-comprehensive-guide-to-xkb-for-linux-6f1ad5e13450
- UPPER STACK, CONSOLE, XSERVER, WAYLAND
- https://wiki.archlinux.org/title/Input_remap_utilities
- https://who-t.blogspot.com/2016/12/the-future-of-xinput-xmodmap-setxkbmap.html
- https://wiki.archlinux.org/title/Xmodmap
- https://who-t.blogspot.com/2016/01/xorg-project-vs-xorg-foundation.html
- https://who-t.blogspot.com/2015/01/xf86-input-libinput-compatibility-with.html
- https://who-t.blogspot.com/2016/12/xinput-is-not-configuration-ui.html
- https://who-t.blogspot.com/2018/06/x-server-pointer-acceleration-analysis.html Series
- https://who-t.blogspot.com/2021/09/an-xorg-release-without-xwayland.html
- https://en.wikipedia.org/wiki/X.Org_Server
- https://en.wikipedia.org/wiki/Wayland_(protocol)
- https://mort.coffee/home/wayland-input-latency/
- https://drewdevault.com/2018/07/17/Input-handling-in-wlroots.html
- https://fcitx-im.org/wiki/Input_method_related_environment_variables
- https://gitlab.freedesktop.org/xorg/driver/xf86-input-libinput
- https://gitlab.freedesktop.org/xorg/app/xmodmap
- https://en.wikipedia.org/wiki/Unicode_input#In_X11_and_Wayland_(Linux_and_other_Unix_variants_including_ChromeOS)
- https://nixers.net/showthread.php?tid=1970
- https://wiki.archlinux.org/title/Xorg/Keyboard_configuration
- https://wiki.archlinux.org/title/Linux_console/Keyboard_configuration
- https://manpages.debian.org/testing/console-setup/setupcon.1.en.html
- https://github.com/pierre-labastie/blocaled
- http://www.freedesktop.org/wiki/Software/systemd/localed
- AUTOMATION, LIBEI, INPUTFD, & other protoc
- https://docs.kernel.org/5.10/hid/uhid.html
- https://www.kernel.org/doc/html/v4.12/input/uinput.html
- https://github.com/torvalds/linux/blob/2eba5e05d9bcf4cdea995ed51b0f07ba0275794a/drivers/hid/uhid.c#L4
- https://github.com/torvalds/linux/blob/master/samples/uhid/uhid-example.c
- https://who-t.blogspot.com/2020/08/libei-library-to-support-emulated-input.html
- https://who-t.blogspot.com/2022/03/libei-adding-support-for-passive.html
- https://who-t.blogspot.com/2022/12/libei-opening-portal-doors.html
- https://who-t.blogspot.com/2023/05/libei-and-fancy-protocol.html
- https://who-t.blogspot.com/2017/04/inputfd-protocol-for-direct-access-to.html
- https://gitlab.freedesktop.org/libinput/libei/-/tree/main
- https://libinput.pages.freedesktop.org/libei/
- https://libinput.pages.freedesktop.org/libei/api/index.html
- https://github.com/ReimuNotMoe/ydotool
- https://who-t.blogspot.com/2025/08/unplug-tool-to-test-input-devices-via.html
- https://git.sr.ht/~brocellous/wlrctl
- https://www.semicomplete.com/blog/xdotool-and-exploring-wayland-fragmentation/
- https://www.collabora.com/news-and-blog/blog/2019/06/24/using-dummy-hcd/
- https://docs.kernel.org/driver-api/usb/gadget.html
- INPUT METHOD
- https://en.wikipedia.org/wiki/Input_method
- https://linuxcommandlibrary.com/man/scim
- https://wiki.archlinux.org/title/Input_method
- https://wiki.archlinux.org/title/IBus
- https://www.csslayer.info/wordpress/linux/key-repetition-and-key-event-handling-issue-with-wayland-input-method-protocols/
- https://wayland.app/protocols/xx-input-method-v2
- https://wiki.qt.io/QtCS2021_-_Wayland_text-input-unstable-v4_protocol
- https://www.chromium.org/chromium-os/chromiumos-design-docs/text-input/
- https://lwn.net/Articles/503320/
- https://nerufic.com/en/posts/how-input-methods-work-in-linux/
- https://mail.gnome.org/archives/desktop-devel-list/2012-May/msg00093.html
- https://wiki.gnome.org/Design(2f)OS(2f)LanguageInput.html
- https://docs.gtk.org/gtk4/class.IMContext.html
- https://docs.gtk.org/gtk4/property.Settings.gtk-im-module.html
If you want to have a more in depth discussion I'm always available by email or irc.
We can discuss and argue about what you like and dislike, about new ideas to consider, opinions, etc..
If you don't feel like "having a discussion" or are intimidated by emails
then you can simply say something small in the comment sections below
and/or share it with your friends.